About
This guide covers the player settings tab (denoted by a gear icon), where you can customize playback, player behavior, toolbars, and interactive features.
Here’s how to identify which settings apply to which players:
| Tag | Player |
| VOD | VOD player |
| Audio | Audio player |
| Reels | Reels player |
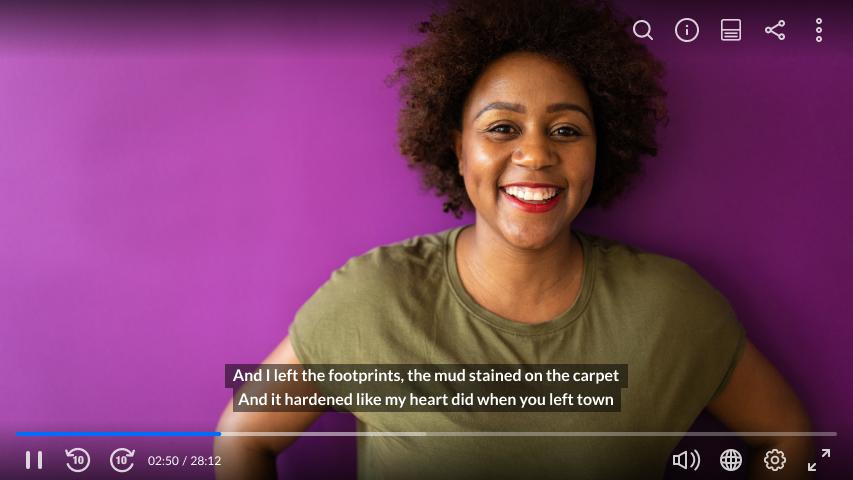
Unless noted otherwise, the images shown in this article are of the VOD player.
Playback options
Playback options vary depending on the type of player.
| VOD player | Audio player | Reels player |
 |
 |
 |
Autoplay
VOD Audio Reels
Enable this option to allow playback to start automatically. If you enable Autoplay, choose whether to start playback automatically only when the player is in view. If a player is not in view, playback will start only when the viewer scrolls to it.
Additional playback option (audio)
Audio
Click the gear icon next to Additional playback option to display the configuration options.

Audio player shown above.
Speed - Choose whether to enable the speed selector on the audio player.
Loop - Choose whether to enable a loop button on the audio player.
The audio player can be enabled with either a speed selector or a loop button, but not both.
Additional playback option (reels)
Reels
Click the gear icon next to Additional playback option to display the configuration options.

Reels player shown above.
Auto-continue - Choose whether to enable continuing to the next item automatically.
Loop - Choose whether to enable playing the playlist in a loop. When selected, the playlist will play automatically, even if Auto-continue is not enabled.
Start playback muted
VOD Audio Reels
Enable this option to allow the video to start in mute mode when playback begins.
Autopause
VOD Audio Reels
Enable this option to allow the video to pause automatically when the player scrolls out of view. Playback will resume when the player comes back into view.
Fallback to muted autoplay
VOD Audio Reels
Enable this option to allow the video to start in mute mode when autoplay playback begins.
Preload
VOD Audio Reels
Enable this option to allow the video to automatically load when the page loads.
Capabilities
Capabilities vary depending on the type of player.
| VOD player | Audio player | Reels player |
 |
 |
 |
Captions default display
VOD Reels
Enable this option to have captions display on the player by default when the user starts playing the video. Click the gear icon to open the caption settings:
Display captions - Check the box to enable.
Default language - Choose the default captions language - Auto or Manual.
- Auto - Will use the user-set preferences from local storage, browser language, or the default language.
- Manual - Requires entering a language code.
If you choose Manual, choose the desired language.
Captions alignment - Set default alignment of captions on the player:
- Default - captions will be displayed as received without any adjustments to alignment
- Left - captions will be aligned to the left
- Center - captions will be centered
- Right - captions will be aligned to the right

For the user guide, see Captions and Audio Tracks.
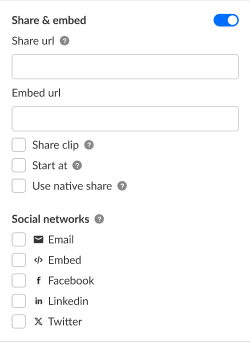
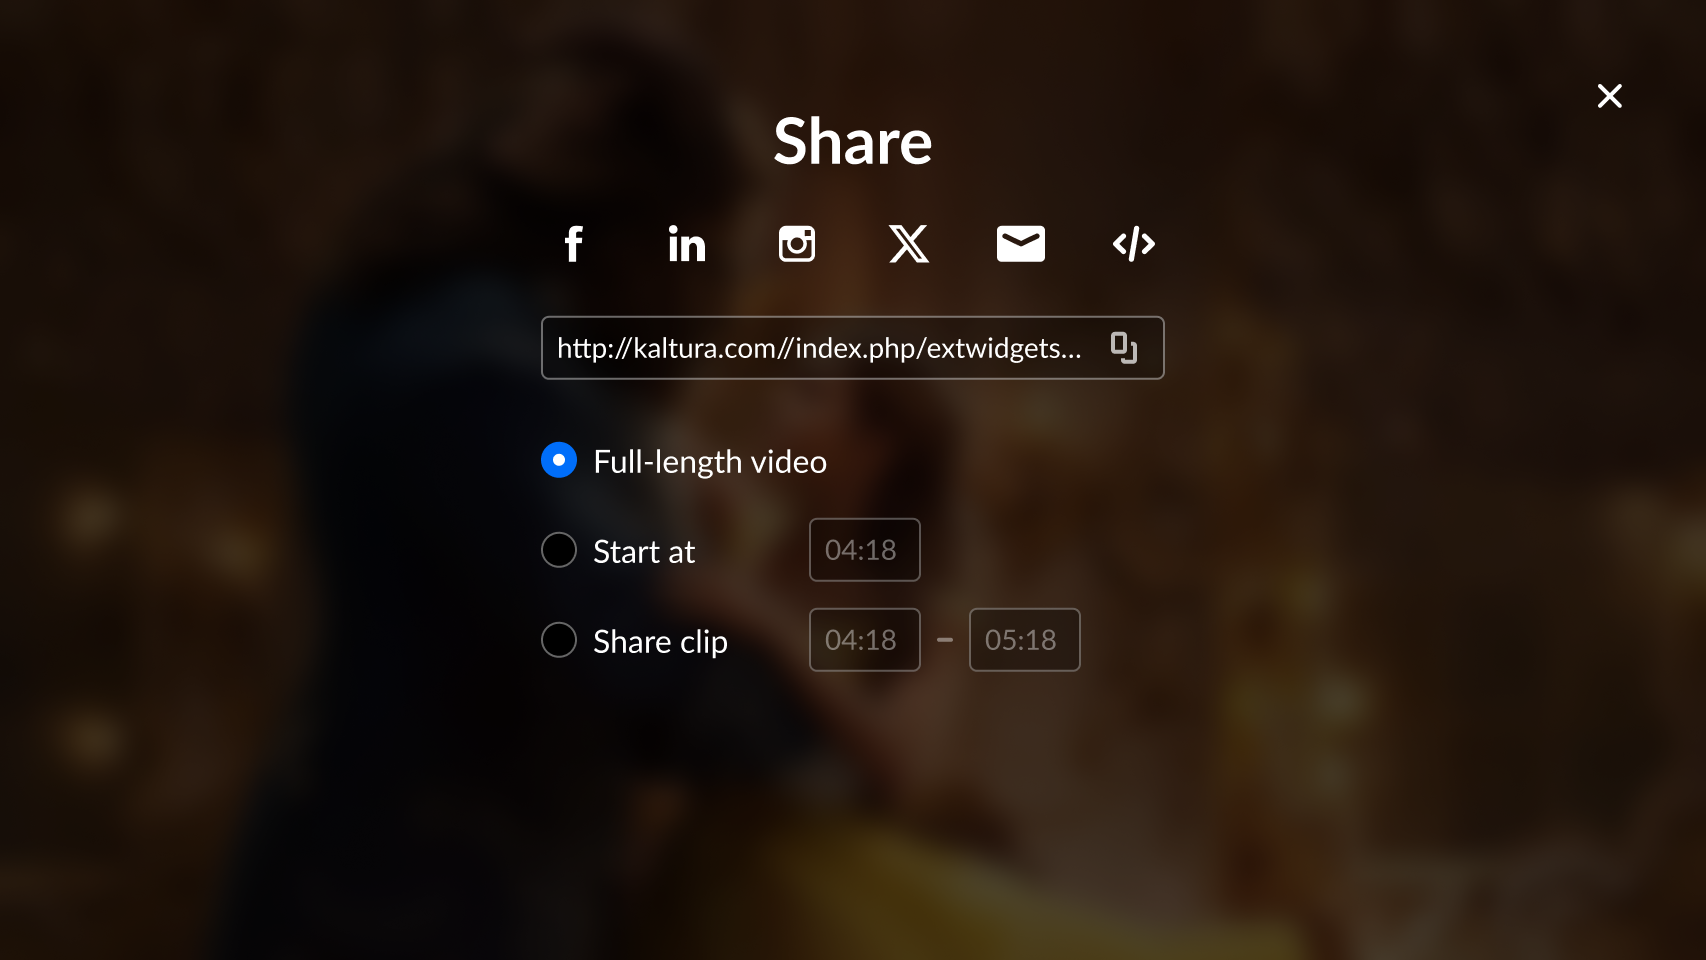
Share & Embed
VOD
Audio
Enable this option to allow users to share and embed the media via social websites and email. If you enable this feature, additional options display:
- Share url - Type the share URL that will override the current page sharing. If desired, you can add {entryId} to the address, for example: https://mycompanymediaspace.com/media/{entryId}, and the link updates according to the entry ID of the video being played.
- Embed url - This URL generates a link that dynamically updates based on the entry ID of the video being played. Type the embed URL in the following format:
{embedBaseUrl}/p/{partnerId}/embedPlaykitJs/uiconf_id/{uiConfId}?iframeembed=true&entry_id={entryId} - Share clip - This enables the user to share a segment of a video by choosing Share clip and then selecting the start and end position of the segment they want to share.
- Start at - This enables the user to share the link and initiate playback at the designated time.
- Use native share - Choose whether the native share dialog of the device is used.
- Social networks - You can define included networks, such as Facebook, LinkedIn, X (formerly Twitter), email, and embed.
For the user guide, see Share & Embed.
Info
VOD
Enable this option to have an information icon display in the upper right corner of the player. When a user clicks on the icon, additional information about the video is displayed.
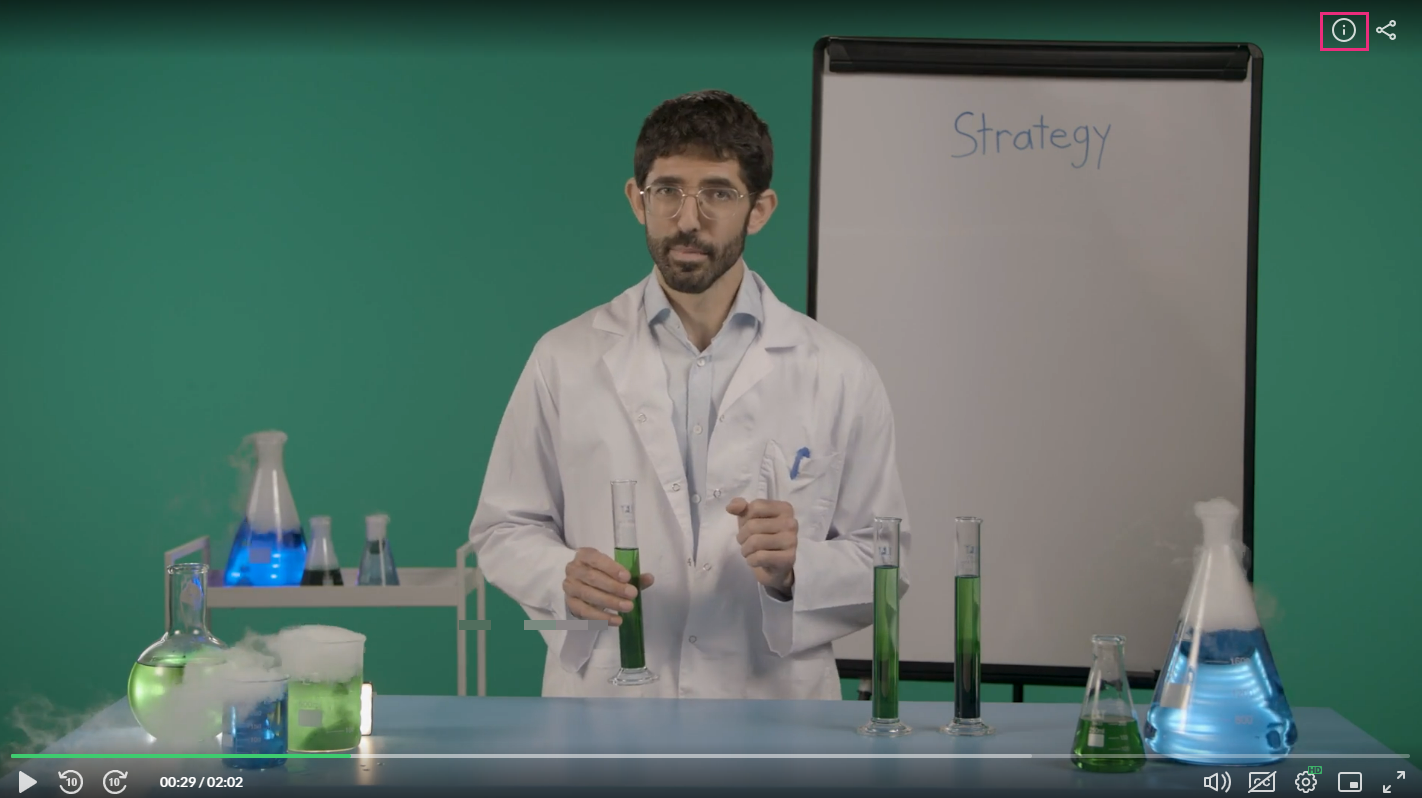
For the user guide, see Info.
Moderation
VOD
Enable this option to have a flag icon display in the upper right corner of the player. A user can click on this button to report content for various reasons. If you choose to enable moderation, additional options display:
Moderation reasons - Choose the options from which the user can choose when reporting content - Sexual Content, Violent or Repulsive, Harmful or Dangerous Act, Spam/Commercials, Copyright Violation, or Terms of Use Violation.
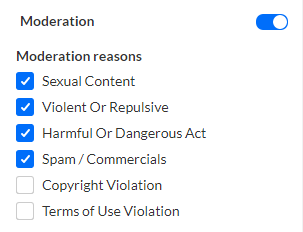
Optional - To customize the moderation reasons, go to Advanced Settings and edit the moderateOptions labels.
For the user guide, see Moderation.
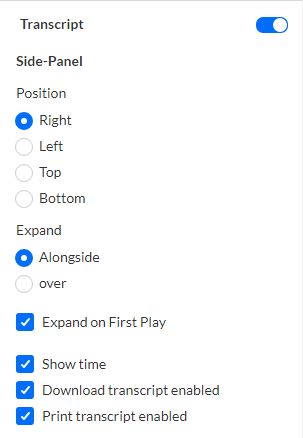
Transcript
VOD
Audio
Enable this option to display a transcript on the video. If you choose to enable transcript, additional options display:
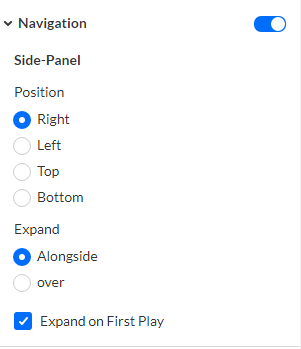
- Position - Choose the position of the transcript - Right, Left, Top, or Bottom.
- Expand - Choose whether to expand the transcript alongside the video or over the video.
- Expand on First Play - Choose whether to expand the playlist side panel on the first play of the video.
- Show time - Choose whether to enable time markers to be added to the transcript.
- Download transcript enabled - Choose whether to allow the users to download the transcript.
- Print transcript enabled - Choose whether to allow the users to print the transcript.
![]()
For the user guide, see Transcript.
Summary & chapters
VOD
Enable this option to display the AI summary and chapters that were created for your video using Kaltura's Content Lab.

For the user guide, see Summary and chapters plugin.
Call to Action (CTA)
VOD
Enable this option to engage your audience with interactive Call to Action (CTA) messages. Add overlays or toasts with clickable buttons for announcements, content recommendations, and more - right from the player. Multiple CTAs can be added per player, labeled sequentially as Call to Action 1, Call to Action 2, and so on.
You can set up CTAs manually for each video or automate them using metadata:
- Manual CTAs: Set up predefined messages and buttons for each video.
- Metadata-Based CTAs: When enabled, video CTAs dynamically update their text and destination based on the entry's metadata. When disabled, all videos in this player show the same CTA.
If you enable Call to Action, additional options display:
Metadata based CTA – See below for setup details.

To create a standard CTA instead, simply skip the Metadata based CTA field and continue with the following configuration:
Type - Choose one of the following options:
- Overlay - The CTA displays across the entire player, pausing the video until the specified 'Hide after' duration elapses.
- Toast - The CTA appears at the bottom right corner of the player, allowing playback to continue for the specified 'Hide after' duration.
Hide After - Click the box to enable. Enter the desired duration in seconds for the CTA message. If left blank, the CTA will remain until the user closes it.
Title - Enter a custom title for the CTA message. You can replace the default text "New call to action" with your own.
Description - Type your message.
Button - Enable/disable the button by clicking the box. If enabled, provide the following information:
- Label - Enter the text that will appear on the button.
- URL - Input the link that the button will direct the user to.
Secondary button - Click the box to add a secondary button (optional).
Position - Choose from the options. If left empty, the CTA will be displayed until closed out by the user.
- Start (enabled by default) - CTA will appear at the start of video playback.
- Time from start (in seconds) - Enter a time in seconds from the start of playback until CTA appears.
If the start position is greater than the video length, the CTA will not be displayed.
- Time from end - Enter a time in seconds counting back from the end of the video when the CTA should appear.
- End - Click the box to enable.
If the CTA duration exceeds the video length, it will be displayed until the end of the video.
Delete Call to Action - Click to delete the CTA. A message displays: “Are you sure you want to permanently delete this CTA?”. Click Delete.
+ Add call to action - Click to add additional CTAs.
Only one CTA configuration can be opened at once. When clicking to open a specific CTA, the rest will be minimized.

The CTA text and design (font family, font size, font color, button shape, button color etc.) can be customized with external CSS. The default color is the player primary color.
 CTA as toast
 CTA as overlay
Metadata-based CTA
To use metadata-based CTAs, start by creating a custom metadata schema. Check out our guide Create a custom metadata schema for CTAs for step-by-step instructions.
Configure the following:
Metadata based CTA - Click to enable.
Additional options display.

Metadata profile ID - Enter the ID of the metadata profile containing the CTA fields. Need help finding it? Check out Create a custom metadata schema for CTAs.
Type - Choose one of the following options:
- Overlay - The CTA displays across the entire player, pausing the video until the specified 'Hide after' duration elapses.
- Toast - The CTA appears at the bottom right corner of the player, allowing playback to continue for the specified 'Hide after' duration.
Hide After - Click the box to enable. Enter the desired duration in seconds for the CTA message. If left blank, the CTA will remain until the user closes it.
Title metadata field - Enter the metadata field that the CTA title should be taken from (replace the default text "New call to action" with your own). Be sure to use the system name shown in the edit custom schema window as it may differ slightly from the field label you entered (as shown in the image below).
Need help finding it? Check out Create a custom metadata schema for CTAs.
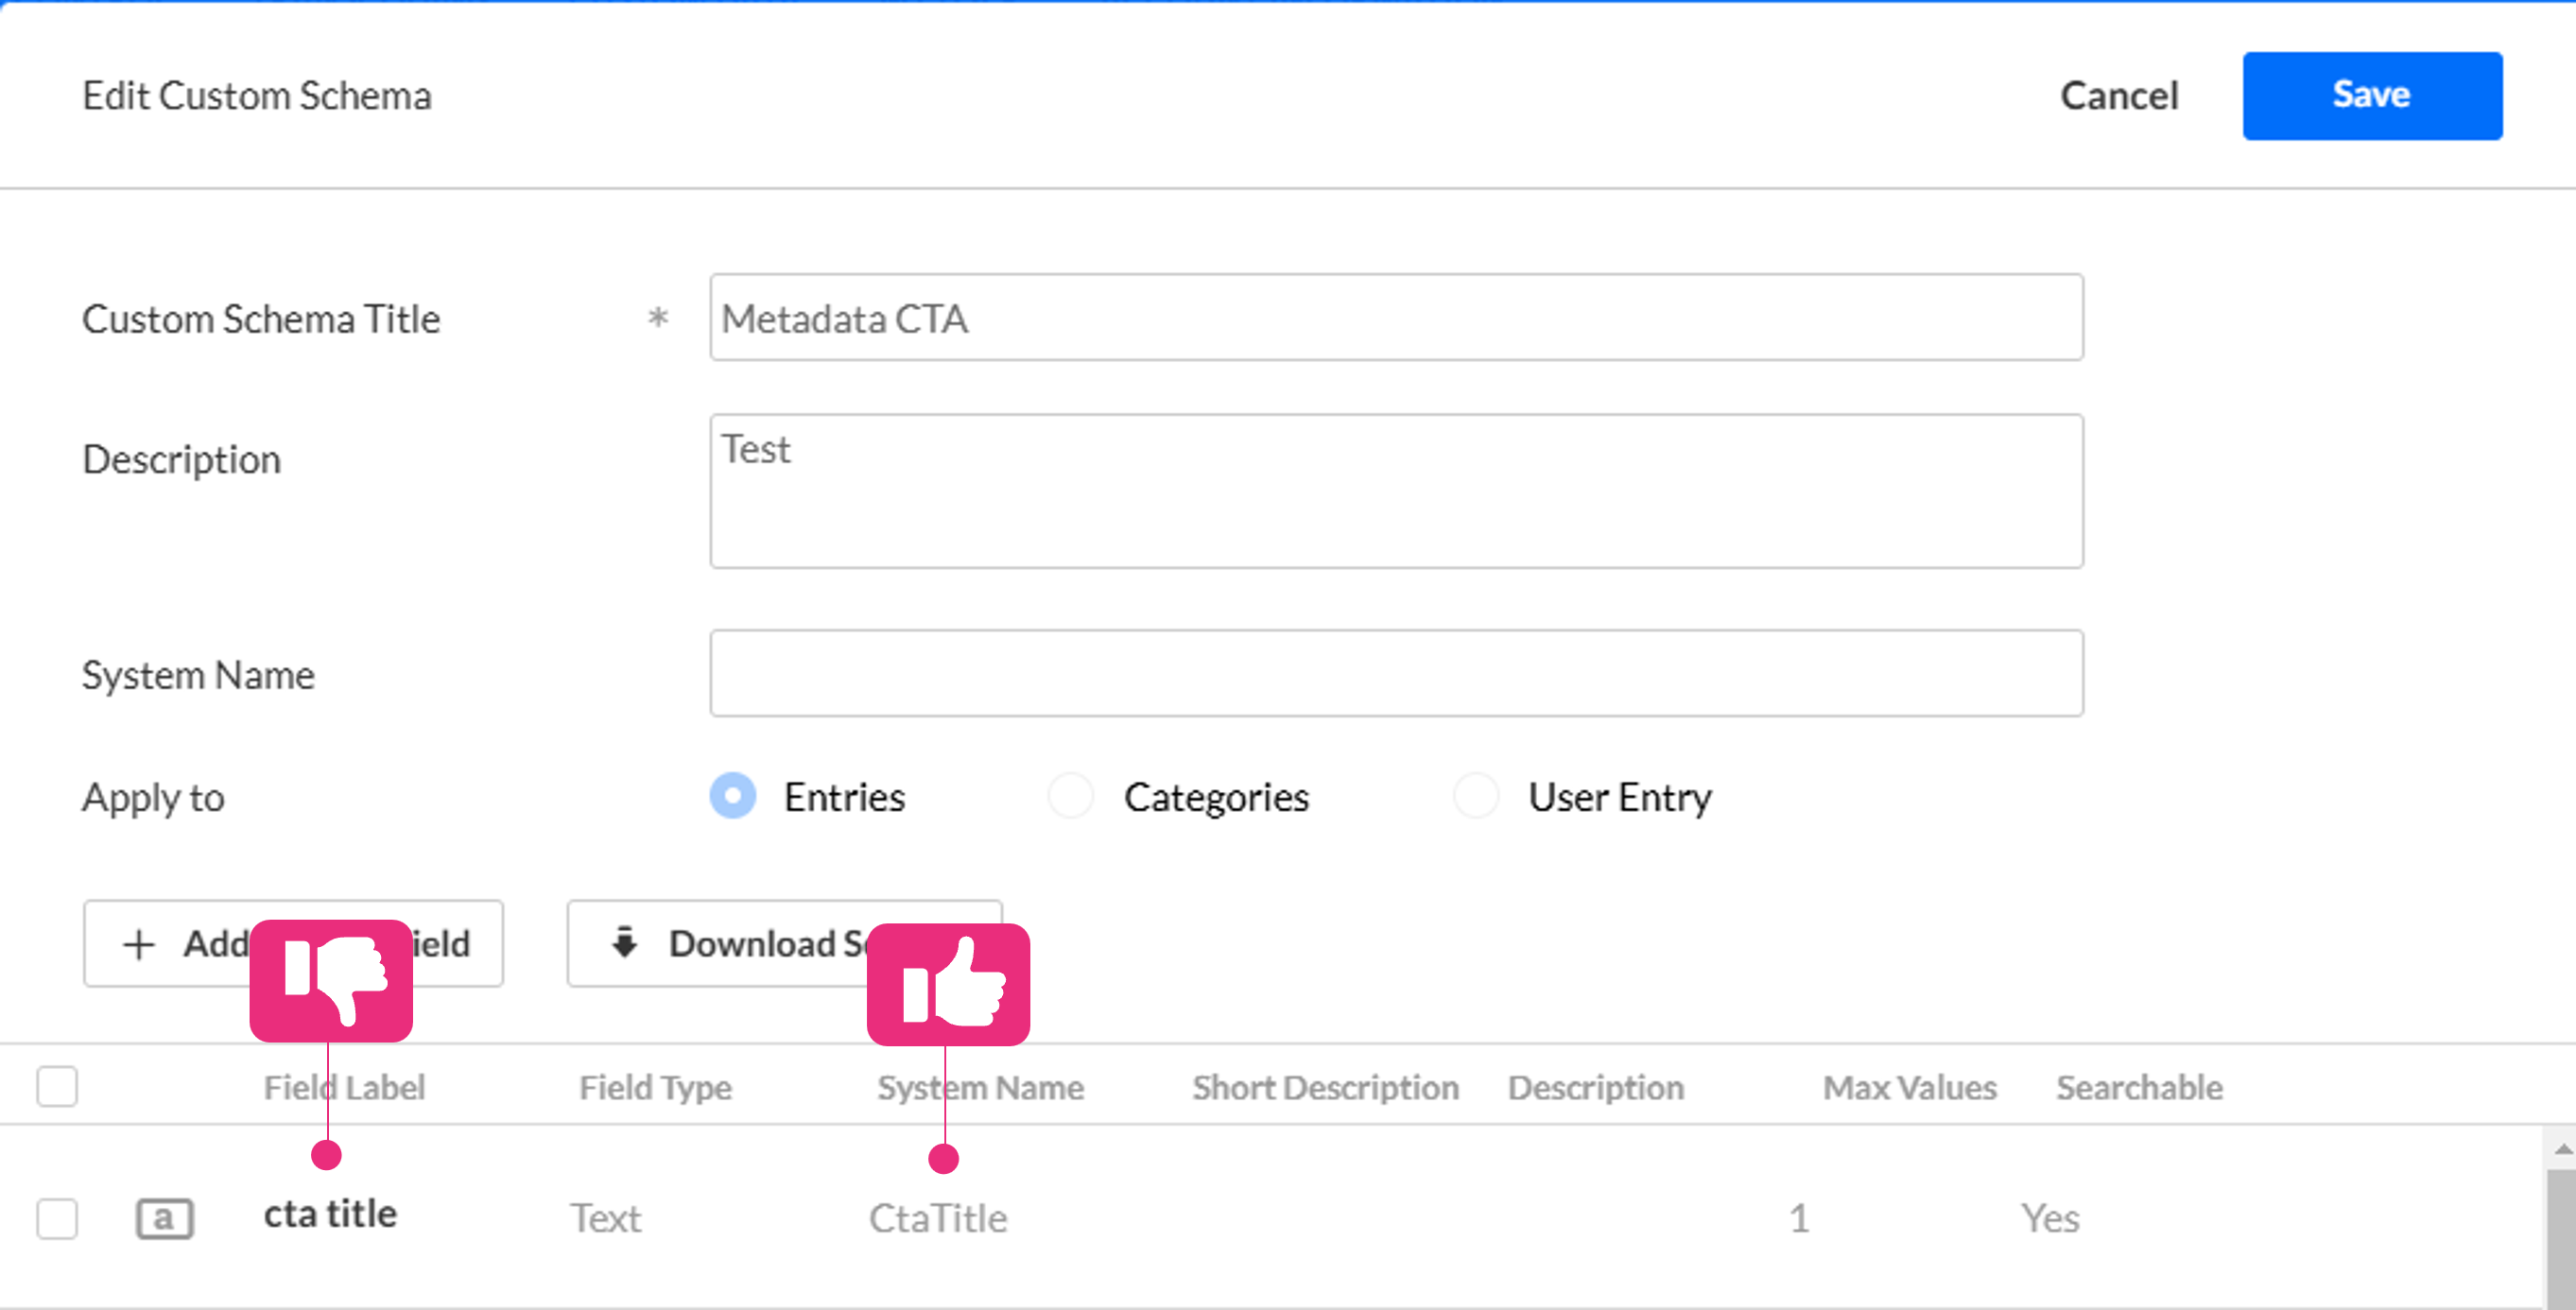 Example taken from the Edit Custom Schema window in KMC
Description metadata field - Enter the metadata field for the CTA description. Use the system name from your schema.
Button - Enable by checking the box, then enter:
- Label - Enter the text (use the system name).
- URL - Enter the destination link (use the system name).
Secondary button - Check the box to add a second button (optional) and repeat the steps above.
 Example configuration
Position - Continue with the steps for standard CTA above.
For the user guide, see Call to Action.
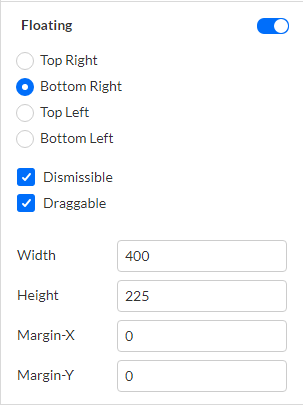
Floating
VOD
Enable this option to display a floating player when the viewer scrolls the player out of view. This keeps the video accessible while allowing engagement with other content. If you enable the floating player, additional options display:
- Choose where to display the floating player: Top Right, Bottom Right, Top Left, or Bottom Left.
- Choose player behavior:
- Dismissible - choose whether the viewer can dismiss the floating player so that it doesn't display while they scroll the page. Users can dismiss the floating video by clicking 'Back to video' to return to the main player, or by clicking the 'X' icon to close the floating player.
- Draggable - choose whether the viewer may drag the floating player. When unchecked, the floating player has a fixed location.
- Choose dimensions and margins:
- Width - type the width of the floating player in pixels.
- Height - type the height of the floating player in pixels.
- Margin-X - type the margin, in pixels, from the selected edge, on the X-Axis.
- Margin-Y - type the margin, in pixels, from the selected edge, on the Y-Axis.
For the user guide, see Floating.
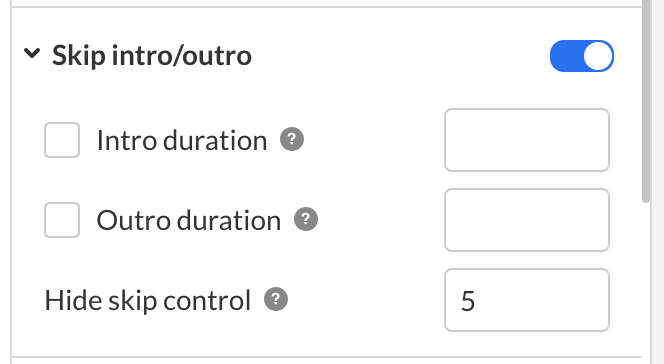
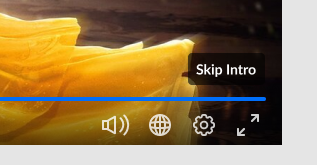
Skip intro/outro
VOD
Enable this option to show a skip button for intros or end credits. If you enable Skip intro/outro, additional options display:
- Intro duration - the Intro will start at the beginning of the video and last the duration you set.
- Outro duration - the outro will start at the time counting back from the end of the video. For example, if the video is one minute long and you set the Outro duration to 10 seconds, the outro will begin at the 50-second mark in your video.
These default values will be overridden if an entry has an intro and/or outro configured in its metadata.
- Hide skip control - type the duration of time (in seconds) before the skip control is automatically hidden from view.


For the user guide, see Skip Intro/Outro.
Prevent seek
VOD
Enable this option to adjust seeking capabilities of the player.
Prevent forward seek - allows you to prevent seeking forward beyond the maximum current seek time.
Prevent seek - allows you to prevent seeking completely (both backwards and forwards).

If the plugin is enabled, when hovering over the scrubber, thumbnails and chapters do not display on the timeline, nor do any other cue points.
For the user guide, see Prevent forward seeking.
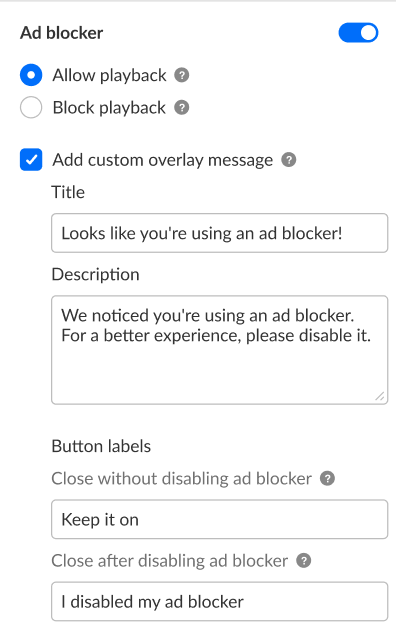
Ad Blocker Detection
VOD
Enable this option to detect ad blockers enabled on users' devices. If you choose to enable ad blocker, additional options display.
- Allow playback - Lets users continue watching even if an ad blocker is detected. A message will prompt them to disable the blocker or keep it on before playback continues.
Applicable to Allow playback only. Ad blocker detection runs once at the start of a browser session. If the user turns on an ad blocker after that, no message will appear.
- Block playback - Prevents playback if an ad blocker is detected. Users will see a message telling them to disable the ad blocker to continue watching.
- Add custom overlay message - A default message appears when an ad blocker is detected, but you can override it with your own custom message by checking this option:
- Title - Type a title for your custom overlay message.
- Description - Type a description for your custom overlay message.
- Close without disabling ad blocker - If you are allowing playback with an ad blocker on, you may type a label for the button users will click to signal they want to continue playback with an ad blocker on.
- Close after disabling ad blocker - Type a label for the button users will click to confirm they've disabled their ad blocker.

For the user guide, see Ad Blocker Detection.
Live
VOD
Enable this option to allow live streaming on the player. If you choose to enable this feature, additional options display:
Display viewer count - Choose whether to display the number of viewers that are watching live directly on the player.
Pre broadcast slate - Add an image or video before a live broadcast has started.
- Entry - Insert a video or image entry ID. Entry will be broadcasted in a loop until the live stream starts. (By default, the entry thumbnail image is used as a background image for this slate.)
- URL - Image only. Insert an image URL that will be displayed until the live broadcast begins. A post slate image or video will play after the live broadcast ends. (By default, the entry thumbnail image is used as a background image for this slate.)
Post broadcast slate - Add an image or video after the live broadcast has ended.
- Entry - Insert a video or image entry ID. Entry will be broadcasted in a loop after the live stream ends.
- URL - Image only. Insert an image URL that will be displayed after the live broadcast has ended.

For the user guide, see Live.
Extended audio description
VOD
Enable this option to allow voice narration of the visuals and actions happening on screen. If you choose to enable extended audio description, additional options display.
Full screen overlay - Choose whether you would like the description overlay to be shown in a full-screen mode.

Example of Extended audio description enabled, and Full screen overlay disabled:

Example of both Extended audio description and Full screen overlay enabled:

For the user guide, see Extended audio description.
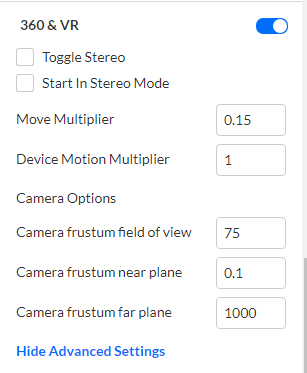
360 & VR
VOD
Enable this feature to support 360 and VR. If you choose to enable this feature, additional options display:
- Toggle Stereo - choose whether to show the Stereo Toggle button (relevant only to mobile devices).
- Start in Stereo Mode - choose whether to start the video in stereo mode.
- Move Multiplier - define the sensitivity of the mouse and touch movement by specifying the move multiplier.
- Device Motion Multiplier - define the sensitivity of the device motion.
Camera Options
- Camera frustum field of view - type camera frustum field of view.
- Camera frustum near plane - type camera frustum near plane.
- Camera frustum far plane - type camera frustum far plane.
For the user guide, see 360 & VR.
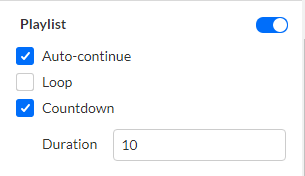
Playlist
VOD
Enable this option to display a playlist on the player. If you choose to enable Playlist, additional options display:
- Auto continue - choose whether to continue to the next item automatically.
- Loop - choose whether to play the playlist in a loop. When selected, the playlist will play automatically, even if Auto continue is not selected.
- Countdown - choose whether to show the countdown.
In the Duration field, type how long the countdown will display.
For the user guide, see Playlist.
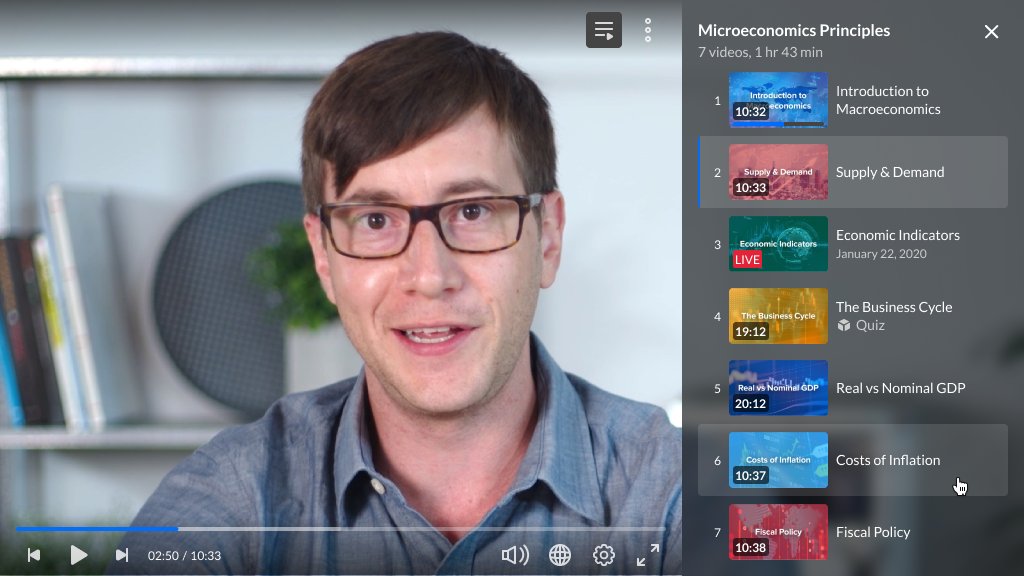
Playlist side panel
VOD
Enable this option to display a playlist side panel in the player. If you choose to enable a playlist side panel, additional options display.
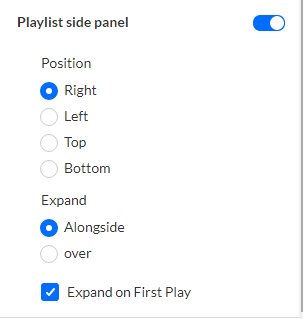
- In Position, choose the position of the playlist side panel - Right, Left, Top, or Bottom.
- In Expand, choose whether to expand the playlist side panel alongside the video or over the video.
- In Expand on First Play, choose whether to expand the playlist side panel on the first play of the video.
For the user guide, see Playlist.
Related
VOD
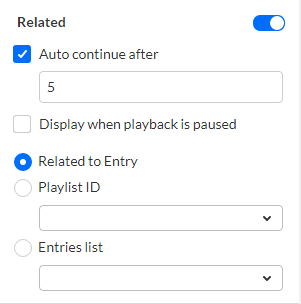
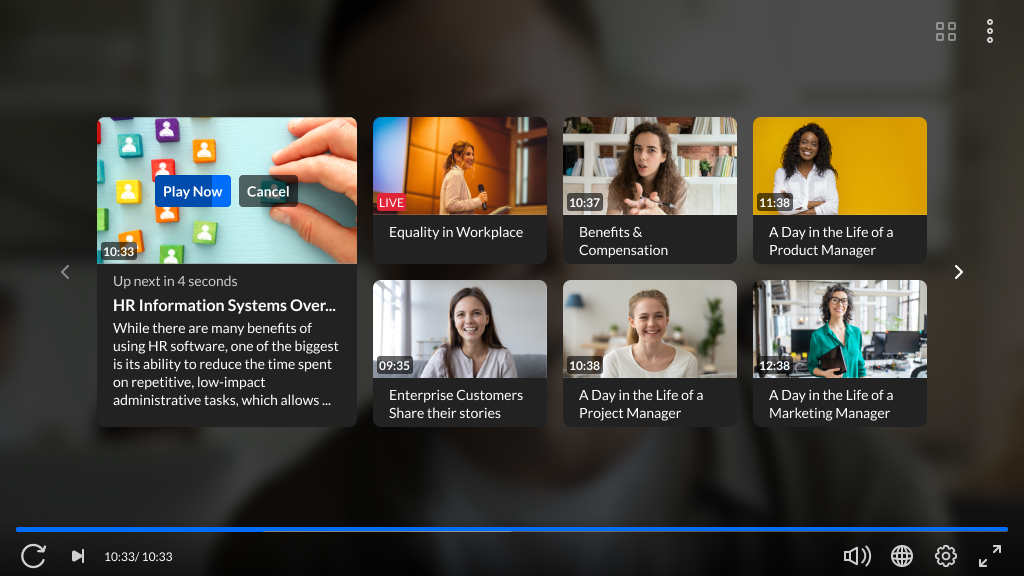
Enable this option to display related videos to attract users to watch other videos. If you choose to enable the Related feature, additional options display:
- Auto continue after - Choose whether the next item is automatically played. Type the time to wait before playing the next item (in seconds).
- Display when playback is paused - Choose whether the related videos screen displays when playback is paused.
- Related to Entry - Entries related to the current entry will be displayed. If there are no related entries, the plugin is disabled.
- Playlist ID - Select the desired playlist.
- Entries List - Type a comma-delimited list of entries.
For the user guide, see Related.
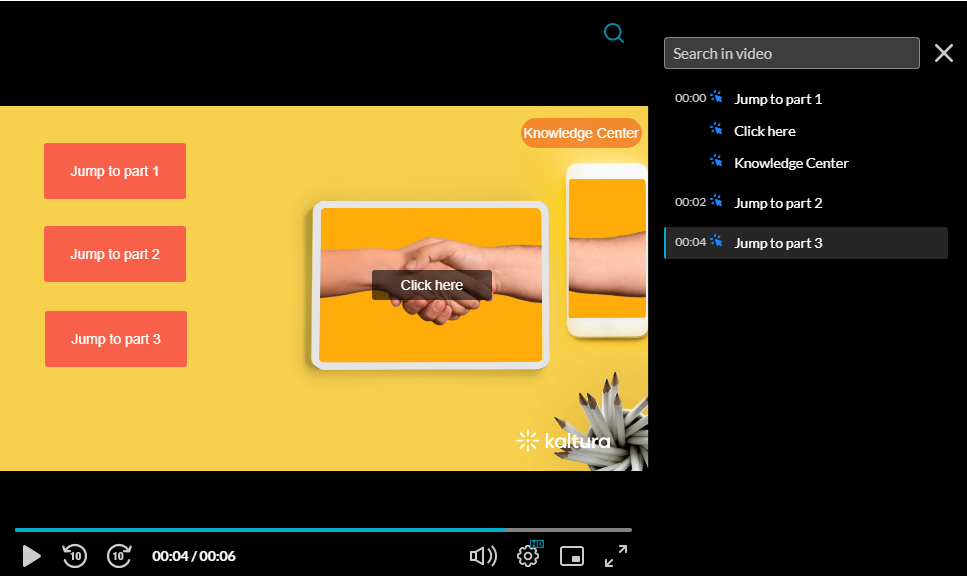
Navigation
VOD
Enable this option to display navigation in the player. Navigation allows the user to search the video and click on and view specific times in the video. If you choose to enable the Navigation feature, additional options display:
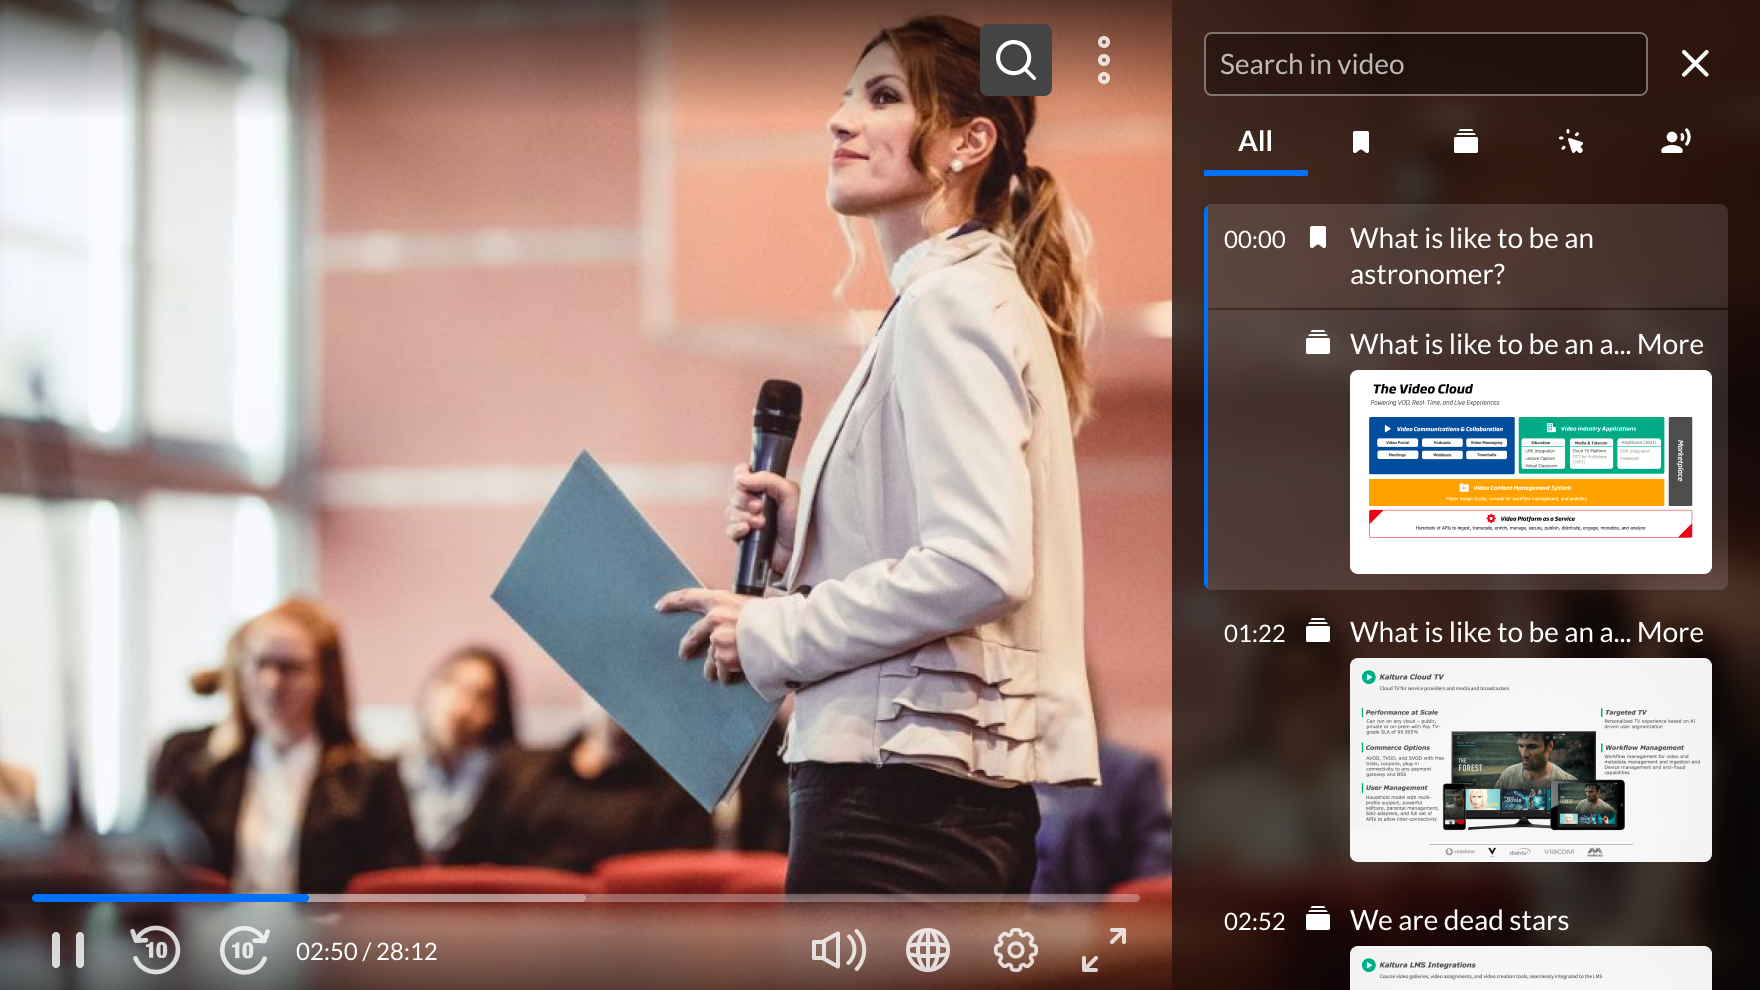
For the user guide, see Navigation.
Download
VOD Audio
Enable this option to allow downloading of the entry media (i.e., source media) (in additional flavor(s)), captions, and/or files that are attached to the entries (i.e., attachments). If you choose to enable the Download feature, additional options display:
Check the desired boxes to allow each download.
- Source media - Allow downloading of the video entry (Main stream) and secondary entries (Additional streams).
- Additional flavors - Allow users to select the quality of the media they would like to download.
- Captions - Allow users to download captions files attached to the media.
- Attachments - Allow users to download files attached to the media.
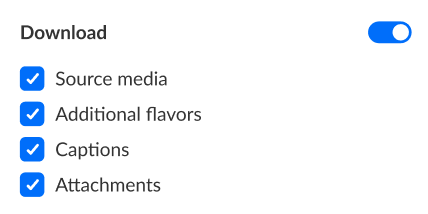
All boxes are checked by default. If you uncheck all the boxes, the Download plugin will be disabled by the player.
For the user guide, see Download.
Quiz
VOD
Enable this option to allow quiz creation on the player, launching quizzes within the video.

For the user guide, see Quiz.
Hotspots
VOD
Enable this option to allow hotspot creation on the player.
To learn more about hotspots, see Hotspots. To learn how to create and edit hotspots, see Kaltura Video Editing Tools - Hotspots Tab.
Dual screen
VOD
Enable this option to display dual screen on the player. When enabled, additional options display:
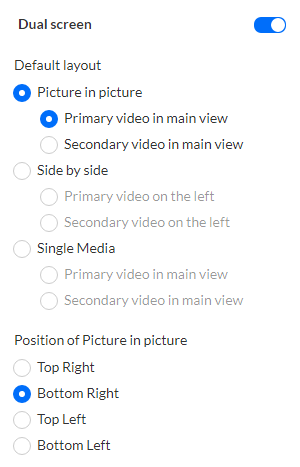
For the user guide, see Dual Screen.
Live Q&A
VOD
Enable this option to allow live Q&A in the video. If you enable Live Q&A, additional options display:
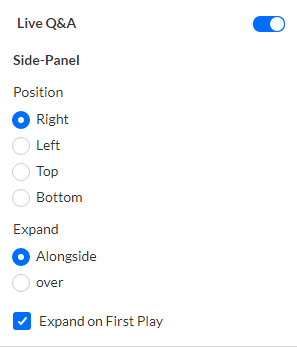

For the user guide, see Live Q&A.
Documents
VOD
Enable this option to allow document entry support. When enabled, if a document has been loaded in a Kaltura player (for example, as part of a playlist), a slate will appear instructing the user how to view the document.
Allow download - Check the box to enable document download when a document is not available for viewing.
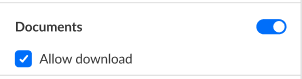
For the user guide, see Documents.
Image playback
VOD
Enable this option to support image playback. For full APIs see Image player usage guide.
General
General options vary depending on the type of player.
| VOD player | Audio player | Reels player |
 |
 |
 |
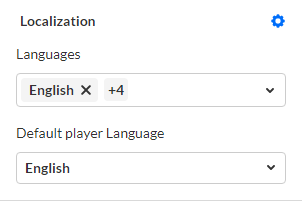
Localization
VOD
- Click the gear next to Localization to display configuration options (or hover and click on the display arrow).
- In Languages, select all languages to be bundled with the player.
- In Default Player Language, select the default language for the player.
Default player ratio
VOD
Audio
Reels
Set the default ratio (width and height) of the player. The values that are set will be used in player embed codes that are generated by embedding tools such as the KMC share & embed tool, and the player share & embed plugin.
- Click the gear icon next to Default player ratio to display the configuration options.
- Insert the preferred width (in pixels)
- Insert the preferred height (in pixels)

Apply user preferences
VOD
Audio
Reels
Select whether to use the user-set preferences from local storage, session storage, or based on the browser's language or default language, or other specified preferences.
When the Apply user preferences setting is enabled, the player first looks for saved preferences in local storage and applies them if found. If this setting is disabled, the player will ignore saved preferences and instead use the uiconf definitions or fallback defaults.
User preferences saved in local storage
Settings like starting playback muted are saved in the browser’s local storage, so users get a consistent experience across sessions. For example, if the last video was muted, the next one will start muted too—even after a page refresh.
The following values are saved in local storage:
- Muted
- Volume
- Audio language track
- Text language track (i.e., captions)
- Captions text style (for example, font size and color)
- Audio flavor (the last selected audio track, including audio description (AD) tracks)
User preferences saved in session storage
Session storage keeps settings only while the browser is open. Once the session ends, they reset. For example, if a user sets playback speed to 2x, it will return to the default (1x) on their next visit.
The following value is saved in session storage:
- speed control
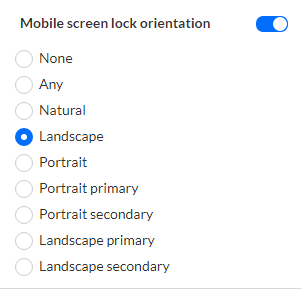
Mobile screen lock orientation
VOD
If you enable Mobile Screen Lock Orientation, additional options display:
None, Any, Natural, Landscape, Portrait, Portrait primary, Portrait secondary, Landscape primary, or Landscape secondary.
Stay on latest version [version number]
VOD
Audio
Reels
Choose whether to prevent the player from automatically updating when a new version becomes available.
Updating the player to the latest version will uncheck the "Keep on Current Version [xx]" radio button in the Studio.
Advanced settings
VOD
Audio
Reels
The Advanced Settings let you manually adjust player settings that aren’t available in the main interface. Please visit our Advanced settings article for details.


