About
The advanced settings let you manually adjust player settings that aren’t available in the main interface. This guide walks you through some key customizations to help you tailor the player’s behavior to your needs.
Access the advanced settings
VOD Audio Reels
- Log in to your KMC and click the Studio tab.
- Click the player you want to edit from the list (or use the search bar in the top right).
- Scroll to the bottom of the player settings and click Advanced Settings.

The Player Studio page displays.
If you haven't created a player yet, check out our article Create a player for guidance.

The player settings display.


The Advanced Configuration panel displays.

When you have finished configuring the settings, don't forget to click Save at the top right before exiting.

Manage advanced playback settings
The advanced playback settings allow users or administrators to fine-tune how videos perform in the Kaltura player. These options provide greater control over streaming quality, playback behavior, and performance optimization to ensure a smooth and customized viewing experience across different devices and network conditions.
Enable in-browser full-screen mode (iPhone and iPad only)
Enable fullscreen playback within the browser, instead of switching to the device’s built-in player.
- In the Advanced Settings tab, hover over playback and click the green + icon.
- In the box, enter inBrowserFullscreen and click the green check mark or hit 'enter' on your keyboard.
- Hover over the setting and click the green edit icon.
- In the box that opens, type true, then click the small green checkmark.
- Click Save to apply your changes.

The Key Name box displays.

You’ll see the new setting listed.


The value displays.

Optional: Disable double-click to enter fullscreen
By default, double-clicking the player puts the video into fullscreen.
- To turn this off, follow the same steps as above, but in the Key Name box, enter config.components.fullscreen.disableDoubleClick
- Set the value to true.
For API reference, see Kaltura’s Playkit JS repository on GitHub.
Set the default volume
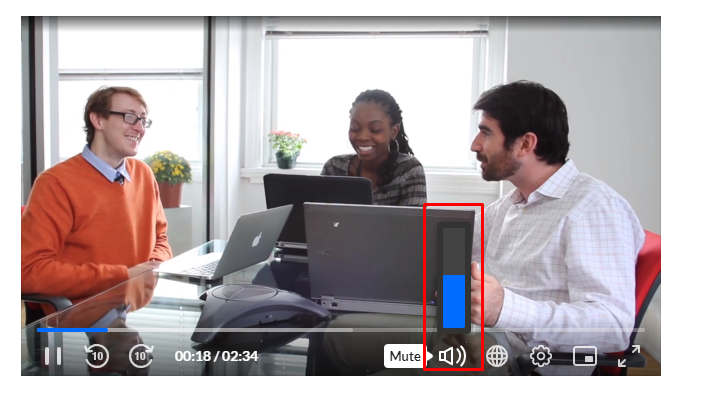
Set the default player volume. For the user guide, see Playback Functionality.
- In the Advanced Settings tab, hover over playback then click the green + icon.
- In the box, enter Volume, then click the green checkmark or press 'Enter' on your keyboard.
- Hover over the setting and click the green edit icon.
- In the box that opens, enter a value between 0 and 1 (for example, 0.5 for 50% volume), then click the small green checkmark.
- Click Save.

The Key Name box displays.

You’ll see the new setting listed.


 Volume assigned a value of 0.5

Define playback speeds
Defines the playback speeds available to users (e.g., slow motion or fast forward).
Set as an array - 1.0 is normal speed. Example: [0.5, 1, 1.5, 2]
For the user guide, see Player controls.
- In the Advanced Settings tab, hover over the playback object then click the green + icon.
- In the box, enter playbackRates, then click the green checkmark or press 'Enter' on your keyboard.
- Hover over the setting and click the green edit icon.
- Remove the null value and enter the desired values inside square brackets, for example: [0.5, 1, 1.5, 1.75, 2, 3], then click the small green check mark.

The Key Name box displays.

You’ll see the new setting listed.

A box containing a null value displays.

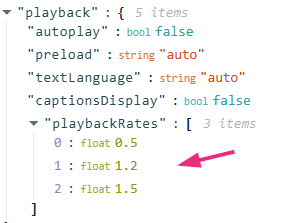
To include just one custom speed, add 1 first, for example, [1, 1.2].

The result looks like this:
 Configured playback rates
 Playback rates displayed on player
Set default audio language
Set the default audio track language.
- In the Advanced Settings tab, hover over playback then click the green+ icon.
- In the box, enter audioLanguage, then click the green checkmark or press 'enter' on your keyboard.
- Hover over the setting and click the green edit icon.
- Remove the null value and enter the desired values: eng for English, es for Spanish, etc.
- Click the green check mark to save.

The Key Name box displays.

You’ll see the new setting listed.

A box containing a null value displays.


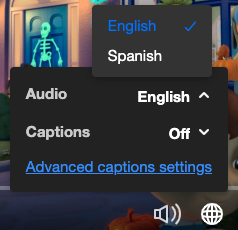
 Configuration set to English
 Player audio language selector
If the value auto is set and an audio track with the specified language is available, it will be selected as the initial audio track.
var config = {  playback: {    audioLanguage: 'auto'  }
};
Using multi-audio tracks requires configuring a designated audio flavor for each language under the account transcoding profile priorly. This configuration requires PS setup; please get in touch with your CSM for assistance.
Set to play in a loop
- In the Advanced Settings tab, hover over playback then click the green + icon.
- In the Key Name box, enter loop, then click the green checkmark or press 'Enter' on your keyboard.
- Hover over "loop" and click the green edit icon.
- Remove the null value and type in true, then click the small green checkmark.
- Click Save.


You’ll see the new setting listed.

A box containing a null value displays.

It should look like this:

Manage advanced UI settings and player customization
The advanced UI settings let administrators customize the look and feel of the Kaltura player to match their organization's branding and user experience goals. These settings control elements such as button layout, color schemes, control visibility, and interactive features - allowing for a tailored, accessible, and consistent viewing interface.
Show preview thumbnails on seek bar
Show thumbnail previews when users hover over the timeline.
- In the Advanced Settings tab, hover over ui then click the green + icon.
- In the Key Name box, enter:config.ui.components.seekbar.thumbsSprite, then click the green checkmark or press 'Enter' on your keyboard.
- Hover over the setting and click the green edit icon.
- Remove the null value and paste in the URL of your thumbnail image, then click the green checkmark.
- Click Save.


You’ll see the new setting listed.


A box containing a null value displays.


The string displays.

To turn this feature off, put an empty string (' ') in the value field.
If the setting doesn't appear after saving, try refreshing the page. Occasionally, Player Studio doesn’t register the added key right away.
Optional: Adjust thumbnail display settings
You can fine-tune how thumbnails appear using the following keys:
Thumbnail width
Key Name: config.ui.components.seekbar.thumbsWidth

Example value: 164

Thumbnail height
Key Name: config.ui.components.seekbar.thumbsHeight
Example value: 92
Number of slices (frames)
Key Name: config.ui.components.seekbar.thumbsSlices
Example value: 100
Each slice is a frame in the preview, so more slices = more accurate preview.
Disable the Advanced Captions settings option

If you don't want the 'Advanced captions settings' option to display (as shown in the image above), you can disable it as follows:
- In the Advanced Settings tab, hover over ui then click the green + icon.
- In the Key Name box, enter settings, then click the green checkmark or press 'Enter' on your keyboard.
- Hover over "settings" and click the green edit icon.
- Remove the null value and paste in the following:
- Click the small green checkmark.
- Click Save.


You’ll see the new setting listed.

A box containing a null value displays.

{"showAdvancedCaptionsMenu": false}

The new value displays.

Here are the results of our configuration:

Custom player text & error messages
See our article How to customize player text & error messages.
Manage provider connections and content retrieval
The advanced provider options allow administrators to configure how the Kaltura player connects to and retrieves content from various media sources. These settings manage aspects such as content delivery networks (CDNs), streaming protocols, authentication, and integration with external systems - ensuring reliable, secure, and efficient delivery of video content across different environments.
Set a custom tag for VR mode
By default, any video tagged 360 triggers VR mode. If you want to avoid triggering it accidentally (for example, on math or technical videos), you can define your own tags.
- In the Advanced Settings tab, hover over provider then click the green+ icon.
- In the box, enter vrTag, then click the green checkmark or press 'enter' on your keyboard.
- Hover over the setting and click the green edit icon.
- Remove the word null and type your custom tag, for example, my__360__tag (do not add quotes - the system will add them automatically).
- Click the green check mark to save your changes.

The Key Name box displays.

You’ll see the new setting listed.

A box containing a null value displays.


Now the VR button will only appear for videos that specifically have the tag you set, preventing incorrect playback in VR mode.

Make sure all relevant videos in your account are updated with the new tag. Only videos with this tag will trigger VR mode.
For more details on configuring VR playback, see 360 & VR.
Manage text settings and display options
The advanced text settings provide control over how text elements - such as captions, subtitles, and on-screen labels - are displayed within the Kaltura player. Administrators can adjust font style, size, color, background, and positioning to improve readability, accessibility, and visual consistency, ensuring that all viewers can engage with the content comfortably and clearly.
Change the default caption font
You can customize how captions appear in your player by changing the default font style, size, and color. This lets you better match your player to your branding or improve readability for your viewers.
- In the Advanced Settings tab, hover over text then click the green+ icon.
- In the box, enter textStyle, then click the green checkmark or press 'enter' on your keyboard.
- Hover over the setting and click the green edit icon.
- Delete the word null, and begin typing your style settings exactly as shown below (make sure to include the opening and closing curly brackets { }), then click the small green checkmark.
- Make sure each line ends with a comma except the last one before a closing bracket.
- Use double quotes " around all key names and string values.
- Use square brackets [] for color (as well as edge values if used, as shown in the advanced example below).

The Key Name box displays.

You’ll see the new setting listed.

A box containing a null value displays.


It will look something like this:

|
Tips while typing: |
Here are the results of our configuration:

Here's a more advanced example that includes additional style options:
"text": {"textTrackDisplaySetting": {"align": "center"},"textStyle": {"fontFamily": "sans-serif","fontSize": "100%","textAlign": "center","fontColor": [255,255,255],"fontOpacity": 1,"backgroundColor": [0,0,0],"backgroundOpacity": 0,"fontEdge": [[34,34,34,2,2,3],[34,34,34,2,2,4],[34,34,34,2,2,5]]}},
See the Kaltura Playkit JS configuration guide for more information.
This setup corresponds to these options in the player:

Manage moderation settings
The advanced moderation settings enable administrators to manage how user interactions and content submissions are reviewed and approved within the Kaltura platform. These settings allow for configuring moderation workflows, setting approval requirements, and controlling user permissions - helping ensure that all published content aligns with organizational standards, privacy policies, and community guidelines.
Change a moderation value
- In the Advanced Settings tab, navigate to moderateOptions (you must first have Moderation enabled in the player settings).
- Hover over the setting and click the green edit icon
- Remove the value and enter the desired value inside the box, then click the green checkmark.
- Click Save.


The string displays.

