Looking for more information about this feature? Feel free to contact your Kaltura representative.
About
Automatically trim long-form videos to create shareable clips containing the most impactful moments. Content Lab’s AI engine identifies these moments based on high engagement points and speaker cues. Clips can be saved as entries and used in internal or externally embedded use cases and downloaded.
Before you start
Videos repurposed with AI must meet the following criteria:
- Video must be in "Ready" status (transcoded)
- Video must have English captions
- Video must be 60 seconds or more in length
- Account must have Content Lab enabled
- Account must have an active REACH profile enabled with relevant catalog item(s)
Access the Content Lab
Steps for accessing the Content Lab vary depending on the Kaltura application.
Rich Media CMS -
Access the Content Lab through the Create with content lab button on the Entries list or on the Entry Details page.
 Rich Media CMS Entries list
Legacy Video Portal -
Access the Content Lab through the Create with content lab button on the Media page.

Kaltura Events - Access the Content Lab through the Create with content lab button on the Edit session page or the Edit media page.
 Events Edit session page
LMS Video - Access the Content Lab through the Create with content lab button on the Media page.

Appearance of the Content Lab
The appearance of the Content Lab varies depending on the Kaltura application.
Rich Media CMS -
After clicking the Create with Content Lab button on the Entries list or on the Entry Details page in Rich Media CMS, the 'Get more from your video' screen displays.
 Content Lab in Rich Media CMS
Legacy Video Portal, Kaltura Events, and LMS Video -
After clicking the Create with Content Lab button on -
- the Media page in legacy Video Portal
- the Edit session page or the Edit media page on Kaltura Events
- the Media page in LMS Video
the 'Create with AI screen' displays. Here's one example from the list above - accessing the Content Lab through the Create with Content Lab button on the Media page in legacy Video Portal:
 Content Lab in legacy Video Portal
Create highlight clips with AI
- Click Create with Content Lab.
In Rich Media CMS, the 'Get more from your video' screen displays.
 Content Lab in Rich Media CMS
In legacy Video Portal, Kaltura Virtual Events, and LMS Video, the 'Create with AI screen' displays.
 Content Lab in legacy Video Portal, Kaltura Virtual Events, and LMS Video
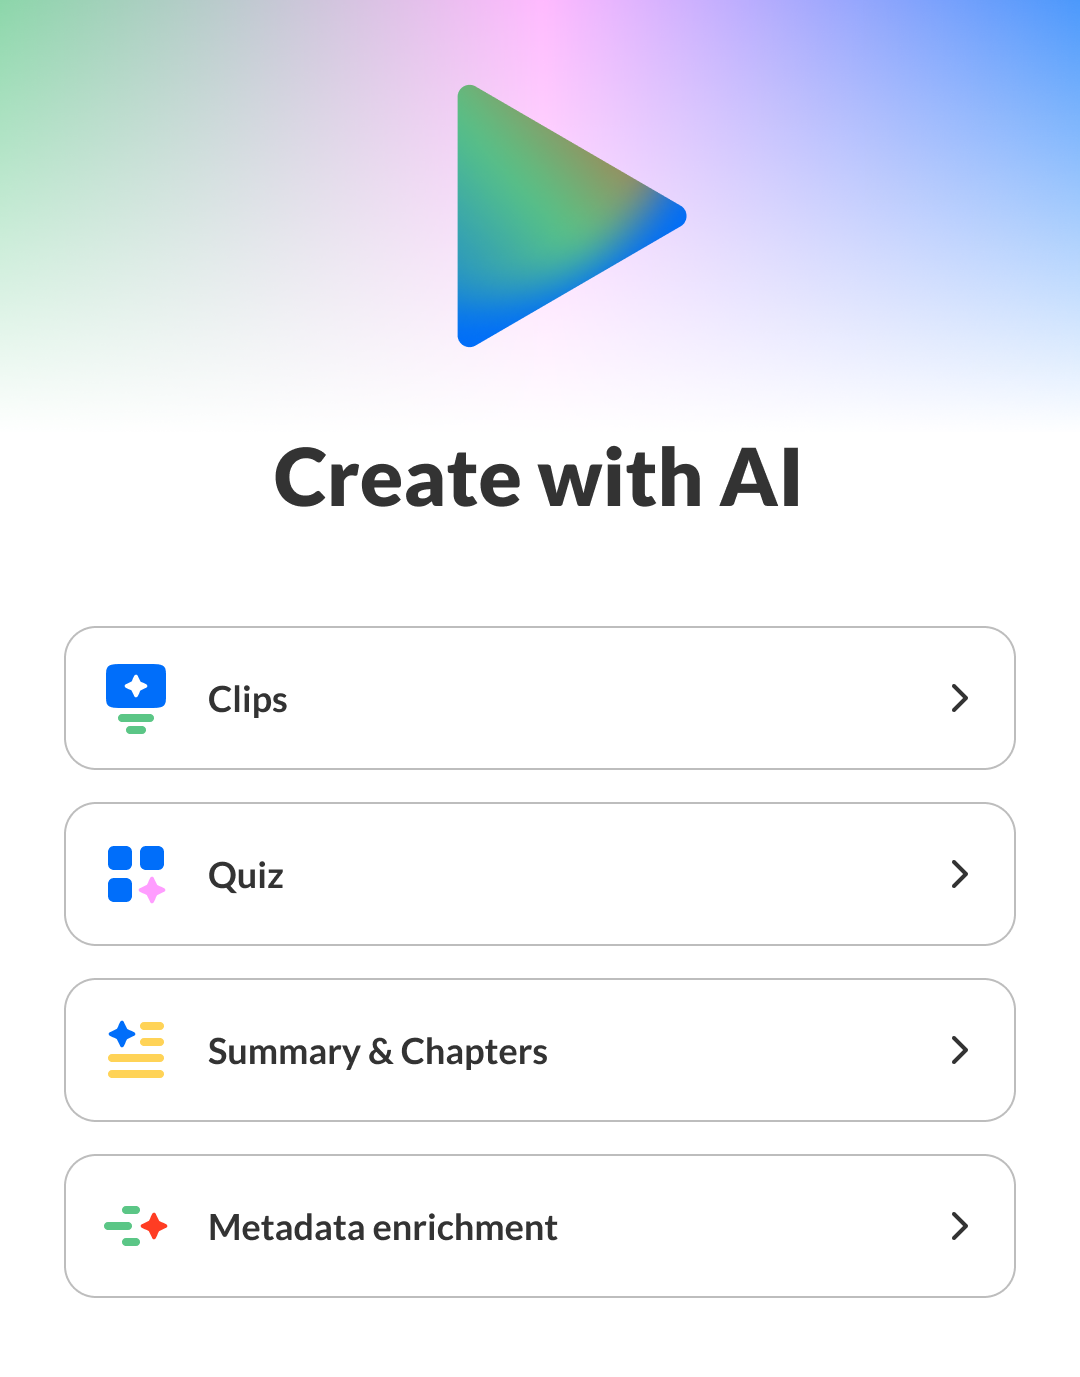
This is the Content Lab's main menu. Options shown vary depending on the services configured for your account.
- Click Clips.
If this is your first time generating clips for the entry, the Create clips screen displays.
If you've already generated clips for the entry in the past, the list of generated clips displays. Simply click Generate new to navigate to the Create clips screen.
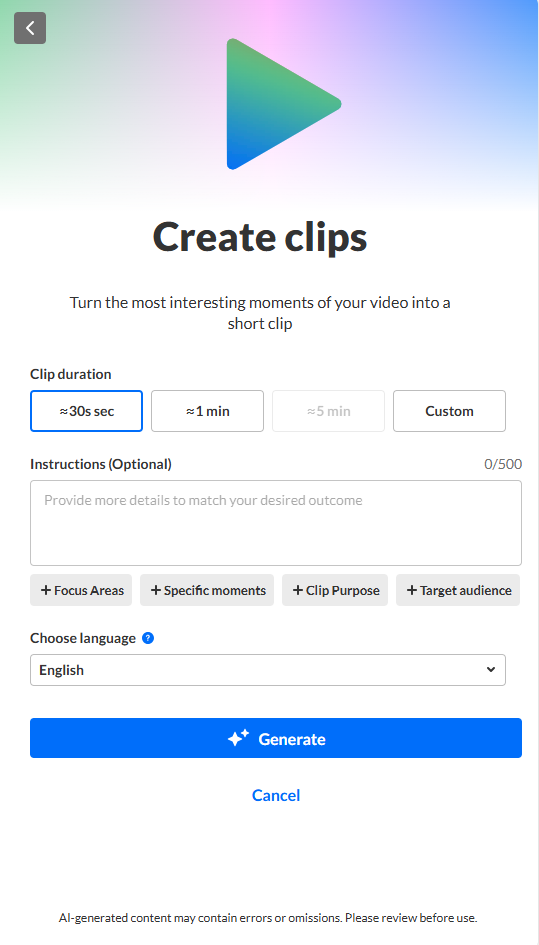
- Choose your clip duration. Only the applicable options are enabled. For instance, if the video from which you are clipping is only 2 minutes long, the "=5 min" option is disabled.
- Provide clear and detailed instructions for your clips. The more information you include, the higher the chance of achieving your desired outcome.
- Option 1: Manually type your own instructions in the Instructions field.
- Option 2: Click on a preset tag provided below the Instructions field. The Instructions field is populated with that tag and a list of suggestions for additional text instructions displays. Click on one of the suggestions to autocomplete the instructions.
- Option 3: Click on a preset tag. The Instructions field is populated with that tag and a list of suggestions for additional text instructions displays. Instead of clicking on one of the suggestions to autocomplete the instructions, manually type in the Instructions field to complete the text.
Following are the available preset tags:
- Focus areas: The clips should focus on key insights and takeaways, actionable tips, memorable quotes, visual demonstrations, or important statistics.
- Specific moments: Describe the moments from which you would like clips created.
- Clip purpose: Design the clips to be used for social media posts, creating video summaries, internal content promotion, marketing teasers, or training reinforcement.
- Target audience: Tailor the clips to a target audience of students, sales teams, marketing professionals, doctors and medical professionals, or financial analysts.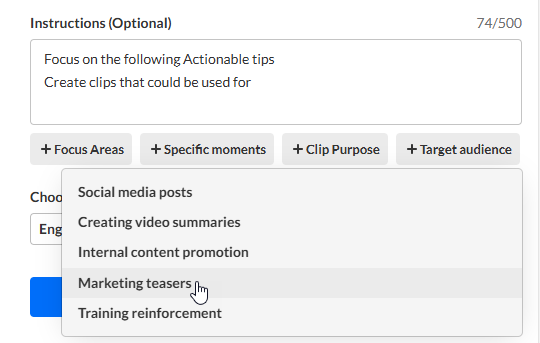
- Select your preferred language for the generated clip metadata, including the title, description, and tags*. The dropdown is divided into two sections: Last used languages (based on previously generated assets) and All languages.
- Click Generate. The Content Lab begins creating your clips.
-
Once finished, the newly generated clips are added to the list to the right.
-
Each clip in the list shows:


- A thumbnail with its position and length in the original video
- Length of clip
- Auto-generated title
- A Reuse prompt button to quickly generate more clips using the same settings (your previous selections will be pre-filled). Hover over the button to view the original prompt details in a tooltip.
Content Lab creates up to 10 clips per generation. Number of clips created depends on certain factors, including preciseness of topic or purpose (for example, there may not be 10 clips that fit the preset or custom prompt entered) and length of requested clip compared to source video (for example, if the source video is 20 minutes long and 5-minute clips are requested, there may not be enough content for 10 clips).
Preview a clip
- Click on a desired clip in the list. The left "preview" pane displays.
- You may click the Play button to preview the clip.

Edit a draft clip’s metadata
You can edit the suggested title, description, and tags* for any draft clip before saving.
- Click on a desired clip in the list. The left "preview" pane displays.
- Click the Edit details button.
-
An additional screen displays.
- Update the title, description, and/or tags*.
- Once you’ve made your changes, click Save. You may also click Cancel to cancel the action.
A confirmation message will appear, letting you know that the previous draft metadata will be overwritten.


The most recently saved metadata will always be shown when returning to the draft.
Delete a draft clip
- Click on a desired clip in the list. The left "preview" pane displays.
- Click the Delete draft button located at the bottom left of the preview screen.
A confirmation displays alerting you that this action cannot be undone. - Click Delete draft to continue. You may also click Cancel to cancel the action. Once deleted, the draft is removed from your list and can no longer be edited or saved.
Provide feedback on a clip
- Click the "thumbs up" or "thumbs down" to provide your feedback on the generated clip. If you click "thumbs down", an additional screen displays.
- Click to choose a reason and, optionally, add specific details about why you gave the clip a "thumbs down". Your feedback is important to us!
- Click Send.

Manually trim a clip and save it
- Click on a desired clip in the list. The left "preview" pane displays.
- Click the Trim manually button. The editing bar at the bottom of your clip displays.
- Use your cursor to adjust each end of the clip and trim it to your liking. The You can make the clip longer or shorter, as well as change the clip's start point and end point. Note: 30% of the time before and after your selected clip is available on the timeline for your use.
- Once you are finished trimming, click Done. You may also click Cancel to cancel the action.
- Click Save at the bottom right of your screen. The Save clip screen displays.
-
A suggested title, description, and tags* are automatically generated for your clip. (Suggested tags are copied from the original entry.) You may edit the title, description, and tags as desired. These will be saved to the metadata of the clip entry that is created.
- Choose whether you would like to embed (burn) captions permanently onto the source video. The checkbox is unchecked by default. If there are multiple caption files on the entry, a drop-down list displays a list of caption files from which to choose.
- Click Save. The clip is added to Saved Clips (at the lower section of the clips list).


Additional clip options
After you've saved your clip, additional clip options display. Options vary depending on the Kaltura application.
- For Rich Media CMS, options are - Share & Embed, Download, and Go to entry.
- For legacy Video Portal, options are - Edit video, Download, and Go to media page.
- For Kaltura Events, options are - Download and Go to entry.
- For LMS Video, options are - Edit video, Download, and Go to media page.
- Click on a clip in your Saved Clips list. The left "preview" pane displays with additional "Clip Options". In our example below, we are viewing additional clip options in legacy Video Portal.
- Choose from the following options depending on the Kaltura application:

- Edit video- Click to launch Kaltura's video editor.
- Share & Embed - Click to place the clip into some other web page.
- Download - Download the source to your machine (to upload it to social media, for example).
- Go to media page - Navigate to the media page for this entry.
- Go to entry - Navigate to the Entry Details page for this entry in the Rich Media CMS.
Combine clips into a playlist or stitch clips into one video
You may select clips (either draft or saved) to combine into a playlist or stitch into one video.
- Click the Combine videos button.
-
The Combine videos screen displays.
- Click to select the desired clips.
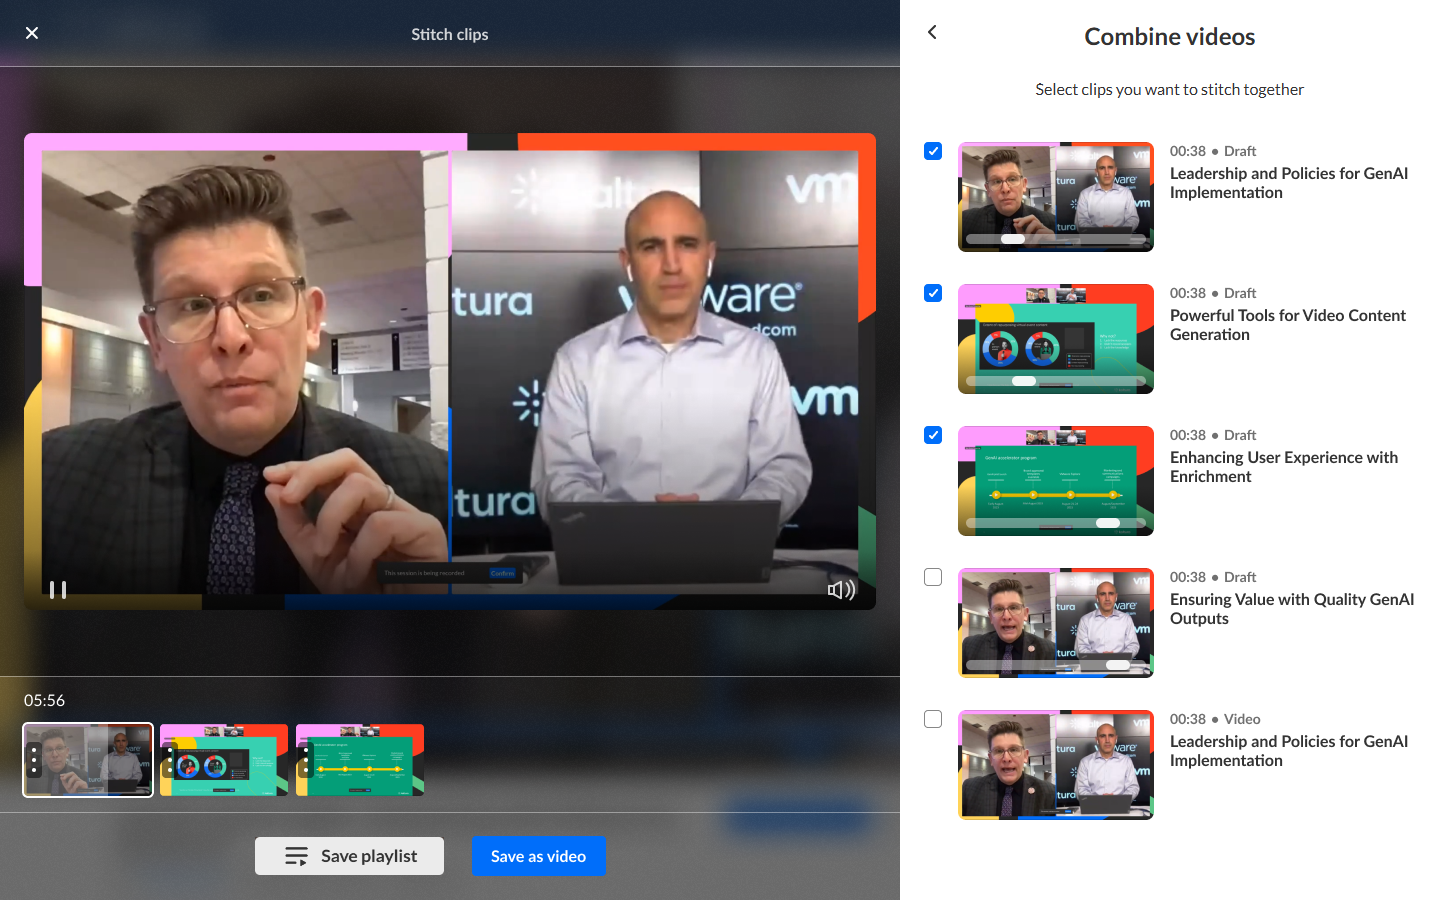
When you select your first clip, it is added to the bottom panel and the preview panel displays with the preview of the clip in the player. As you click to select more clips, they are subsequently added to the bottom panel in the order that they were selected. The length of the combined clips is displayed above the bottom panel. If you un-select a clip, it is removed from the bottom panel and the time indicator is adjusted accordingly.
-
Click on any clip in the bottom panel to preview it in the player. The clip that is currently being played is highlighted with a white overlay in the bottom panel, giving you an idea of your current playback position. You may also hover over a clip to display the title of that clip.
- To manually reorder the clips, grab the three dots on the left side of a clip and drag it to the desired spot in the bottom panel.
- Once you are finished selecting your clips and have them in the desired order, you have the choice of either saving a playlist of the selected clips or stitching all the selected clips into one video with optional transitions between clips.


To save a playlist -
Currently, saving a playlist is available for Content Lab in Rich Media CMS, legacy Video Portal, and LMS Video.
Click Save playlist. The Save playlist screen displays.

A suggested title, description, and tags* are automatically generated for your playlist with AI. (Suggested tags are copied from the original entries.) You may edit the title, description, and tags as desired. These will be saved to the metadata of the playlist that is created.
Click Save. The playlist is added to your Saved Clips list.

To create a stitched video -
Click Save as video. The Save a single video screen displays.

A suggested title, description, and tags* are automatically generated for your video with AI. (Suggested tags are copied from the original entries.) You may edit the title, description, and tags as desired. These will be saved to the metadata of the video that is created.
Embedded captions in video - Choose whether you would like to embed (burn) captions permanently onto the source video. The checkbox is unchecked by default. If there are multiple caption files on the entries, a drop-down list displays a list of caption files from which to choose.
Create chapters & summary - Choose whether you want to create chapters and a summary for this video. The summary will be the description you chose for the stitched video. Each clip selected for the video will be displayed as one chapter and will include the original title of the clip and the original description of the clip.
Add transition between clips - Choose whether you want to add transitions between the clips.
Click Save. The video is added to your Saved Clips list.

Additional playlist and stitched video options
After you've saved your playlist or stitched video, additional options display. Options vary depending on the Kaltura application.
Playlist -
- For Rich Media CMS, options are - Edit playlist, Share & Embed, and Go to playlist
- For legacy Video Portal, options are - Edit playlist and Go to playlist
- For LMS Video, options are - Edit playlist and Go to playlist
Stitched video -
- For Rich Media CMS, options are - Share & Embed, Download, and Go to entry
- For legacy Video Portal, options are - Edit video, Download, and Go to media page
- For Kaltura Events, options are - Download and Go to media page
- For LMS Video, options are Edit video, Download, and Go to media page
Click on a playlist or stitched video in your Saved Clips list. The left "preview" pane displays with additional "Clip Options" or "Playlist Options". In our example below, we are viewing additional clip options in legacy Video Portal for Playlist.

Choose from the following options depending on the Kaltura application:
- Edit playlist/video - Click to launch Kaltura's video editor.
- Share & Embed - Click to place the playlist/video into some other web page.
- Download - Download the source to your machine (to upload it to social media, for example).
- Go to media page/Go to playlist - Navigate to the playlist page/media page for this entry.
- Go to entry - Navigate to the Entry Details page for this entry in the Rich Media CMS.
*Currently, tags are available for Content Lab in Rich Media CMS and legacy Video Portal.
Kaltura does not use customer data to train its AI models. To learn more, see Kaltura's Artificial Intelligence Principles.
