Agenda tab - Add and edit Live webcast session


About

This article describes how to add and edit a Live webcast session.

Live webcasts are orchestrated, highly produced live-streaming events for large audiences. Kaltura Webcasting supports you from the initial planning stage to live broadcast production and management and finally to post-production and after-event management. This session type includes an automated transition from live to VOD.

Our agenda management system is designed to cater to the diverse needs of virtual, hybrid, and in-person events. It allows organizers to include room or location information for specific sessions, facilitating easy navigation for in-person attendees. Whether it's a virtual webinar, a hybrid conference, or an in-person workshop, our agenda management system ensures that participants can access relevant details about session locations or virtual links, enhancing their overall event experience. Our agenda management system offers the option to seamlessly integrate live broadcasting of in-person sessions, extending accessibility to virtual participants. This feature enhances the inclusivity of events, enabling remote attendees to engage with on-site sessions in real-time.

Furthermore, with Live webcasts you have the added flexibility of "going live" directly from a Kaltura webcast studio (if the stream has already been initiated through the encoder tool). Simply create a Live webcast session, then navigate to the webcast studio and begin broadcasting. 

Once the session is created, the webcast studio is automatically created as well. Moderators may access the webcast studio via a direct private link. This way, they can begin preparing the webcast studio ahead of the broadcast. The agenda, on the other hand, is available to all on the event site.

Add a Live webcast session

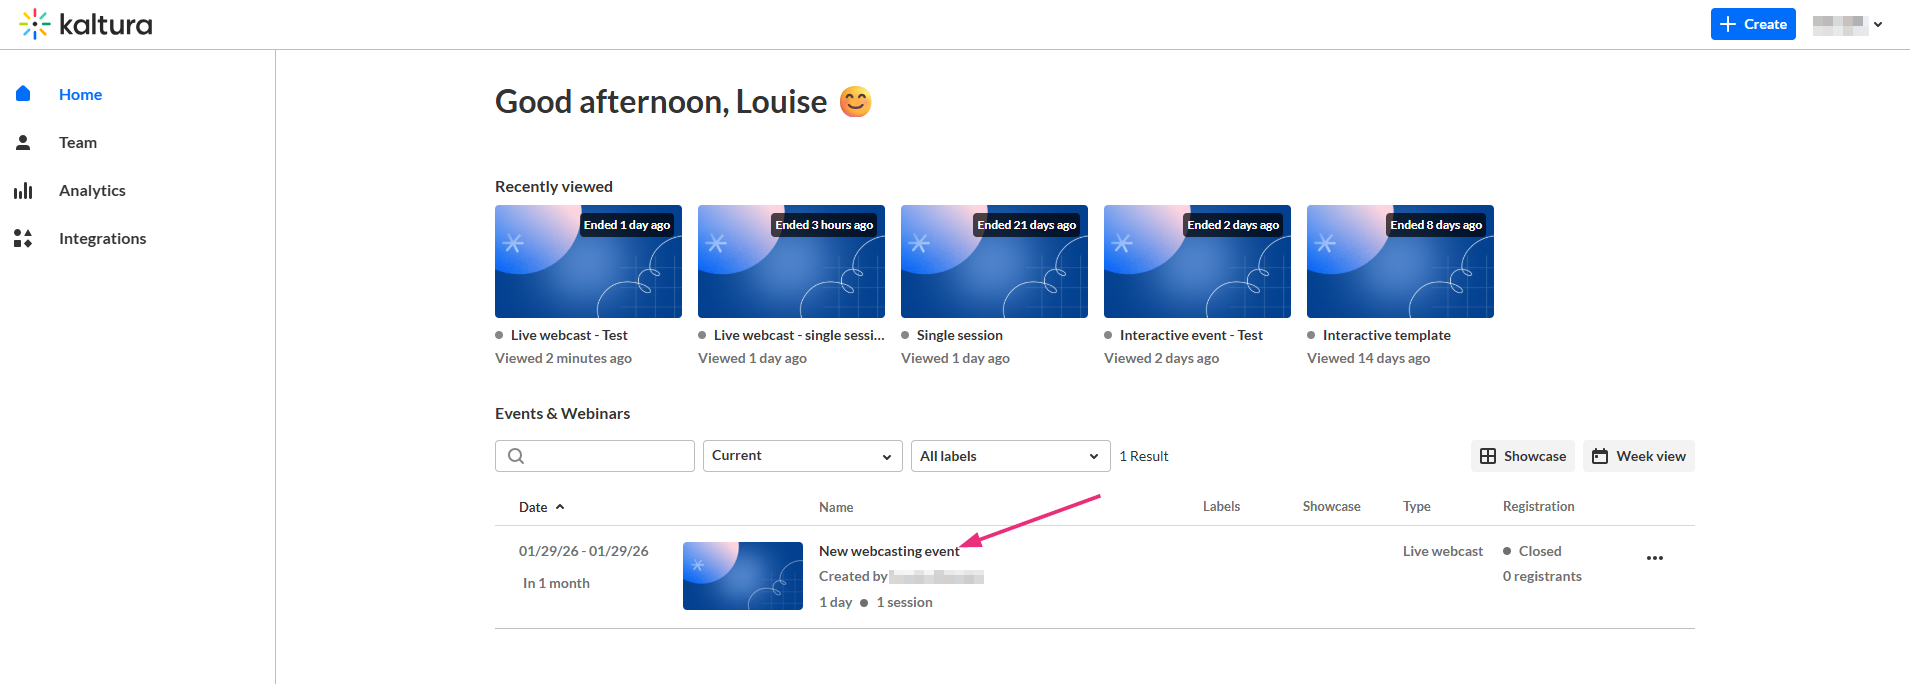
There are two ways to add a session to your event: 

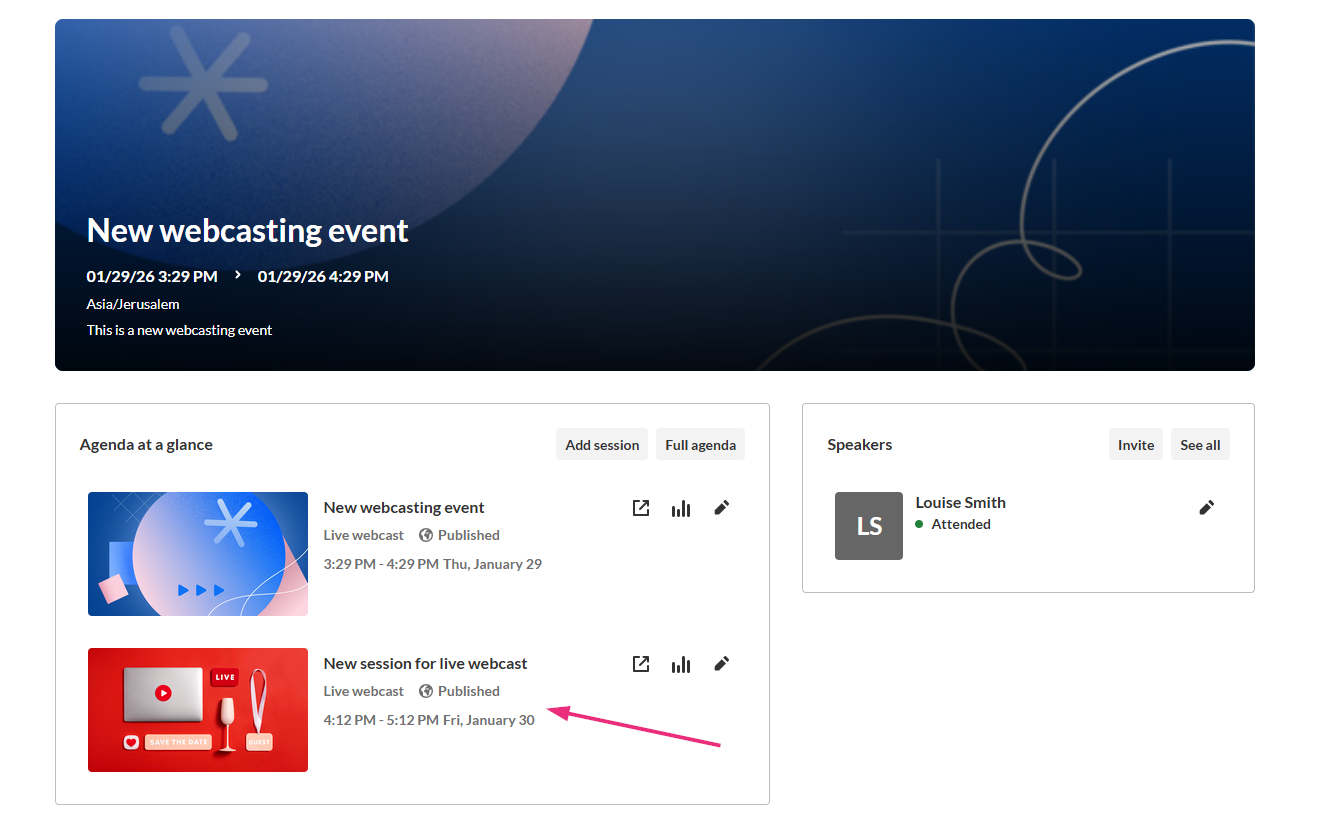
  • On the Event Overview page, in the Agenda at a glance section, click Add session.
  • On the Event Agenda page, click Add session.

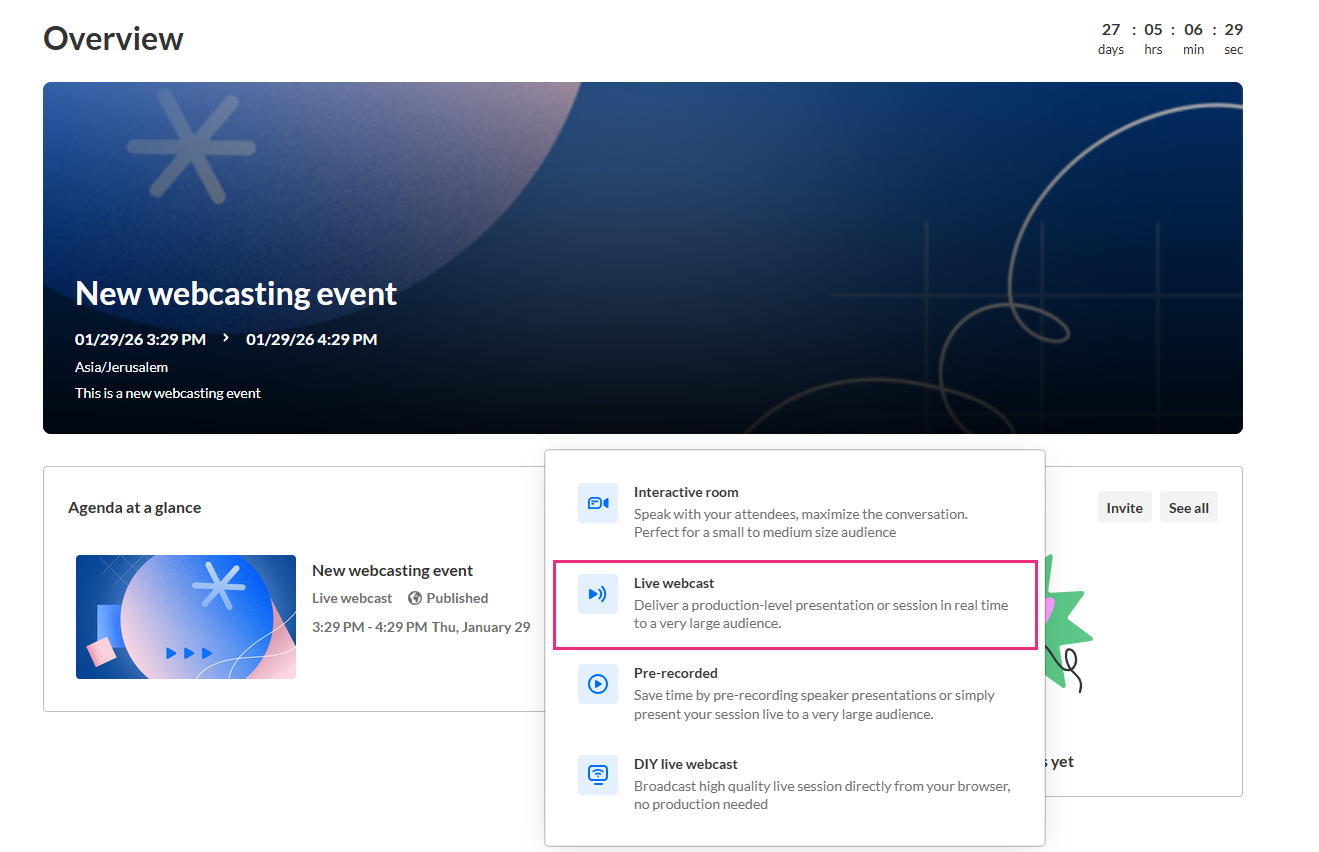
The Add session pop-up screen displays. 

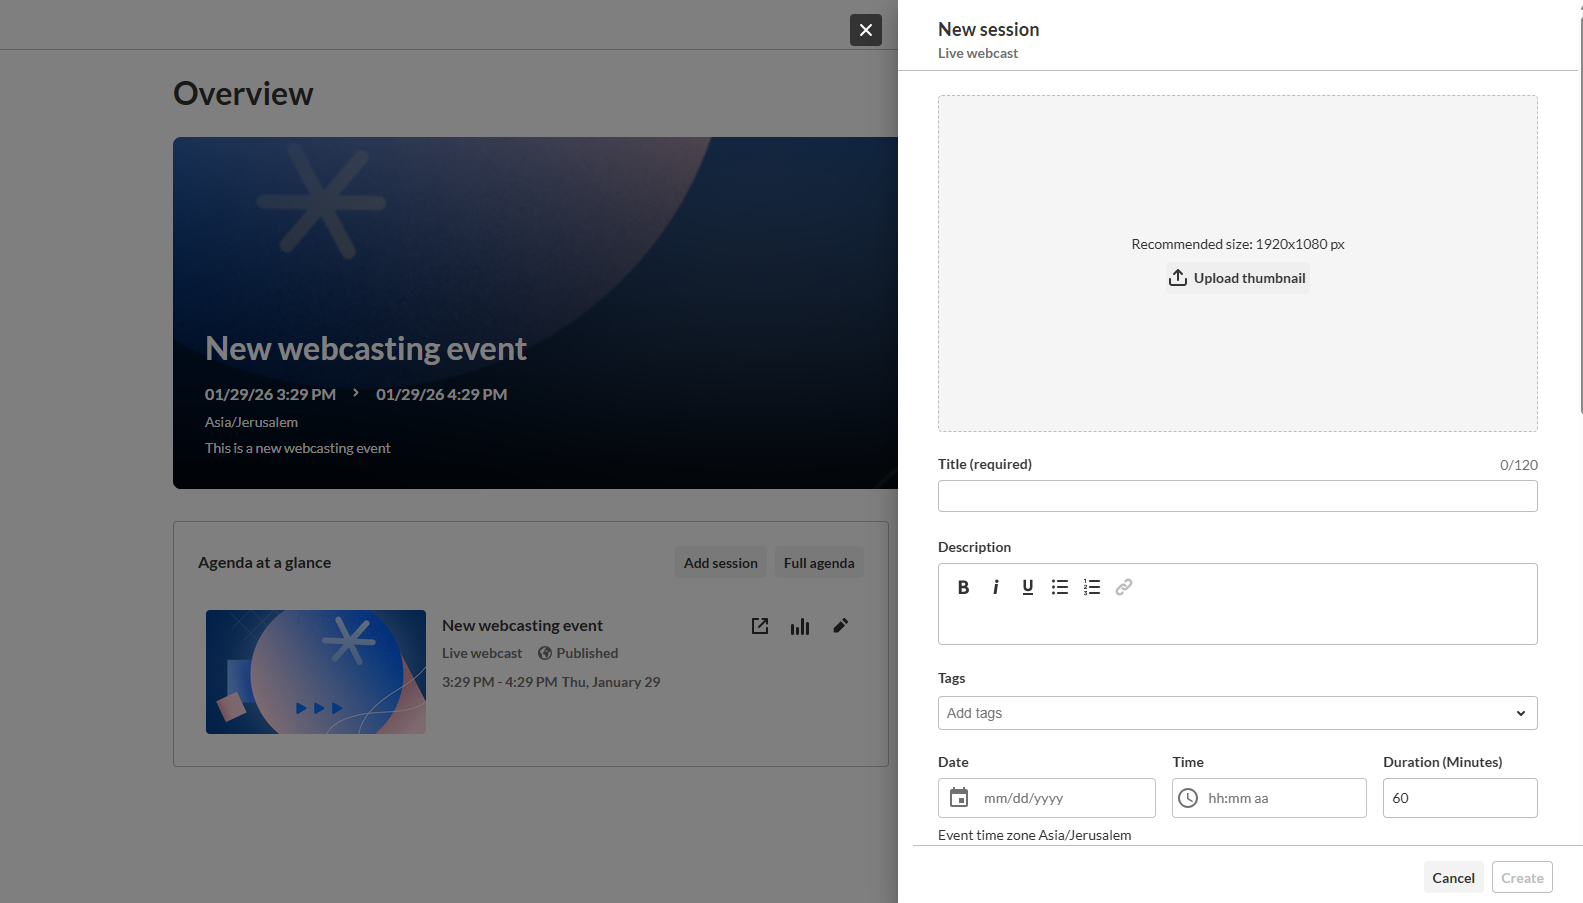
Select Live webcast. The New session Live webcast screen displays.

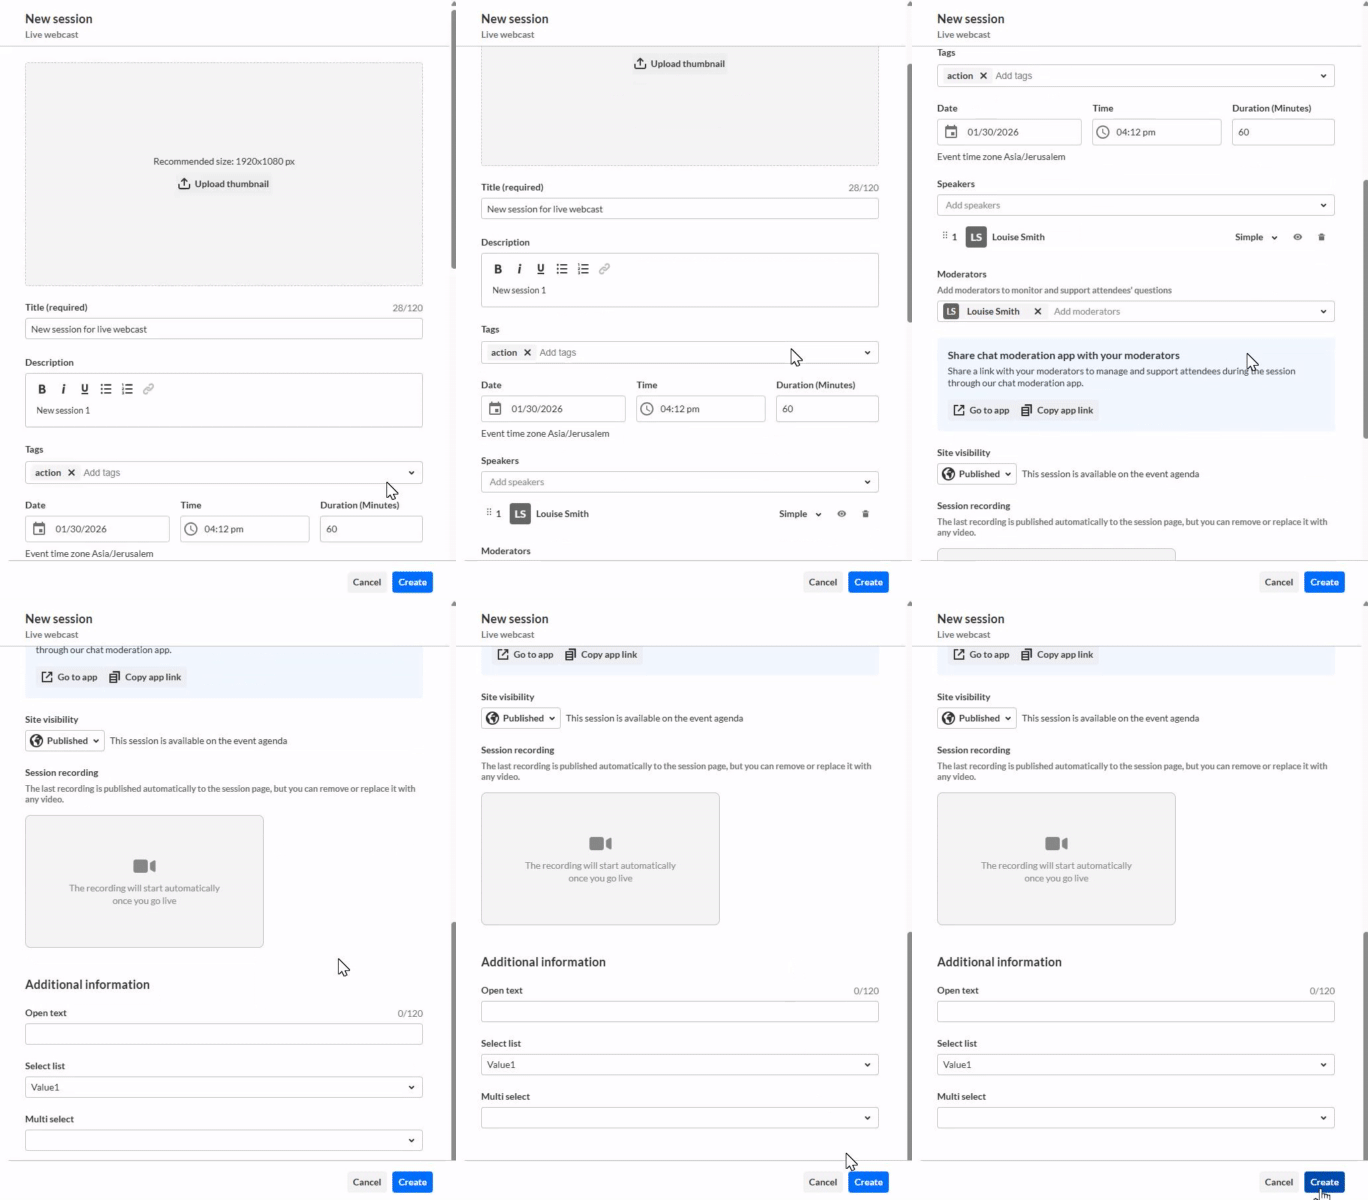
  1. You may add the following information:
    • Header - Click Upload thumbnail and choose the desired file. We recommend using an image size of 1920x1080 px.
    • Title (required) - Type a title for your session (char limit is 120). Please note: Characters "<" and ">" are not supported.
    • Description - Type a description for your session. 
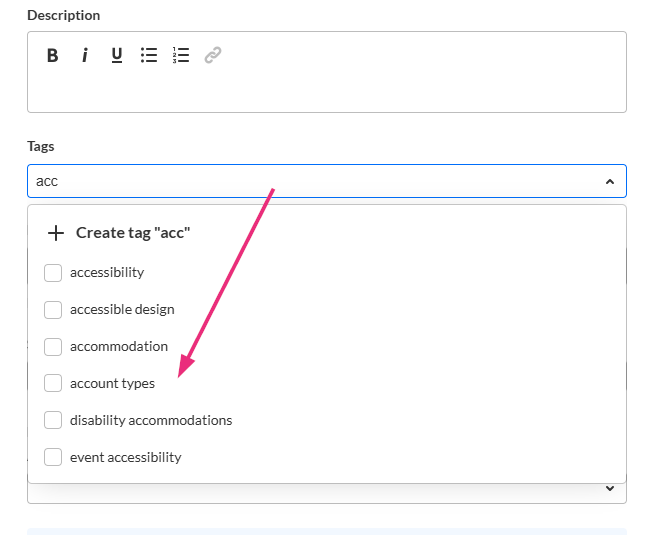
    • Tags - Apply existing or create new useful, relevant tags for your session to help categorize it within the event. You may then filter your Agenda page and the Agenda section of Page builder based on these unique tags.   
      • To apply a tag - Click in the Add tags field. Start typing the first few letters of a tag and a list of matching tags will populate for you. Click to select the checkbox next to the desired tag.
      • To create a new tag - Type your new tag in the Add tags field, then click +Create tag "[tag name]".
      • To detach a tag from a session, simply click "X".

        Session tags are visible to event attendees. 
    • Date (required) - Choose the day your session will start.
    • Time (required) - Choose the time your session will start. 
    • Duration (required) - Choose the duration of your session (in minutes). Max duration is 1440 minutes (24 hours).
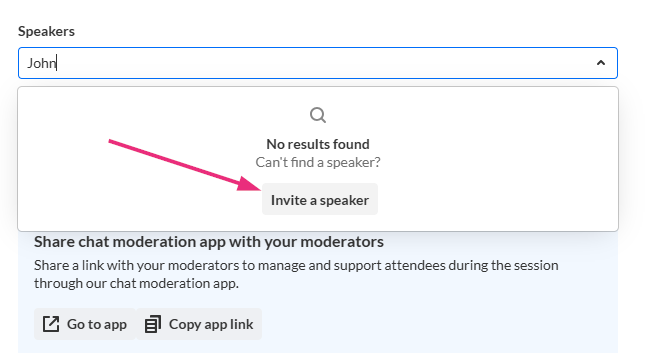
  2. To add speakers to this session, click in the Speakers field and start typing the name of a user who has been assigned a Speaker role. The name is auto filled. Click to select the user.
    If no results are found, click Invite speaker. This re-directs you to the Speakers page where you can invite speakers to your event.
  3. To add moderators to this session, click in Moderators field and start typing the name of a user who has been assigned a Moderator role. The name is auto filled. Click to select the user.
    If no results are found, click Invite moderator. This re-directs you to the Moderators page where you can invite moderators to your event.

    Team members who created the event (AKA "Event Organizers") are automatically assigned as Moderator to both the event they created (at the "Event Level") and the first session that was created as part of the event (at the "Session Level").

  4. Moderation links - Click Go to app to access the chat moderation app, which allows you and your moderators to organize, manage, and answer Q&A threads; publish polls and Q&As; and answer private chats during the session. Click Copy app link to share a link to the moderation app with your moderators.
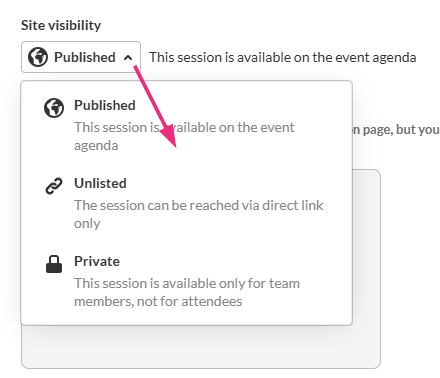
  5. Choose visibility of the session.
    Private - The session will be available only for team members, not for attendees.
    Unlisted - The session will be reachable via direct link only.
    Published - The session will be available on the event agenda.

    The Session recording area is accessible via the Edit Session page once the live session is finished.

    Live stream details will be available after creating your session and accessing the Edit Session page. See Obtain Live Stream Details

  6. Once you are finished completing the fields, click Create. (The Create button is enabled only after you've begun filling in the fields.) The new session is now added to your event.

Edit a Live webcast session

There are two ways to reach session editing capabilities: 

  • On the Event Overview page, in the Agenda at a glance section, hover over the session you would like to edit, then click the blue pencil (edit) icon.
  • On the Event Agenda page, click the name of the session, or the three blue dots to the right of the session and choose Edit.

Filter Agenda page by tags - You may filter and search for sessions by tag(s). 

Click in the All field. A list of available tags display.

In our example below, we have clicked the checkboxes to filter the agenda by the tags "Connect", "Keynote", and "Social Media Insight". 

You may also start typing the first few letters of a tag and a list of matching tags will populate for you. You may then click the checkbox to filter by that tag.

The Edit session page displays with the Basics tab open by default. 

Basics tab

Activate and prepare the webcast studio ahead of the broadcast

You may activate your broadcast studio, add slides and images to your live session, and start broadcasting directly from a Kaltura webcast studio (if the stream has already been initiated through the encoder tool).

  1. Navigate to the Edit Session page. 
  2. Click on the Basics tab.
  3. Click one of the Launch webcast studio buttons (either at the top of the screen or at the bottom of the screen). The Kaltura webcast studio displays. See the Kaltura webcast studio of the Kaltura Knowledge Center for complete information.

Share a direct private link to the webcast studio with a moderator

Let the moderators assigned to the session access the webcast studio and begin preparing ahead of the broadcast. 

  1. Navigate to the Edit Session page. 
  2. Click on the Basics tab.
  3. Click Copy link.
  4. Share this link with a moderator of the session.

Visit the session page

You may access the session directly from the Edit Session page. 

  1. Navigate to the Edit Session page. 
  2. Click on the Basics tab.
  3. Click Visit session page
    You are redirected to the session page.

Share a direct link to the session page 

You may copy a direct link to the session page for sharing purposes. 

  1. Navigate to the Edit Session page. 
  2. Click on the Basics tab.
  3. Click Copy link
  4. Share this link with attendees.

Edit your session details

Edit details like your session's title and description; change the date, start time, or duration of your session; add or remove speakers and moderators, etc. 

  1. Access the Edit Session page.
  2. Click on the Basics tab.
  3. Make appropriate edits. 
  4. Click Save.
    The session is now updated with the new information.

Assign resource location

Once you have a configured resource, it becomes available as a resource and appears in the live resource location list. You can then select it when creating a new webcast session to easily stream from that source.  

Supported hardware encoders include Epiphan, Extron, Lumens, and Vizrt. 

In order to configure resources, contact a Kaltura representative.

  1. Access the Edit Session page.
  2. Click on the Basics tab.
  3. Click on the Assign resource location pull-down list. A list of resources displays, along with their availability. 
  4. Click on the desired (available) resource. The resource displays as selected. 

To ensure a seamless webcast experience, please assign all required resources at least 20 minutes before your scheduled start time. This buffer helps maintain stream integrity and prevents any disruptions to your broadcast. 

Manage recordings

Live sessions include the automated transition from live to VOD (meaning, once the live session is finished, the recording is automatically published to the event site). In some cases, Event organizers may not want a VOD available after the session, or they may want to take down the recording, go through some post-production, and then re-upload the recording. 

To unpublish or download a recording:

  1. Access the Edit Session page.
  2. Click on the Basics tab.
  3. Scroll down to the Session recording section.

Click Unpublish to unpublish the recording from the event site. You are prompted to confirm your action. Once the recording is unpublished, it will display on the Media page. 

Click Download to download the recording. It is downloaded to your local machine. 

To publish a new recording:

  1. Access the Edit Session page.
  2. Click on the Basics tab.
  3. Scroll down to the Session recording section.
  4. Click Choose from Media. The Media page displays (if you need to upload a new file, upload it first to the media page).
  5. Click Select next to the media you would like to upload to the session. You receive confirmation that the recording was published on the session page and removed from the Media page.

Obtain live stream details

  1. Access the Edit Session page.
  2. Click on the Basics tab.
  3. Scroll down to the Live stream details section and click Show on the desired protocol.

  4. Copy the live stream details.
  5. Paste the live stream details into your broadcast app/encoder(s) to stream to this session. For an example on how to do so, see OBS Studio and Kaltura Live Streaming.

Captions tab - Manage captions and translation for your session

The ability to order captions and translation must be enabled and configured on your account. If they are not, please contact your Kaltura representative to enquire about adding them. If captions and translation are enabled and configured on your account, you may order them only after creating your session and accessing the Captions tab of the Edit Session page. 

You may order live captions and translation on future sessions only. You may not order live captions or translation on sessions that have already started. If you did not order live captions for the session, and you have a recording of the session, you may order and/or upload captions for that recording.

To order live captions for a session

  1. Access the Edit Session page. 
  2. Click on the Captions tab.
  3. Click Order captions. The Order captions screen displays.
  4. Complete the fields in the Order captions screen. 
    • Feature - Select Live Captions.
    • Live Captions Start Time - Choose when the captioning service should start:
      - at the beginning of the event
      - 15 minutes before the event starts (recommended)
      - 30 minutes before the event starts
      - 60 minutes before the event starts
    • Live Captions End Time - Choose how long captions should run after the scheduled end time: 
      - at the end of the event
      - 15 minutes after the event ends
      - 30 minutes after the event ends
      - 60 minutes after the event ends
    • Service - Select the type of Live Captioning service. 
      • Machine - Automated captioning process. (Machine captions must be ordered at least 15 minutes ahead of your session.)
    • Source Media Language - Select the spoken language of the live stream. 
    • Multiple languages are supported. Don’t see yours? Contact your Kaltura representative to request it.

  5. Click Submit.

Once captions have been ordered, you may view existing caption requests in the Edit Session page.

Please note that if you reschedule the event, the original order won't update automatically. You will have to cancel it and place a new order.

To order live translation for a session

  1. Access the Edit Session page. 
  2. Click on the Captions tab.
  3. Click Order captions. The Order captions screen displays.
  4. Complete the fields in the Order captions screen. 
    • Feature - Select Translation.
    • Live Captions Start TimeChoose when the captioning service should start:
      - at the beginning of the event
      - 15 minutes before the event starts (recommended)
      - 30 minutes before the event starts
      - 60 minutes before the event starts
    • Live Captions End TimeChoose how long captions should run after the scheduled end time:
      - at the end of the event
      - 15 minutes before the event ends (recommended)
      - 30 minutes before the event ends
      - 60 minutes before the event ends
    • Service - Select the type of Live Translation service. 
      • Machine - Automated translation process. (Translations must be ordered at least 15 minutes ahead of your session.)
    • Source Media Language - Select the spoken language of the live stream. 

      Multiple languages are supported. Don’t see yours? Contact your Kaltura representative to request it.

    • Target translation language - Select one or more languages from the dropdown. Captions can be ordered in parallel for multiple target languages. 
  5. Click Submit.

Once captions have been ordered, you may view existing caption requests in the Edit Session page.

Please note that if you reschedule the event, the original order won't update automatically. You will have to cancel it and place a new order.

Status definitions

  • Pending - The vendor has not yet opened the request
  • Scheduled - The request has been accepted and is being processed
  • Completed - The captioning job was completed successfully 

Only start streaming when all caption orders show Scheduled. If the status is Pending, wait and refresh the list manually.

Best practices for live captioning

  • Start streaming a few minutes early to ensure full caption coverage.
  • Machine captions must be ordered at least 15 minutes before the event.
  • You can cancel machine orders any time before the event. 
  • Captions apply to the primary stream only - backup streams aren’t supported.
  • Events must be at least 10 minutes long (600 seconds minimum).
  • Captions can last up to 8 hours per session

To order captions for a session recording

  1. Access the Edit Session page. 
  2. Click on the Captions tab.
  3. Click Order captions. The Order captions screen displays.
  4. From the Feature pull-down list, choose Captions
  5. Click Submit.

Once captions have been ordered, you may view existing caption requests in the Edit Session page.

To upload captions for a session recording

  1. Access the Edit Session page. 
  2. Click on the Captions tab.
  3. Under Upload captions, click Upload. The Upload captions screen displays.
  4. Click Upload to choose the desired captions file from your computer, select the language, then click Add caption. As you add captions, they display on the Captions tab under Upload captions.

Please note - You may upload only one file per language.

To set as default, edit, download, and delete captions for a session recording

  1. Access the Edit Session page. 
  2. Click on the Captions tab.
  3. Click the three blue dots to the right of each caption file for additional functionality.
    • Choose Set as default to set the caption file as the default.
    • Choose Edit to edit the caption file.
      The Edit Captions page displays. See Editing Captions for more information.
    • Choose Download to download the captions file to your machine.
    • Choose Delete to delete the caption file.

Attachments tab - Manage attachments for your session

Provide your audience a greater immersive experience and more value by enriching your session with downloadable content. Manage content like documents, spreadsheets, presentations, audio/video files, and images for your session on the Attachments tab. 

Supported file types consist of the following: 

  • Media files - *.mts;*.MTS;*.qt;*.QT;*.mov;*.MOV;*.mpeg;*.MPEG; *.avi;*.AVI;*.mp4; *.MP4; *.vob;*.VOB;*.flv; *.FLV; *.f4v; *.F4V; *.asf;*.ASF; *.wmv;*.WMV;*.m4v;*.M4V;*.3gp;*.3GP; *.mkv;*.MKV;*.arf;*.ARF; *.webm;*.WEBM; *.mxf;*.MXF

  • Document files  - 'doc', 'docx', 'docm', 'dotx', 'dotm',  'xls', 'xlsx', 'xlsm', 'xltx', 'xltm', 'xlsb', 'xlam',  'ppt', 'pptx', 'pptm', 'potx', 'potm', 'ppam', 'ppsm',  'odb', 'odc', 'odf', 'odg', 'odi', 'odm', 'odp', 'ods', 'odt',  'otc', 'otf', 'otg', 'oth', 'oti', 'otp', 'ots', 'ott', 'oxt','swf','pdf'

  • Image files - 'jpg', 'jpeg', 'bmp', 'png', 'gif', 'tif', 'tiff'

Upload attachments to your session

  1. Access the Edit Session page. 
  2. Click on the Attachments tab.
  3. Click on the Upload button and choose desired file(s).
    The progress of your upload is displayed.
    When complete, you receive notification of successful upload.

Edit attachments on your session

  1. Access the Edit Session page. 
  2. Click on the Attachments tab.
  3. Click the three blue dots to the right of the attachment and choose Edit.
    The Edit details screen displays.
  4. Type the title and description (optional). The title should be a more descriptive name for this file. The description should provide context on the file's content. Both will be visible to your attendees. 
  5. Click Save changes

Download attachments from your session

  1. Access the Edit Session page. 
  2. Click on the Attachments tab.
  3. Click the three blue dots to the right of the attachment and choose Download.
    The attachment is downloaded to your machine.

Get information on attachments in your session

  1. Access the Edit Session page. 
  2. Click on the Attachments tab.
  3. Click the three blue dots to the right of the attachment and choose More info.
    Addition information displays about the attachment.
  4. Click "X" to exit the screen.

Delete attachments from your session

  1. Access the Edit Session page. 
  2. Click on the Attachments tab.
  3. Click the three blue dots to the right of the attachment and choose Delete.
    You are asked to confirm your action.
  4. Click Delete.
    When complete, you receive notification of successful deletion.

Share & Embed tab

Looking for more information about this feature? Feel free to contact your Kaltura representative.

When using Kaltura's Live Broadcasting services, you can choose to share (re-stream) your scheduled live event to any RTMP based live broadcasting service. When re-stream is set, Kaltura will take care of replicating your live stream and concurrently stream it to additional live broadcasting services such as social media live streaming.

You may share (restream) and embed only after creating your session and accessing the Share & Embed tab of the Edit Session page. 

You may share (restream) and embed future sessions only. 

  1. Access the Edit Session page. 
  2. Click on the Share & embed tab.

    To embed the player on an external site:
    Click Copy to copy the embed code, then paste the embed code into your external site.

    To share (restream) your live webcast on a social media channel:
    1. Click + Add stream. The Add a social stream window displays.

    2. In the Social channel (required) field, type the name of the social channel (i.e., Facebook, Twitter, etc.).
    3. In the Stream URL (required) field, paste in the stream URL (RTMP) provided by the social channel.
    4. In the Stream key (required) field, paste in the stream key provided by the social channel.  
    5. Click Add. As you add social channels, they display on the Share & Embed tab under Social media streams.

When sessions are embedded or shared (restreamed) on social media, some viewership data will be lost because viewers accessing events via embed or restream are not required to register for the event and will appear anonymously on the session analytics.  In addition, enrichment capabilities, such as dual screen and cue points, are not supported when streaming live webcasts to socials.


To edit an existing stream:
1. Click the three blue dots to the right of the desired stream. Additional options display.

2. Click Edit. The Edit social stream window displays where you can make your edits, then click Save.

To delete an existing stream:
1. Click the three blue dots to the right of the desired stream. Additional options display.

2. Click Delete. You are asked to confirm your action. 

Additional resources

See the following additional articles for reference: 

  • Configure the firewall
  • Monitor your webcast through real-time analytics
  • Live encoding best practices guide which contains the following information: 
    • An overview of live encoding
    • Live production management checklist
    • Guidelines on connectivity and basic hardware
    • System requirements
    • Minimum recommended encoder hardware/internet line specs for broadcasting live video to Kaltura
    • Things to consider when selecting your encoder(s), impact of encoder capabilities on streams, how to monitor and configure your encoder(s)
  • Standards and best practices for streaming to Kaltura which contains the following information: 
    • Live broadcasting specifications
    • Recommended hardware/encoders
    • Guidelines on multi-audio live streams
    • Where to find the live stream details
    • Testing your stream, including information on performing a dry run before your event
    • Additional related resources 
Was this article helpful?
Thank you for your feedback!
User Icon

Thank you! Your comment has been submitted.

In this article
Related articles
Back to top

Never miss a thing!

Subscribe to our customer newsletter and our release notes updates, so you always get the best out of Kaltura.
Newsletter