About
The Event site editor acts as a one-stop-shop for all your event page and registration form building needs. From here you may:
- Navigate to the Lobby page customization screen where you can customize the page that displays while your event is closed.
- Navigate to the Registration form where you can customize what information will be required from attendees in order to officially register for your event.
- Build custom pages to better customize and control the structure of your event. Admin can use this powerful design tool to create as many different pages as they want, styled with unique components, creating different experiences based on their audience. They can choose to make these pages public, or only available to a select group of authenticated users. They can also choose to set one of these custom pages as the event home page.
The screens shown here represent a multi-session event. The same actions apply when working with single session.
This feature must be enabled on your account. If it is not, please contact a Kaltura representative about enabling it.
Navigate to the Event site editor
After creating a new event, navigate to the Event site editor page; from the Event page, click the Event site editor tab.

The Event site editor page displays. In our example below, the two system pages are displayed - Event lobby and Registration - and two custom pages that have already been built are listed as well - Landing page and Landing page V2.

System pages
Click pencil "edit" icon in Event lobby section to navigate to the Lobby page customization screen. See Customize your Lobby page.
Click pencil "edit" icon in the Registration section to navigate to the Registration form. See Set up registration.
Create a custom page
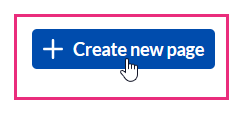
- Click the blue + Create new page button in the upper right corner of the screen.
 If no custom pages exist, you may also click the + Create new page button in the main body of the page.
 The Create new page screen displays.
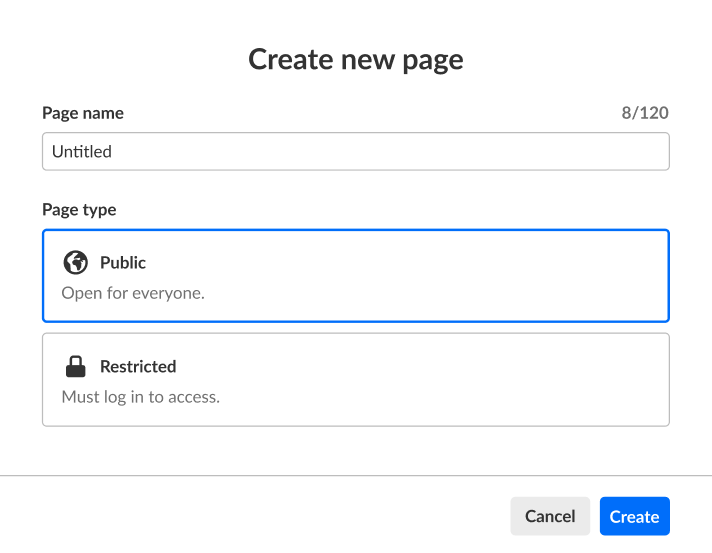
- Type a name for the custom page in the Page name field.
- Choose the type of page will custom page will be - Public or Restricted.
- Public - Open for everyone, this type of page is meant to spark interest and drive registration.
- Restricted - This type of page is accessible only to logged in attendees.
- Click Create.
Regardless of the type of page chosen (Public or Restricted), the page building flow is the same. However, there are two differences in the way the pages are pre-set upon creation. 1. The access for a Public page is pre-set to Public (anyone on the internet will be able to access this page); the access for a Restricted page is pre-set to Restricted (access to this page will be limited to invited or registered users only) and shown on navigation. You can always change these settings later. 2. The Public page has three components automatically added upon creation; the Restricted page is empty (with no components added) upon creation.
 If no custom pages exist, you may also click the + Create new page button in the main body of the page.
 The Create new page screen displays.

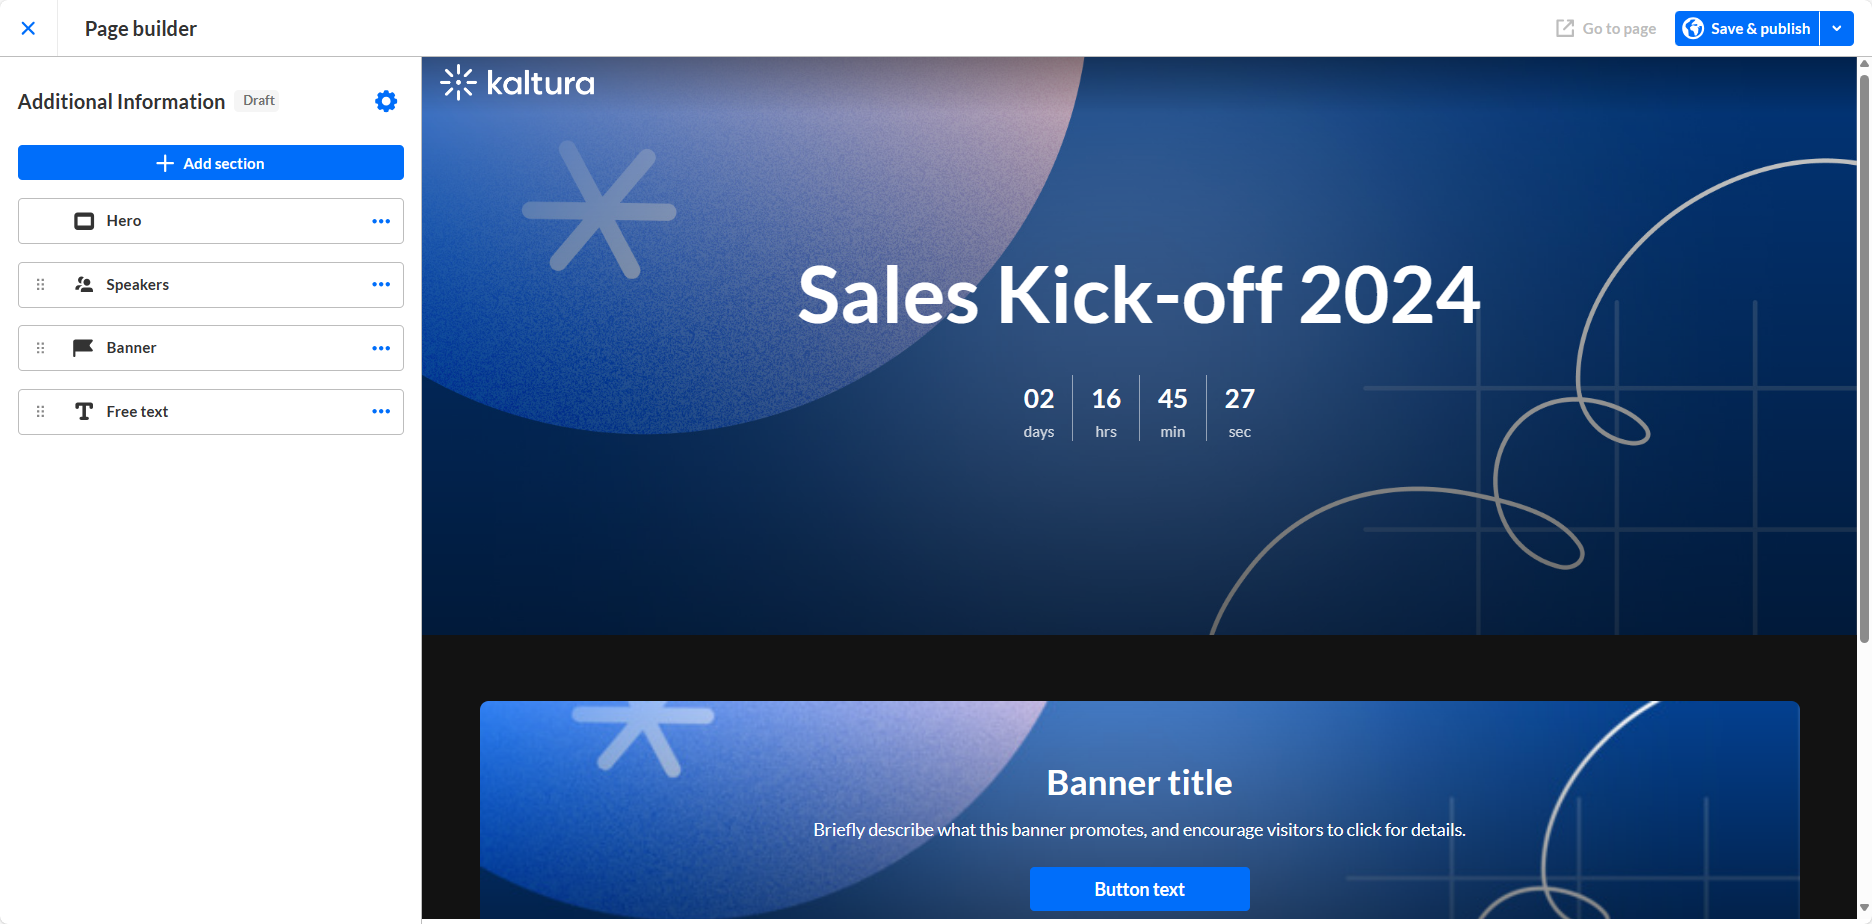
The Page builder displays.

The name of the page and whether the page is published or not is displayed on the upper left corner of the screen.

You will learn how to rename the page and publish it herein.
Page settings
Click the gear "Page settings" icon. The Page settings area displays.

You may edit/add the following information:
Page name - By default, this is set to the name you gave your custom page when you created it. If you would like to change it, delete the pre-filled text and type as desired (char limit is 120). Please note: Characters "<" and ">" are not supported.
Browser tab title (optional) - By default, this is set to the name you gave your custom page when you created it. This title will display on the browser tab of your custom page. If you would like to change it, delete the pre-filled text and type as desired (char limit is 60).
Page URL - By default, this is set to the name you gave your custom page when you created it. This text displays at the end of the page URL after the backslash. This text acts as a unique identifier or quick description of the custom page. Please note: Characters “?” and “#” are not supported and more than one word will be separated by a "-" (dash). You can click Copy URL to copy this URL and share it with your attendees.
Homepage - Set as homepage/Remove as homepage (depending on the status of your page). Select this custom page as your event homepage. The default homepage is Full agenda.
Only one custom page may be set as your event homepage.
In order to set a custom page as your event homepage, the custom page must be Restricted and published. Please note, once a custom page is set as your event homepage, the Navigation setting at the bottom of the Page settings area is disabled.
Who can view this page? If you chose "Public" when you created this custom page, by default, the access is pre-set to Public (anyone on the internet will be able to access this page). If you choose "Restricted" when you created this custom page, by default, the access is pre-set to Restricted (access to this page will be limited to invited or registered users only). You can change access as desired by clicking the appropriate button.
If you chose Restricted access, an additional option displays, Navigation. Choose whether to display this page on navigation once the page is published.
Once you are finished editing the page settings, click Save.
Configuration components
The configuration components are listed on the left side of the screen and the preview of the custom page is shown on the right.
Hero - Background image, event name, dates, live counter, and registration button. (Automatically added to a Public page.)
Agenda - Display your event agenda. (Automatically added to a Public page.)
Speakers - Display your speakers' photos, names, and titles. (Automatically added to a Public page.)
Spotlight video - Feature a key video prominently on the page. Choose autoplay or click to play.
Banner - Grab attention in high-traffic areas with the banner to promote your content.
Free text - Write anything you like.
Images - Two clickable images that are side-by-side, one on the left and one on the right. (Recommendation: 16:9 ratio, 854 x 480 px) Clicking on the images can redirect attendees inside the event site or out of it.
Media - Display a media carousel (in a compact view if desired). Users may click on the media items to view them.
Looking for information about other components? Feel free to contact your Kaltura representative.
Add a component
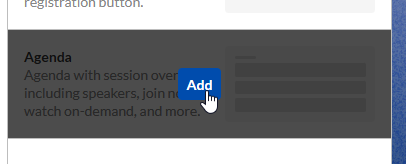
- Click + Add section to add a new component to the custom page. The Add section panel expands to the right and displays a list of available components.

- Hover over the desired component and click Add. (In the image below, the user is shown hovering over the Agenda component.)


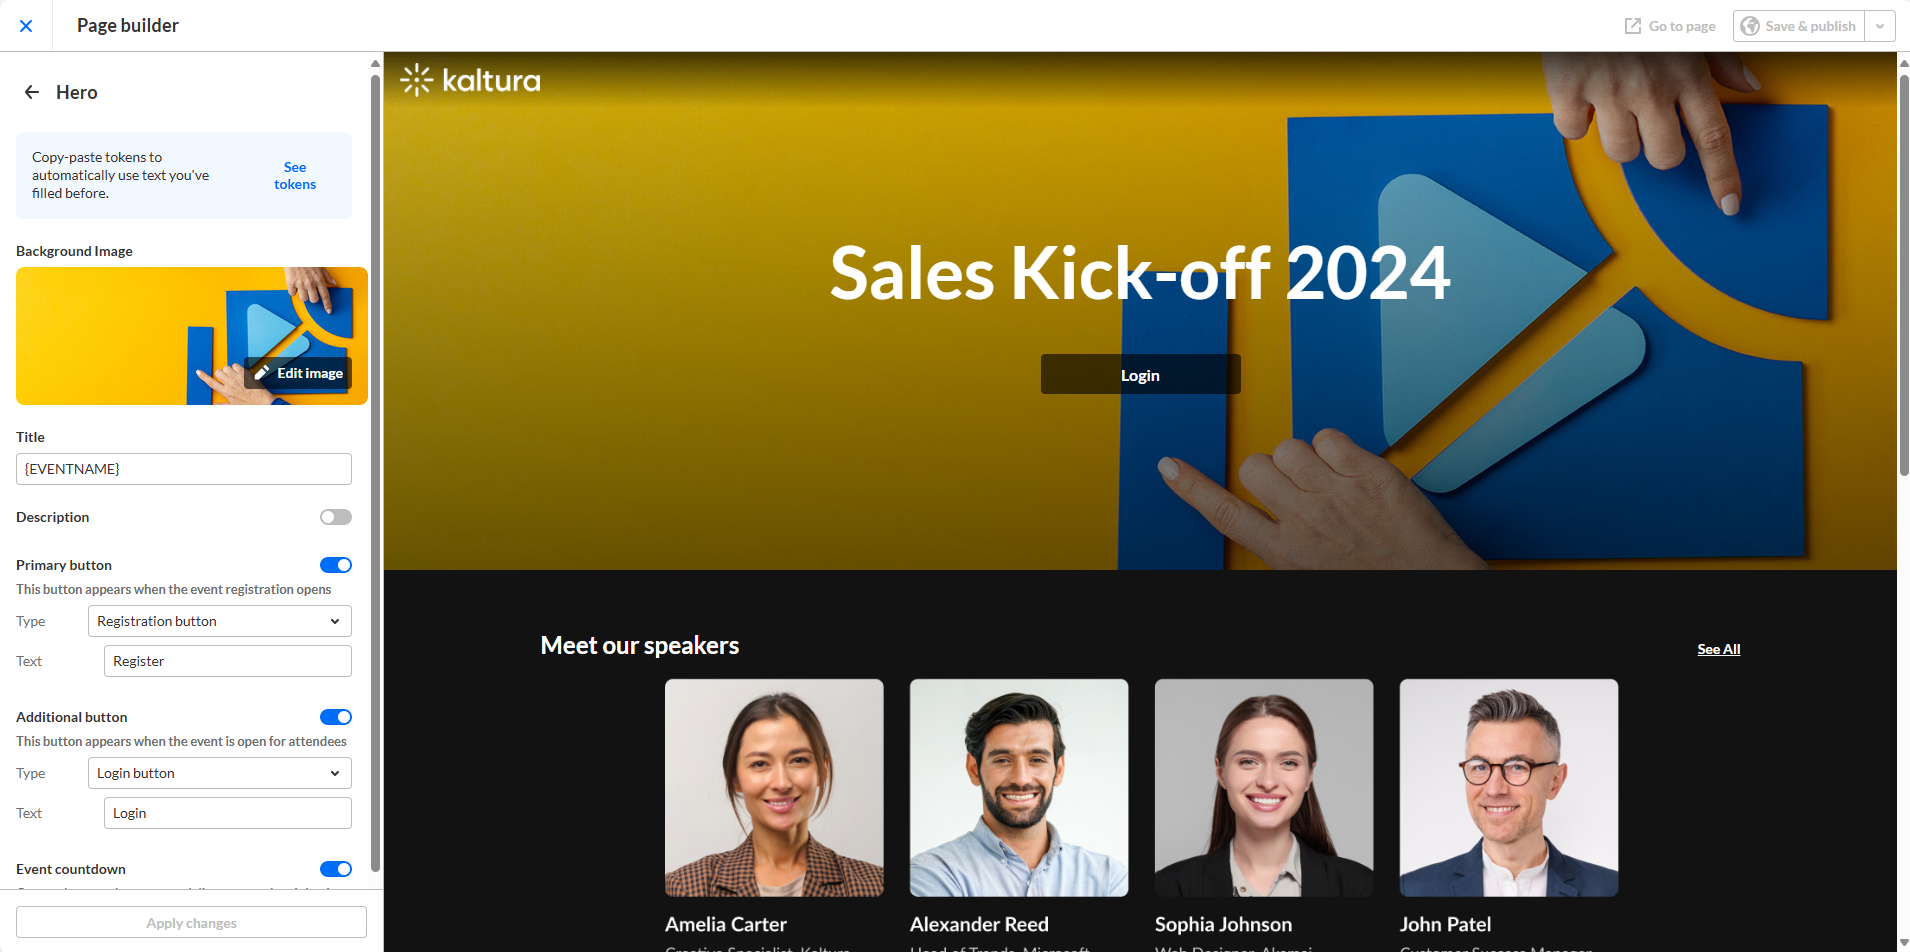
Hero
Click Hero. The Hero component configuration screen displays.

Complete the following:
Background image - The default event banner is taken from the template initial setup. If you wish to insert a different image, click Replace image and choose the desired file.
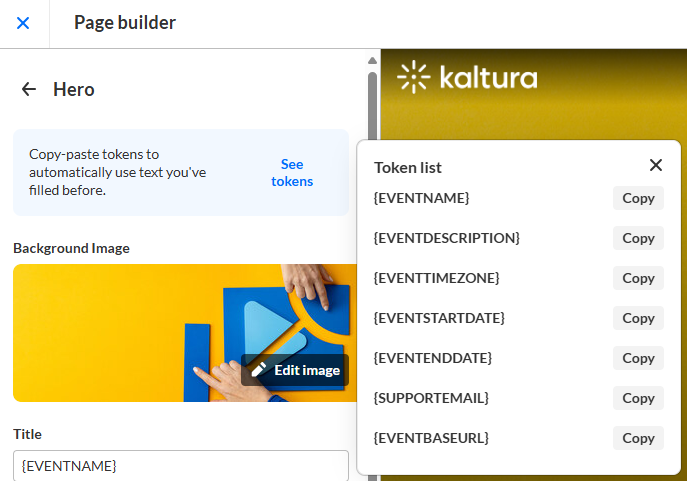
Title - By default, the event title is pre-filled with the token {EVENTNAME}. If you would like to change it, delete the pre-filled text and type as desired. You may also click See tokens to copy a different token from the list that displays on the right.
Description - Click to enable if you would like for an event description to be added to the Hero component. By default, the description is enabled and pre-filled with the token {EVENTDESCRIPTION}. If you would like to change it, delete the pre-filled text and type as desired.
Primary button - Click to enable if you would like for a primary button to be added to the Hero component.
Type - Choose the type of primary button you would like displayed.
Registration - This button displays when the event registration opens.
Login - This button displays when the event is open for attendees.
Custom - This button is one custom built by you.
Text - Type text that will display on the button.
Destination (only applicable for Custom Primary button) - Type the URL your user will be redirected to when they push the button.
Additional button - Click to enable if you would like for another button to be added to the Hero component (in addition to the primary one).
Type - Choose the type of primary button you would like displayed.
Registration - This button displays when the event registration opens.
Login - This button displays when the event is open for attendees.
Custom - This button is one custom built by you.
Text - Type text that will display on the button.
Destination (only applicable for Custom Primary button) - Type the URL your user will be redirected to when they push the button.
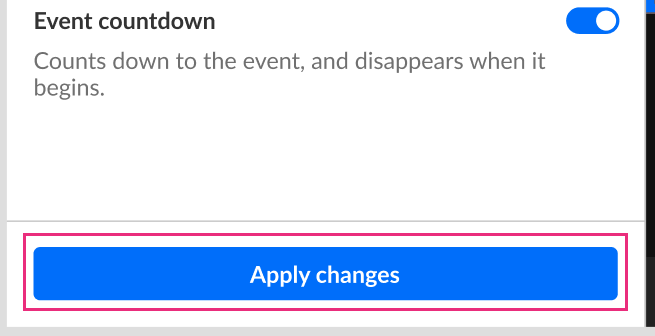
Event countdown - Click to enable if you would like an event countdown to display on your Hero component. This element will countdown to the event and disappear once the event starts.
Note: The Hero component may only be added once (and is already enabled by default). When hovering over a Hero component that has already been added, a notification displays that this component can only be added once.

After you've finished configuring the component, click Apply changes.
Agenda
Click Agenda. The Agenda component configuration screen displays.

Complete the following:
Title - Click to enable if you would like a title to display on your Agenda component. Type a title as desired. By default, the title is enabled and pre-filled with "Agenda".
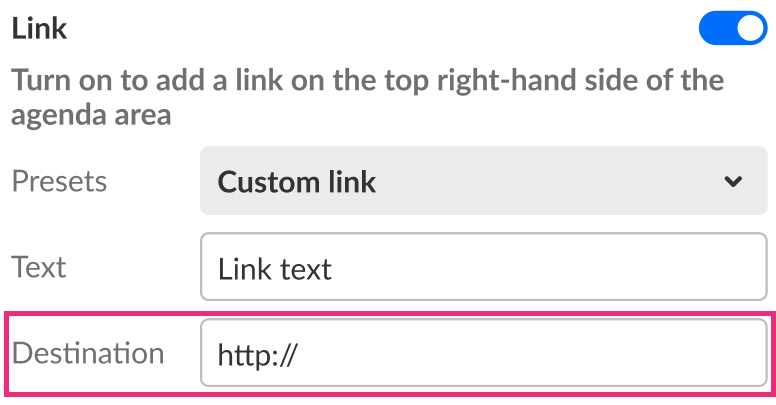
Link - Click to enable if you would like to display a link on the top right-hand corner of the Agenda component.
Once enabled, additional options display.

- Presets - Choose from a list of existing published custom pages to link to. You may also choose Custom link to link to a page that's outside of the event site.
- Text - Type text that will display on the link.
- Destination (only applicable for Custom link) - Type the URL your user will be redirected to when they click the link.

Agenda content - Choose to display all content on the Agenda component of your custom page, or filter content based on session tags.

If you choose Filter by tags, an additional field displays - Select. Click in the Select field. A list of available tags display (the list of available tags is driven from the tags used on the agenda sessions).

You can click on the Settings icon and decide whether you want sessions including ANY of the selected tags to be displayed on the Agenda component, or if you want sessions with ALL of the selected tags to be displayed on the Agenda component. Once you've made your selection, click Done.

In our example below, we have clicked the checkboxes to filter the Agenda component by the tags "Keynote", "Sales", and "Tech".

You may also start typing the first few letters of a tag and a list of matching tags will populate for you. You may then click the checkbox to filter by that tag.

Sessions order - Choose how you would like the sessions sorted in the Agenda component, either earliest first or latest first.
After you've finished configuring the component, click Apply changes.
Speakers
Click Speakers. The Speakers component configuration screen displays.

Complete the following:
Display - Choose how your speakers will be displayed on the component - either in a carousel format or in a list.
Title - Type a title as desired. By default, the title is pre-filled with "Meet our speakers".
After you've finished configuring the component, click Apply changes.
Spotlight video
Click Spotlight video.
A list of videos (in "Ready" status) that are currently uploaded to your event site media. Click Select next to the video you would like to spotlight on your custom page. Note - If you haven't uploaded any videos to your event site, the Select video screen will be empty, and you will be prompted to upload videos via the Media tab in Events.

The Spotlight video component configuration screen displays with your selected video displayed in a small player under the Video section and in a large player in the component's preview section. You may interact with the video in both places (i.e., play, pause, skip, etc.).

Complete the following:
Select from Media - Click to select a different video to spotlight on your custom page.
Autoplay video - Enable this option to allow playback to start automatically. When enabled, the playback will start for the viewer in muted mode.
Title - Type a title as desired.
Description - Click to enable if you would like for a description to be added to the Spotlight video component. Type as desired.
Layout - Choose where the spotlight video will be displayed on the component - either on the left or right side of the screen.
After you've finished configuring the component, click Apply changes.
Note about duplicating events with Spotlight video:
When you duplicate an event that includes a Spotlight video component on a custom page, the component is copied but the video is not. After duplication, you must select a new video for the Spotlight video component in the duplicated event.
Banner
Click Banner. The Banner component configuration screen displays.

Complete the following:
Background image - The default event banner is taken from the template initial setup. If you wish to insert a different image, click Replace image and choose the desired file.
Title - Click to enable if you would like a title to display on your Banner component. Type a title as desired. By default, the title is enabled.
Description - Click to enable if you would like for an event description to be added to the Banner component. Type as desired. By default, the description is enabled.
Primary button - Click to enable if you would like for a primary button to be added to the Banner component.
Text - Type text that will display on the button.
Destination - Type the URL your user will be redirected to when they push the button.
After you've finished configuring the component, click Apply changes.
Free text
Click Free text. The Free text component configuration screen displays.

By default, the Free text component is pre-filled with the event description, indicated by the token {EVENTDESCRIPTION}. If you choose to keep this pre-filled text, simply click the arrow to the left of the component name. This will take you back to the main view. If you would like to change it, delete the pre-filled text and type as desired. You may also click See tokens to copy a different token from the list that displays on the right.
After you've finished configuring the component, click Apply changes.
Images
Click Images. The Images component configuration screen displays.

Complete the following:
Left image - The default event banner is taken from the template initial setup. If you wish to insert a different image, click Replace image and choose the desired file. (Recommendation: 16:9 ratio, 854 x 480 px)
Destination link - Type the URL your user will be redirected to when they click on the image.
Open in new tab - Choose if clicking on this link will open a new tab for your users.
Right image - The default event banner is taken from the template initial setup. If you wish to insert a different image, click Replace image and choose the desired file. (Recommendation: 16:9 ratio, 854 x 480 px)
Destination link - Type the URL your user will be redirected to when they click on the image.
Open in new tab - Choose if clicking on this link will open a new tab for your users.
After you've finished configuring the component, click Apply changes.
Media
Click Media. The Media component configuration screen displays.

Complete the following:
Title - Type a title as desired. By default, the title is pre-filled with "Media".
Layout - By default, three clickable media items are displayed on the carousel. If compact view is enabled, four clickable media items are displayed on the carousel instead, as shown below.

After you've finished configuring the component, click Apply changes.
Edit, duplicate, or remove a component
- Click the three blue dots to the right of the component title to edit, duplicate, or remove that component. Note - Actions are component-specific AND many depend on whether the component is already added. For example, you may not duplicate the Hero component, so "Duplicate" will not display as an option for the Hero component.
Example: Free text actions when a Free text component has already been added to the page -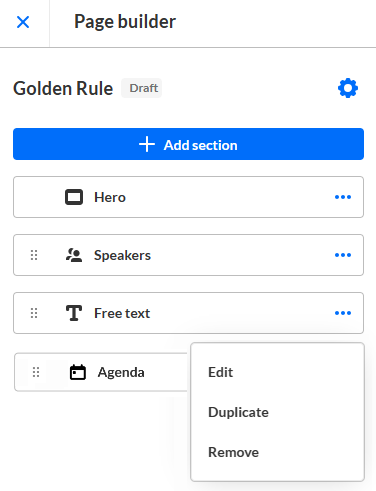 Example: Hero action -
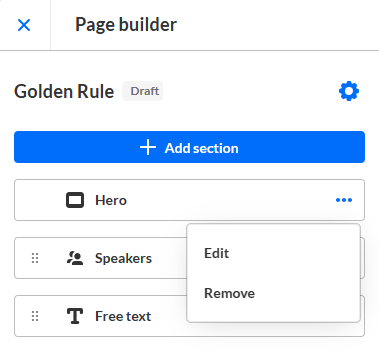 For the purposes of this article, we've chosen to edit the Hero component.
- Edit the following:
- Edit image - Replace the Hero component image.
- Title - By default, this is set to the Event Name, indicated by the token {EVENTNAME}. If you would like to change it, delete the pre-filled text and type as desired. You may also click See tokens to copy a different token from a list that displays on the right.
- Description - Enable or disable. When enabled, by default, this is set to the event description, indicated by the token {EVENTDESCRIPTION}. If you would like to change it, delete the pre-filled text and type as desired. Here, too, you may also click See tokens to copy a different token from the list that displays on the right.
- Primary button - Enable or disable. When enabled, you may choose the type of primary button (Registration, Login, or Custom), the text for the primary button, and (in the case of Custom), the Destination (set by default to the event base URL, indicated by the token {EVENTBASEURL}). The behavior of each type of button is as follows:
Registration button - Displays when the event registration opens.
Login button - Displays when the event is open for attendees.
Custom button - Displays at all times. - Additional button - Enable or disable. When enabled, you may choose the type of primary button (Registration, Login, or Custom), the text for the primary button, and (in the case of Custom), the Destination (set by default to the event base URL, indicated by the token {EVENTBASEURL}). The behavior of each type of button is as follows: Registration button - Displays when the event registration opens.
Login button - Displays when the event is open for attendees.
Custom button - Displays at all times. - Event countdown - Enable or disable the Event countdown which counts down to the event and disappears when the event begins. If disabled, the default text shown on the Lobby page is "Coming soon".
- Once you are finished editing the component, be sure to click Apply changes.
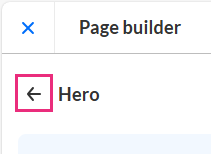
- Go back to the main view by clicking the arrow to the left of the component name.
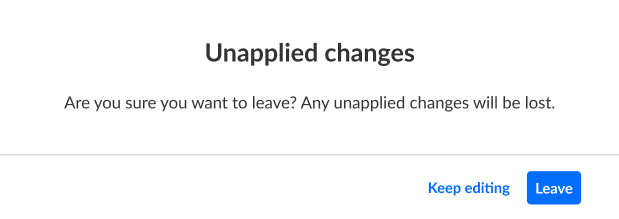
 Note - If you attempt to go back before you have clicked the Apply changes button, you will be notified that you have unapplied changes. You may click Keep editing to return to editing mode and apply changes, or you may click Leave and lose all unapplied changes.
 Example: Hero action -
 For the purposes of this article, we've chosen to edit the Hero component.


 Note - If you attempt to go back before you have clicked the Apply changes button, you will be notified that you have unapplied changes. You may click Keep editing to return to editing mode and apply changes, or you may click Leave and lose all unapplied changes.

Reorder components
You may reorder the components by dragging and dropping them into the desired order.

The Hero component is the only component that is not movable.
Go to the custom page
Click Go to page in the upper right corner of your screen to navigate to the custom page and see how it looks!

Before the custom page is published, button is grayed out a tool tip displays that reads, "You'll be able to view the page once it's published".
Publish your changes to the custom page
Once you are happy with your new custom page, you may save and publish it to the event site by clicking Save & publish.

OR
You may click the carrot "pull-down" icon to the right of Save & publish and select Save without publishing. This saves the page as a draft. You may then come back later and publish the custom page when you're ready.

Either way, you are redirected to the Event site editor page, and you receive confirmation that your changes were saved successfully.
Custom pages - Additional functionality
In time, you will have many custom pages created for your event. Every time a custom page is created, it displays in a list in the Custom pages area of the Event site editor.

Additional functionality related to Custom pages is described below.
Sort by page name
Click the carrot "sorting" icon to sort the custom pages alphabetically by page name.

View custom page once it's published
You may click the go to page icon to the right of the custom page name to navigate to the custom page and see how it looks!
Before a custom page is published, this button is grayed out and a tool tip displays as follows:

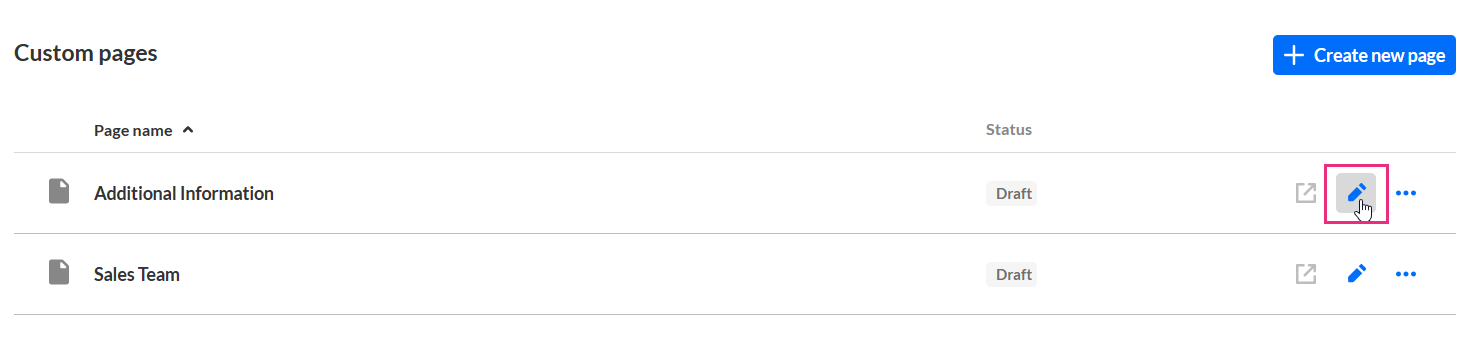
Edit an existing custom page
- Click on the name of the custom page OR click pencil "edit" icon to the right of the custom page name.
 The page builder displays.
- Make desired edits to the custom page. Start here if you need a re-fresher.
 The page builder displays.

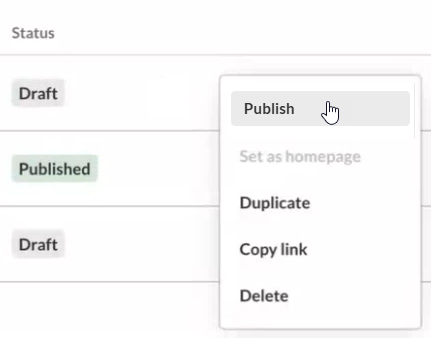
Publish/Unpublish a custom page
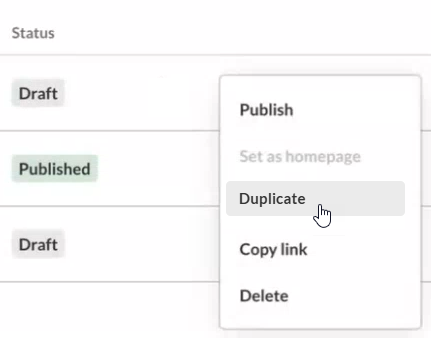
- Click the three-dot button to the right of the custom page name and choose Publish/Unpublish (depending on the status of your page). In our example below, the draft custom page has yet to be published, so the option is to publish.
 You are asked to confirm your action.
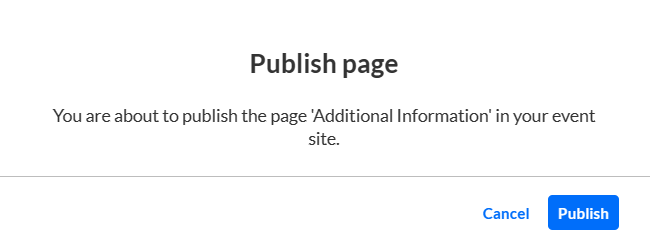
- Click Publish to confirm or Cancel to exit.
 You are asked to confirm your action.
Set/Remove as homepage
In order to set a custom page as your event homepage, the custom page must be Restricted and published.
- Click the three-dot button to the right of the custom page name and choose Set/Remove as homepage (depending on the status of your page). In our example below, the published custom page has yet to be is not set as the event homepage, so the option is to Set as homepage.
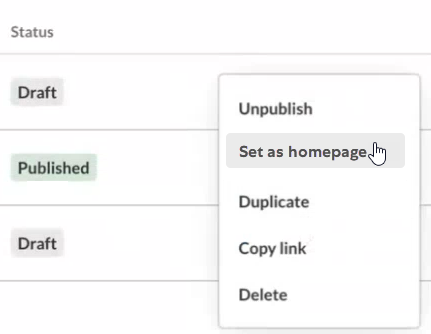 You are asked to confirm your action.
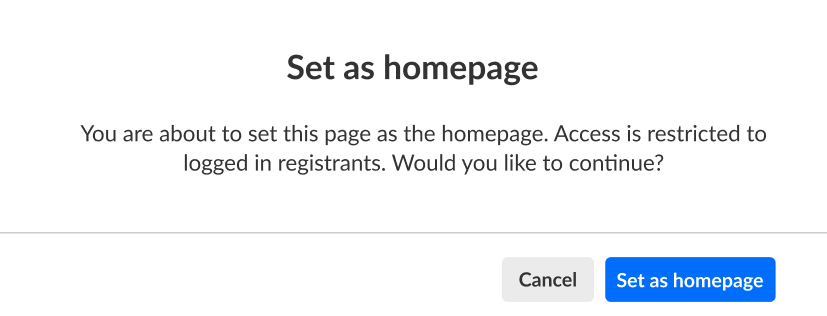
- Click Set as homepage to confirm or Cancel to exit.
 You are asked to confirm your action.
A custom page set as the event homepage may not be unpublished or deleted.
Duplicate a custom page
- Click the three-dot button to the right of the custom page name and choose Duplicate.
 The Duplicate page screen displays.
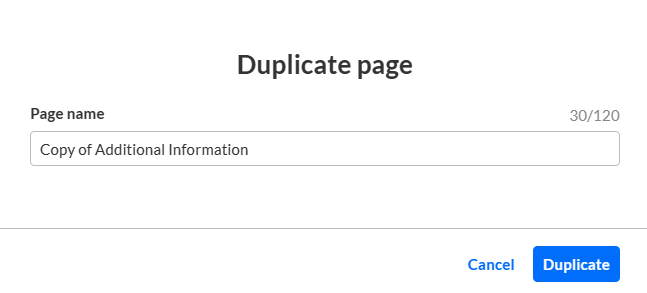
- By default, the Page name set to "Copy of [the name of the custom page you are duplicating]." Delete the pre-filled text and type as desired (char limit is 120). Please note: Characters "<" and ">" are not supported.
- Click Duplicate to duplicate the page. You may also click Cancel to exit the action.
If you clicked Duplicate, Page builder opens allowing you to edit the duplicated custom page as desired. Start here if you need a re-fresher.
 The Duplicate page screen displays.
Copy the link to a custom page
Click the three-dot button to the right of the custom page name and choose Copy link.

This way you can share the link to the custom page with your attendees.
Delete a custom page
- Click the three-dot button to the right of the custom page name and choose Delete.
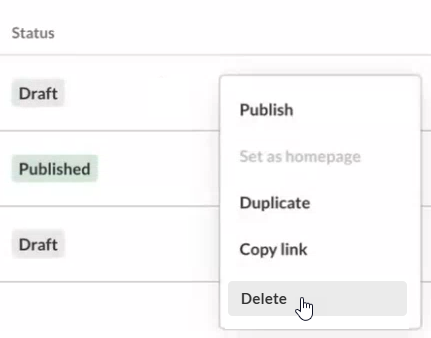 You are asked to confirm your action. This is a permanent deletion of the custom page.
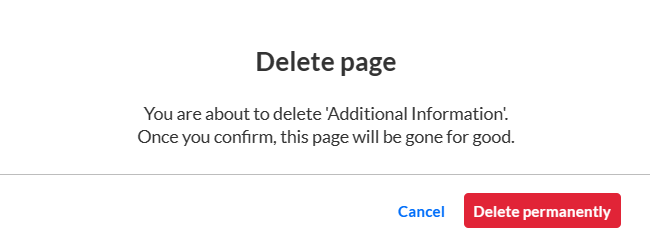
- Click Delete permanently to confirm or Cancel to exit.
 You are asked to confirm your action. This is a permanent deletion of the custom page.
