Overview of Live Encoding
Live content needs to be thought about a little differently from on-demand content.
- The production and management workflows are different
- The objective is to deliver content that has time relevancy, for example sport, news, weather, executive announcements, etc. Due to the nature of relevancy, the margin for error on live content is extremely low
- Live content needs to consistently hold attention, therefore much thought needs to be put into how content is packaged to make it interesting and relevant to watch. There is a cost associated with this approach.
- Live content can be pulled from different areas - for example content may be licensed or content may be created by your production team.
The following diagram illustrates a typical live workflow that spans production through to delivery.

Live Production Management Checklist
Executing a live production successfully requires focus and resources in several areas. The following is a basic checklist for you to get started:
- Clean content ingestion from production
Make sure to get your content feed from your production team - which includes video in the correct dimensions, frame rate and with properly mixed audio (the correct levels). - IT support
Make sure to have the correct speed internet line for outbound streams, and bandwidth that is dedicated to this task. - Use appropriate encoders
Make sure to use encoders that support the number of bitrates you have chosen to output, and that off reliability which aligns with the profile of your event. - Security and authentication
For sensitive content that is broadcast to a closed audience, be sure to send your content to a player that is embedded in a secure environment - for example a closed MediaSpace or SharePoint instance. - Audience development, marketing and management
How will your audience find your live content? Make sure to put the necessary marketing in place to draw viewers to your event. How will your audience get support? Make sure you are prepared to provide technical and account support to viewers. - Compliance and Live Captions
For viewers that require viewing assistance or would like to view content in a different language, be sure to integrate live closed captions into your content.
Connectivity and Basic Hardware
Kaltura delivers to many devices and platforms. While streaming protocols are supported on many viewing devices, Kaltura live features with the Kaltura player are tested on all Kaltura player supported platforms.
System Requirements
The following specification outlines the basic system requirements for viewers watching live content.
- A wide number of devices are supported -across Mac, PC, mobile devices, TVs, gaming consoles and more
- Adobe Flash Player 10.0.32 or above (devices supporting Flash only)
- Internet Explorer 8.0 or above, Firefox 2.0 or above, Safari 3.0 or above, Chrome 4.0 or above
- Microsoft Windows XP SP2, Microsoft Windows Vista, Macintosh OS X v10.4 or above, or Linux
- 256 megabytes (MB) of RAM - 512 MB recommended
- JavaScript and Cookies must be enabled.
- Super VGA (800 x 600) or higher resolution
- 16-bit sound card
- Speakers/headphones
Internet Connection Speed Test
Viewers require the following internet connections to successfully view live video:
- For a reliable viewing experience, viewers should have access to download speeds approximately 50% faster than the bitrate they are trying to view. For example, a viewer trying to watch a 700kbps live stream, should have access to a 1.4Mbit/sec (down) internet line. Bear in mind that consumer internet connections are typically not dedicated and speeds fluctuate according to shared usage.
- By referencing the above example, you should be able to estimate what internet speeds your viewers required based on the live bitrates you send out from your encoder.
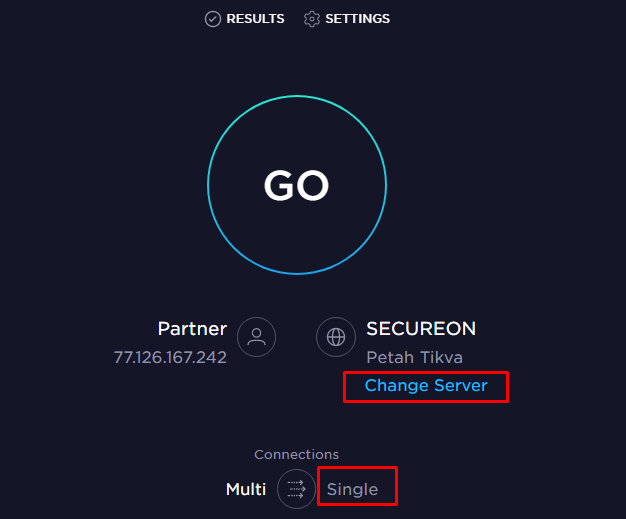
- You can test your encoder upload speed by going to: https://www.speedtest.net/
Make sure to:
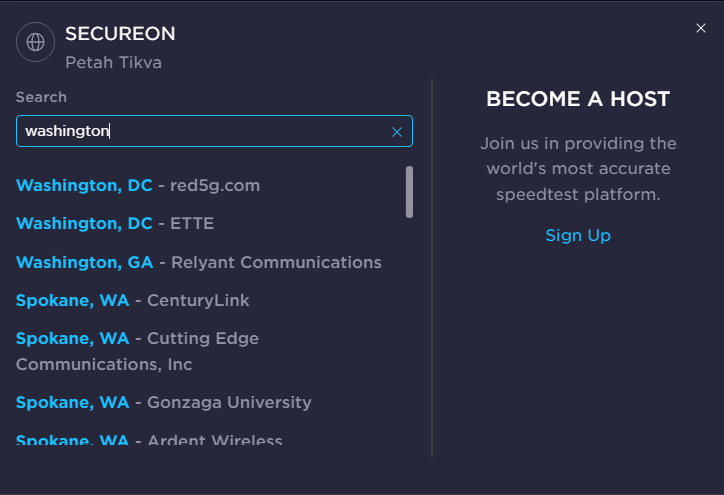
1. Select single and not multi connections
2. Select a server in Washington USA
 Once you press the go button, the test will return with 3 metrics: Ping, Download, and Upload. The metric that will determine your broadcast throughput in the upload.
- We recommend testing several times as bandwidth can fluctuate.
 Once you press the go button, the test will return with 3 metrics: Ping, Download, and Upload. The metric that will determine your broadcast throughput in the upload.
Broadcasting to Kaltura
The following are the minimum recommended encoder hardware and internet line specs for broadcasting live video to Kaltura. Hardware specs are most relevant to software encoders that are installed on a PC or Mac. If you are using a dedicated hardware encoder, the below hardware specs are less relevant - refer to your encoder output specs that came with your device.
Minimum System Requirements for Broadcasting
- Intel Core 2 Duo 2Ghz or Higher
- 4GB RAM
- 1Mbit/sec upload bandwidth
- Dedicated video card, 256MB VRAM
- Windows XP / Vista or Mac OS X 10.5 or higher (v20.0.89)
Recommended System Specifications for Broadcasting
- Quad Core CPU
- 4GB RAM
- 2Mbit/sec upload bandwidth
- Dedicated video card, 512MB VRAM
- Windows Vista / Windows 7 or Mac OS X 10.5 or higher (v20.0.89)
Optimal (for HD Multi-Bitrate Streaming)
- Quad Core i7-2600 series CPU or better
- 8GB RAM
- 5Mbit/sec or better upload bandwidth
- Dedicated video card, 512MB VRAM
- Windows Vista / Windows 7 or Mac OS X 10.6 or higher
It is a best practice to broadcast from your encoder over wired Ethernet connection. However, if you do need to broadcast over wireless, try to make sure that your wireless hub is not shared with other users that may be concurrently utilizing bandwidth. If you need to broadcast over a cellular connection, it is recommended that you use a bonded solution that combines cellular connections from multiple carriers into a single high-speed output. For an example of a bonded solution -http://teradek.com/pages/bond.
Selecting an Encoder
What kind of encoders you choose should depend on the nature of your broadcast. Here are a few key questions to consider before making a decision:
What type of Event are you Running?
- High-end event with large visibility.
- Lower-end event with small visibility.
Mission Criticality
If the broadcast fails, how serious of an issue is it?
- Very serious.
- Manageable.
Duration of event
How long is your event?
- Full-day / multi-day .
- A few hours.
Production value?
- Professionally produced or premium content.
- Informal or unprofessional content.
Multi-bitrate vs single-bitrate
- Multi-bitrate output required.
- Single-bitrate output required.
Static vs Mobile
- The encoder will be static or rack mounted.
- The encoder needs to be mobile or used in the field.
How will content be ingested?
- Via an uncompressed broadcast feed - HD-SDI, IP or Fiber
- Via a prosumer-type feed - HDMI, component, composite, etc
Require remote management?
- The encoder needs to be remotely managed over a local network or from off-sit.e
- The encoder will be managed in-person.
Redundancy Required?
- The encoder needs redundant power supply, CPUs and GPUs to guarantee uninterrupted broadcast should any hardware fail.
- No redundancy is required.
If your answers to these questions are mostly #1's, an enterprise-grade encoder is likely a good fit for your use-case. If your answers are mostly #2's, a lower-end encoder is likely a good fit for your use-case.
|
Enterprise-Grade |
Prosumer-Grade |
|
Digital Rapids (Imagine Communications) StreamZ Live |
Telestream WireCast |
|
Elemental Live |
Flash Media Live Encoder |
|
Envivio Muse Live |
Teradek Cube / Vidu |
|
Haivision Kulabyte |
|
For additional information about Akamai Encoders, see the article: AkamaiHD EncoderGuidelines..
For additional information about the supported encoders for Kaltura Live streaming, see the article: What encoders can I use with the Kaltura Live streaming?
Determining an Encoder's Capabilities
It is important to understand the capabilities of the software and hardware used to encode live streams and how streams are sent to Kaltura.
Depending on what Kaltura live entry configuration you have chosen, your encoder will either be encoding and outputting single or multiple RTMP streams. This process involves ingesting a feed from production, and encoding this feed into H.264 before outputting over IP to Kaltura.
- Single bitrate streams are less resource intensive on your encoder, since only one stream is being encoded to H.264
- Multi-bitrate streams are more resource intensive on your encoder, since multiple streams needs to be concurrently encoded to H.264
- HD streams (720p, 1080p) are more resource intensive on your encoder than smaller definition streams (360p, 540p)
Monitoring your Encoder
Most encoders in the market today provide some kind of real-time status information on live stream output:
- CPU Usage
Whatever your configuration - single or multi-bitrate output - your CPU usage should not exceed 80% - 85%. - GPU Usage
If you are using an encoder that harnesses both CPU and GPU, your usage on both should not exceed 80% - 85%. - FPS (frame per second or frame-rate)
Your fps should consistently be close to the rate configured on your encoder. For example, if you configured your encoder to output 24fps then the realtime log should show output at approximately 22fps - 25fps. If the fps drops significantly lower than this, check your Dropped Frames log. - Buffer Usage
Many encoders let you configure a buffer, often from 0 - 2000ms. The encoder buffer helps to send out streams without compromise on slower internet lines. If you are dropping frames and are using a slower internet line, try increasing your buffer. A fast internet line (50%+ faster than your combined output bitrate) would use a buffer of approximate 300ms whereas a slower internet line (10% - 20% faster than your combined output bitrate, or a line that is not dedicated). - Dropped Frames
If you are consistently dropping frames, either your encoder CPU/GPU usage is too high and therefore your encoder cannot handle the output that has been configured or your internet line is too slow. Dropping frames will cause your live picture to appear jerky. - Bitrate
If you have configured your encoder to stream using CBR (constant bitrate that does not fluctuate), your output bitrate should match your configuration. When using CBR, if the bitrate is dropping, your internet line may not be fast enough. If you have configured your encoder to stream using VBR (variable bitrate that fluctuates according to picture detail), your bitrate will fluctuate somewhat. - Flash Queue
Certain encoders, such as Wirecast, display a Flash queue which shows how much data is currently buffered on your machine waiting to be transferred to the server. Your Flash queue should be low or empty. If your Flash queue is close to full or completely full, your output bitrate is too high for your internet line or the CPU.

Wirecast Real Time Logs
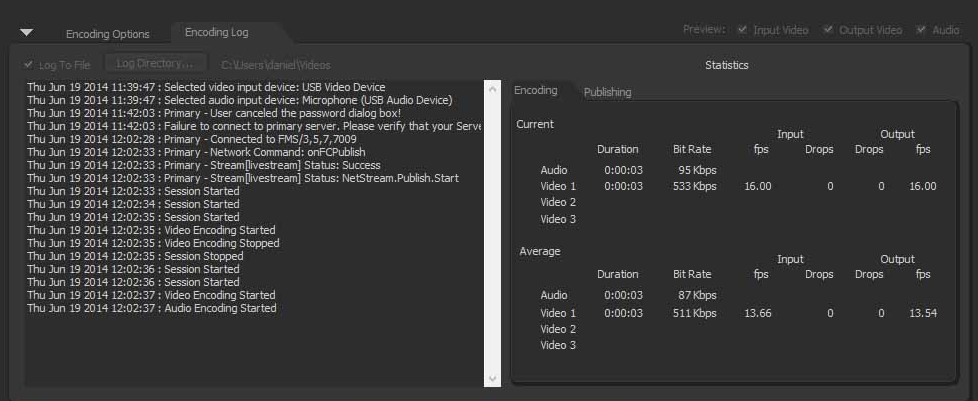
FMLE Real Time Logs
Configuring an Encoder
There are two core areas of your encoder that need to be configured:
Stream Settings
After you have created a live entry in Kaltura, you can navigate the Edit Entry window and grab your live stream details to input into your encoder.
- Primary RTMP URL
- Backup RTMP URL
- Stream Name
- Username (Universal Streaming only)
- Password (Universal Streaming only)
You need to copy these details, configure a single or multi-bitrate RTMP stream in your encoder, and paste the details into the fields provided.
For single-bitrate output, your Stream Name will need to either have a '%i' variable or a '1' at the end. Which option is used depends on your encoder.
For multi-bitrate output, your Stream Name will need to either have a '%i' variable or sequential numbers for each stream at the end. For example, stream #1 would have the stream name sdflhsdf_1 and stream #2 would have the stream name sdflhsdf_2.
Encoder Settings
You also need to configure the encoder settings to use for each output stream:
- Basic Settings
- Advanced Settings
Basic Settings
- Video Bitrates - Video bitrate equates to quality. The higher the bitrate, the better the quality. However, bitrates need to be downloaded by viewers in order to view content, therefore it is important to pick bitrates that will reach the widest audience possible, at quality levels that are acceptable.
|
Bitrate Recommendations per Dimension | |
|
Dimension |
Bitrate Range |
|
640 X 360 |
400kbps - 800kbps |
|
960 x 540 |
600kbps - 1200kbps |
|
1280 x 720 |
900kbps - 2000kbps |
|
1920 x 1080 |
1500kbps - 3000kbps |
- Video Dimensions -Each stream that is sent out requires a dimension. As a rule of thumb, never stream a higher dimension than what is being ingested into your encoder. For example, if you receive 720p from production you shouldn't stream at 1080p. For standard 16:9 dimensions and associated bitrates, please see the table above.
- FPS (frame per second) - As a rule of thumb, you will want to stream content matching the fps that is used on ingest into the encoder. For example, if you receive 30fps from production, you should stream at 30fps. Typical frame rates include 23.98, 24, 25, 29.97, 30, 50 and 60 fps. Higher frame rates are best suited to high motion video like sports.
- Audio Bitrates - equates to quality. As a rule of thumb, try to pick either 96kbps, 128kbps or 192 kbps for audio output, with the higher bitrate being the better quality.
- Audio Sample Rates -Audio sample rates should be matched with what is ingested into your encoder from production. Typical sample rates include 41KHz and 48KHz.
Advanced Settings
- Buffer Size - The buffer value helps to ensure full fps and bitrate output on internet lines that may need be very fast. Buffer values typically range from 0ms - 2000ms. A fast internet line (50%+ above the total output bitrate) would use a buffer of approximately 300ms while a slower internet line (10% - 20% above the total output bitrate) would use a buffer closer to 1500 - 2000ms.
- CBR vs VBR - The Constant BitRate (CBR) option maintains a steady streaming bitrate and does not fluctuate according to picture complexity, while the Variable BitRate option fluctuates the output bitrate depending on picture complexity and typically has a threshold, for example 150% above the target bitrate. Using VBR with a high threshold can cause more flavor changes during adaptive streaming, so it is a best practice to bring this threshold down to between 110% - 120%. CBR on the other hand does not cause quite as many flavor changes, but can sometimes produce a lower quality picture during segments of high motion or picture complexity.
- Keyframe Interval - Keyframes are individual frames of video that have a full set of image data, they do not reference any other frames. Video playback always needs to start on a keyframe, therefore it is important to set a consistent keyframe interval on your outgoing streams. The keyframe interval for Kaltura live streams must be 2 seconds.
- Compression profile - The H.264 codec supports 3 different output profiles - Baseline, Main and High. Each successive profile adds a few extra features and an increase in quality, at the cost of slightly less device support. So for the widest device support, Baseline is the preferred profile. For the best quality, especially in HD, the High profile is better but may not be supported on older devices.
Your Checklist
- Use Ethernet where possible, as opposed to wifi or cellular connections
- Use a dedicated line where possible, as opposed to a shared line
- Best practice is to utilize a line that has uplink speed at 50%+ your combined bitrate output.
- For example, when sending a 1500kbps, 1000kbps and 500kbps feed (totaling 3000kbps), utilizing a line that can upload 4500kbps and up.
Live Adaptive Bitrate Available Broadcast
Adaptive bitrate is the process by which the player pushes the correct flavor (bitrate) to the viewer according to the viewer's internet connection speed. In order for live video to take advantage of adaptive bitrate, multiple flavors of a live video need to be concurrently pushed to the player.
How is this achieved?
- Using Kaltura Live (Passthrough), the encoder sends multiple RTMP streams at various bitrates to the same URL
- Using Kaltura Live+ (Cloud Transcode), the encoder sends a single high-bitrate RTMP stream to the URL, and Kaltura's servers create live flavors in the cloud
- Using Kaltura Universal Streaming (Passthrough), the encoder sends multiple RTMP streams at various bitrates to the same URL
- Using adaptive bitrate is a best practice, as it allows live video to be viewed by a wider audience using varying internet connections. While the player will automatically push the best suited live flavor to the viewer, the viewer can also force a specific live flavor using the Flavor Selection button on the player when it is enabled in the Rich Media CMS Studio.
Setting up Live Entries in the Rich Media CMS
Configure Your Transcoding Profile
Kaltura Live Streaming includes Kaltura Live (Passthrough) and Live+ (Cloud Transcode)
Before creating new live entries in the Rich Media CMS, you will need to make sure that your live transcoding profile settings are configured to align with your particular use-case. See How to Set Transcoding Profiles for Live Streaming.
- In the Rich Media CMS, navigate to: Settings > Transcoding Settings > Switch to Advanced Mode (bottom left) > Switch to Live Profiles Mode (bottom left)
You should see all your live transcoding profiles. Out the box, two profiles should exist in this area:
- Cloud Transcode for Kaltura Live+
- Passthrough for Kaltura Live
Configuring the Cloud Transcode Profile
To configure the Cloud Transcode profile
- Click on the Cloud Transcode profile.
You will see checkmarks next to all the flavors that will be created by Kaltura's servers when receiving a single stream from your encoder, plus the Source flavor (the flavor sent by the encoder) - Configure what flavors you would like to create by checking and unchecking the relevant boxes
If you do not see a flavor that you would like to use, please reach out to support or your CSM to have a custom flavor added to your Partner ID
You will see 2 Ingest flavors in this window, which allow you to leverage a hybrid configuration whereby Kaltura creates live flavors from your source bitrate, but also ingests and passes through 2 additional flavors to the player. In this case, you would be sending through 3 flavors from your live encoder. - Click Save.
You are now ready to create live entries.
Configuring the Passthrough Transcode Profile
To configure the Passthrough Transcode profile
- Click on the Passthrough Transcode profile.
You will see checkmarks next to the Source flavor as well as a number of Ingest flavors that will pass through Kaltura's servers and be sent directly to the player. - Configure what flavors you would like to ingest by checking and unchecking the relevant boxes. For example, if you plan to send 3 live flavors from your encoder, you will need to check boxes next to the Source, Ingest 2 and Ingest 3 flavors.
If you do not see a flavor that you would like to use, please reach out to support or your CSM to have a custom flavor added to your Partner ID. - Click Save.
You are now ready to create live entries.
Creating a Live Stream Entry
To create a live stream entry
- See the Workflow for Setting up Live Streaming.
- Pick the live stream type from the drop down.
- Kaltura Live Streaming includes Kaltura Live (Passthrough) and Live+ (Cloud Transcode)
- Kaltura Universal Streaming bypasses Kaltura, and sends streams directly to the Akamai CDN. This option is follows a passthrough-type workflow.
- Manual Live Stream URLs allow feeds to be pulled directly from the CDN into the player that are being broadcast by a 3rd party.
Kaltura Live and Live+ both offer Live-to-VOD and a 2hr DVR window, Universal Streaming does not offer Live-to-VOD and offers only a 30min DVR window.
- After you select the stream type:
- Kaltura Live and Live+
- Give your stream a name.
- Choose between Cloud Transcode and Passthrough workflows.
- Enable or disable DVR.
- Enable or disable recording (Live-to-VOD).
- Recording comes with 2 additional options - Append to Single Entry and Create New Entry. Append to single entry will always add recordings to the end of the original VOD entry each time you start and stop broadcasting from your encoder. Create new entry will always create a new unique VOD entry each time you start and stop broadcasting from your encoder.
- Select Create Live Stream.
- Universal Streaming
- Give your stream a name.
- In each IP field, enter a pingable IP address that is close to the location that your encoder will broadcast from. This allows Akamai to provision an endpoint that is geographically close to the streaming location to accept the output streams from the encoder.
- Optionally, enter a broadcast password.
- Enable or disable DVR.
- Select Create Live Stream.
- Manual Live URLs
- Give your stream a name
- Enter both your HDS and HLS URLs that have been provided by the 3rd party streaming to the CDN.
- If the Akamai protocol is used on your HDS stream, check this box.
- Kaltura Live and Live+
Addtional Options
- After you created your entry, you can access the entry via the entries table.
- Clicking on the entry opens the Edit Entry window
- Navigating to the Live Stream tab will show the details needed to enter into your encoder (Kaltura Live, Live+ and Universal Streaming only).
