Introduction
This article explains how to stream a playlist of pre-recorded videos as a Live Stream, using Kaltura and several free, open-source tools. Streaming pre-recorded videos as a "Live Linear" stream provides many benefits for certain use cases. It ensures that viewers view the content sequentially, without skipping backward or forward though the playlist (like watching TV). It also allows a live stream to be simulated for viewers during times when real live content is not available. Live Linear streams can also be useful for public displays (including digital out-of-home advertising), or websites that normally contain live shows. Herein, you will learn the steps to set up and configure Live Linear.
Note: The illustrations used herein depict a live stream of marketing videos Kaltura created for our educational clients.
Prerequisites for Streaming
To enable the live stream, you must:
- Have a computer (Mac, Windows, or Linux) available for the duration of time you wish your simulated live stream to play.
Note: The instructions herein are based on a Windows 10 computer. Other operating systems will work similarly. - Have an active Kaltura account, enabled for Live Streaming.
- Download and install the VLC Media Player. You must install VLC Media Player first.
- Download and install the Open Broadcaster Software (OBS) Studio.
Setup
Log in to your Kaltura Rich Media CMS account. See the section Getting Started in the Rich Media Content Management System User Manual.
Upload Videos and Create a Playlist
- Upload your desired videos using Rich Media CMS. See the section Upload Media in the Rich Media Content Management System User Manual.
- Create a Manual Playlist of the videos that you would like to have played. See the section Creating a Manual Playlist in the Rich Media Content Management System User Manual.
Create Syndication Feed
1. Create a Syndication Feed in Rich Media CMS. See section titled Setting up Syndication in the Rich Media Content Management System User Manual. Configure the settings as follows:
| Feed Name | Type a feed name. |
| Select Content | 1. Select Only content from this playlist. 2. Pick the playlist you created earlier. |
| Feed Type | Select Flexible Format Feed |
| XSL Code | Unzip and upload this XSLT file (xspf.xslt). |
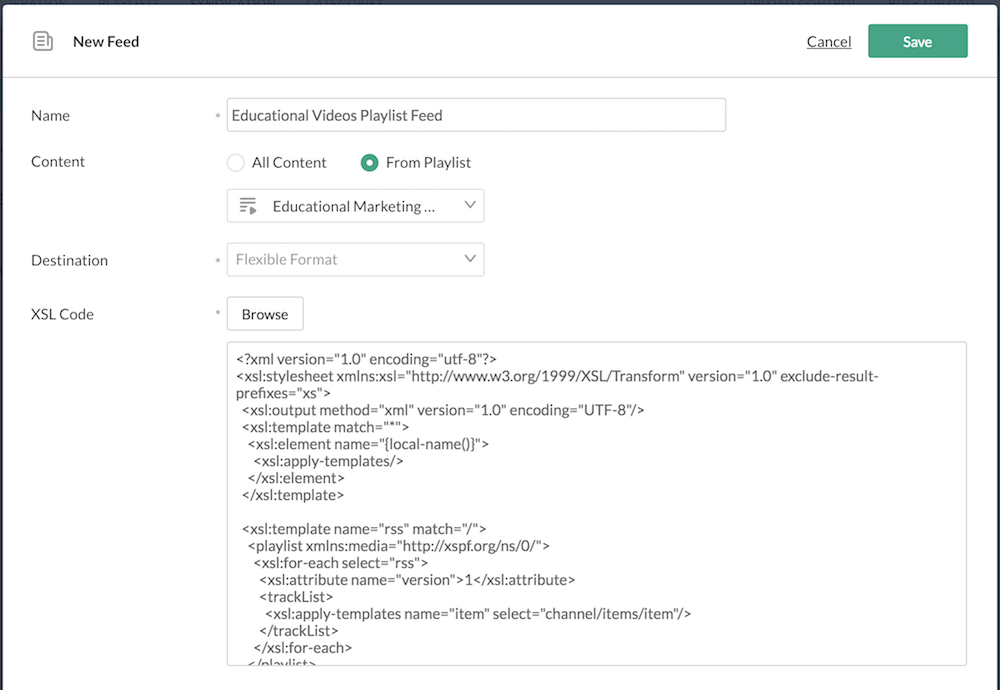
Figure 1. Add Video Feed Window Settings
2. Copy the Feed URL. You will need this later to configure OBS Studio.
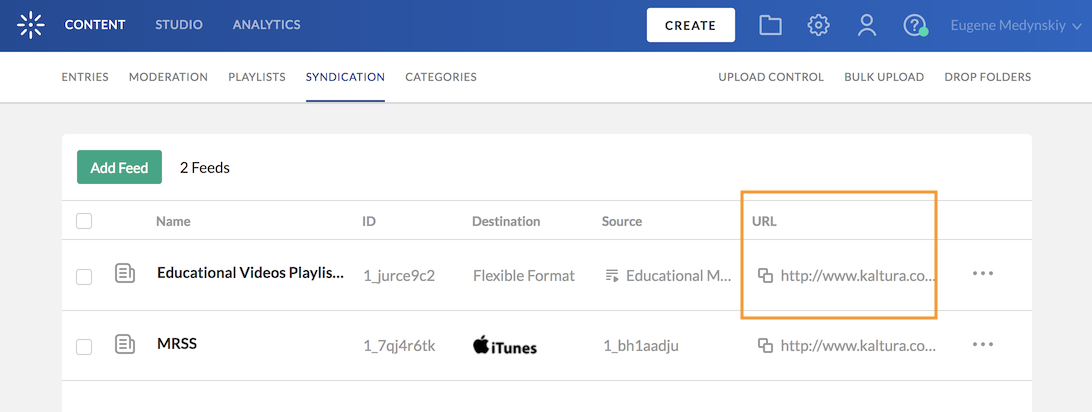
Figure 2. Feed URL Screen
Create Live Streaming Entry
1. Create a Live Streaming Entry in Rich Media CMS. See the section Creating a Live Streaming Entry in the Rich Media Content Management System User Manual.
2. Configure the settings as follows.
| Live Stream Type | Kaltura Live Streaming |
| Name | A name for your stream |
| Description | A description for your stream (not required) |
| Live Transcoding Profile | Select one of the available options. |
| Enable Live DVR | Off (Recommended) |
| Enable Recording | Off (Recommended) |
| Auto-start | On (Recommended) |
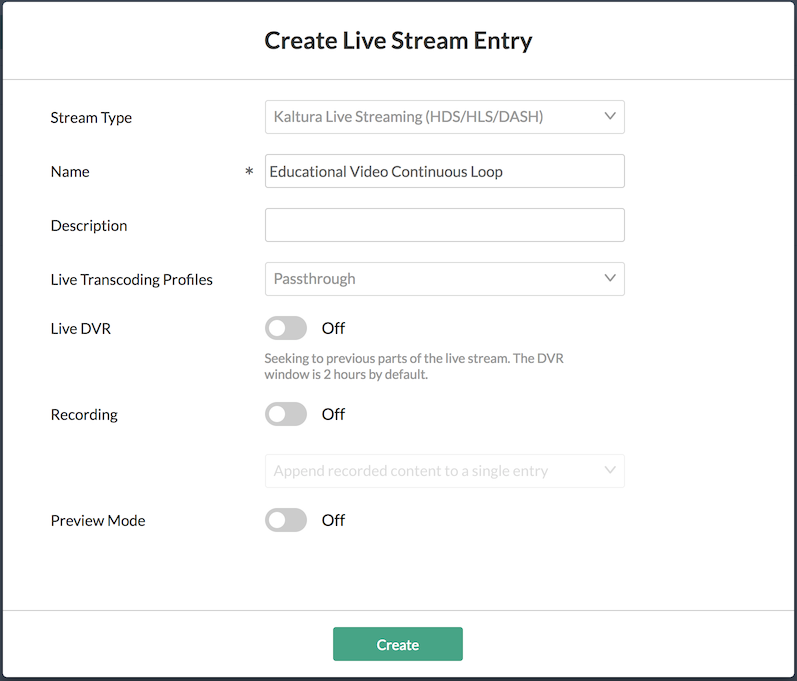
Figure 3. Add New Stream Window Settings
If you do not see the option to create a live streaming entry, your account is not provisioned for Live Streaming. Please contact your Kaltura representative for assistance.
2. View the new Live Stream entry details when prompted.
3.On the left side of the screen select Live Stream. In the Broadcasting URLs section, note the Primary URL and Stream name. You will need these later to stream to this entry.
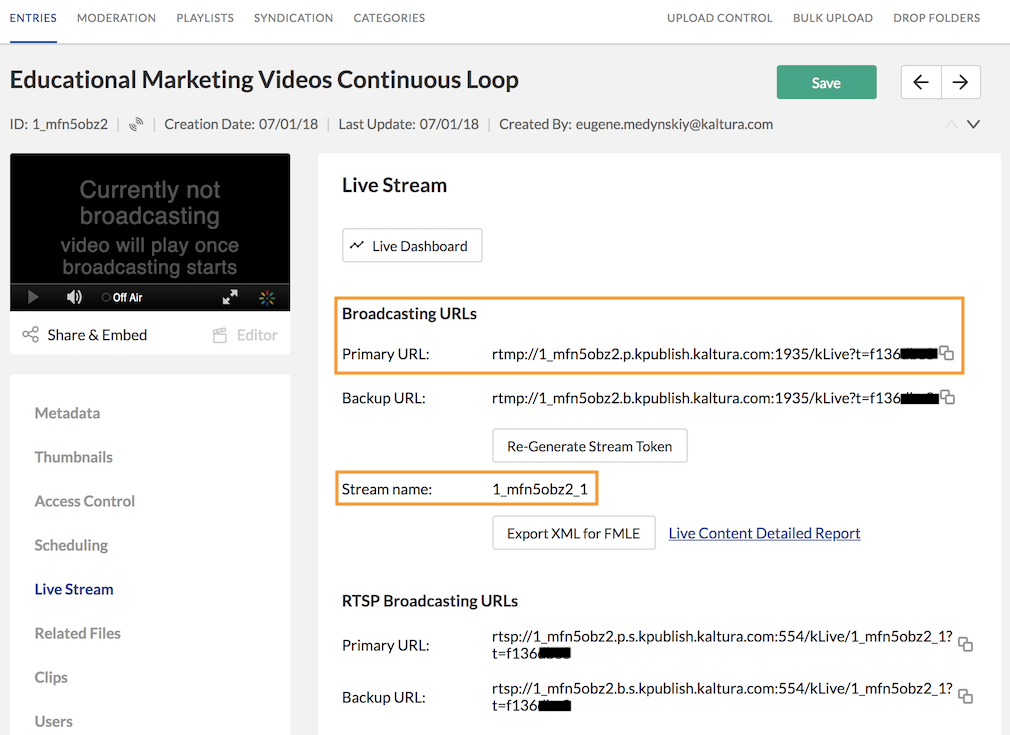
Figure 4. Primary URL and Stream Name
Software Download and Installation
Kaltura does not provide technical support for the VLC Media Player or the OBS Studio.
You must install VLC Media Player first.
Download and Install VLC Media Player
- Navigate to http://download.videolan.org/pub/videolan/vlc/
- Click on 2.2.8/ (you may need to scroll down the list to see 2.2.8/)
Note: As of September 2018, you must use VLC version 2.2.x. The brand new 3.x version does not yet integrate with OBS. This has no impact on playback quality or user experience. The 2.2.x version is well-maintained and continues to be popular with most users. - Click on win64 or win32.
Note: You may use either the 64-bit or the 32-bit version, but the bit versions for both VLC Media Player and OBS Studio must match. For example, you cannot choose 32-bit for VLC and 64-bit for OBS. - Wait for download to finish then complete the installation on your machine.
Note: Uncheck the "Regularly check for VLC updates" option, because you do not want to upgrade to the latest (3.x) version.
Download and Install OBS Studio
- Navigate to https://obsproject.com/
- Click on the latest version (64-bit or 32-bit).
Note: The bit versions for both VLC Media Player and OBS Studio must match. For example, you cannot choose 32-bit for VLC and 64-bit for OBS. - Wait for download to finish then complete the installation on your machine.
- Launch the software.
- Decline Auto Configuration Wizard.
- Mute the Desktop and Mic audio in the "Mixer" to avoid feedback or streaming from your machine’s microphone.
- On the far right side of the screen, click on Studio Mode.
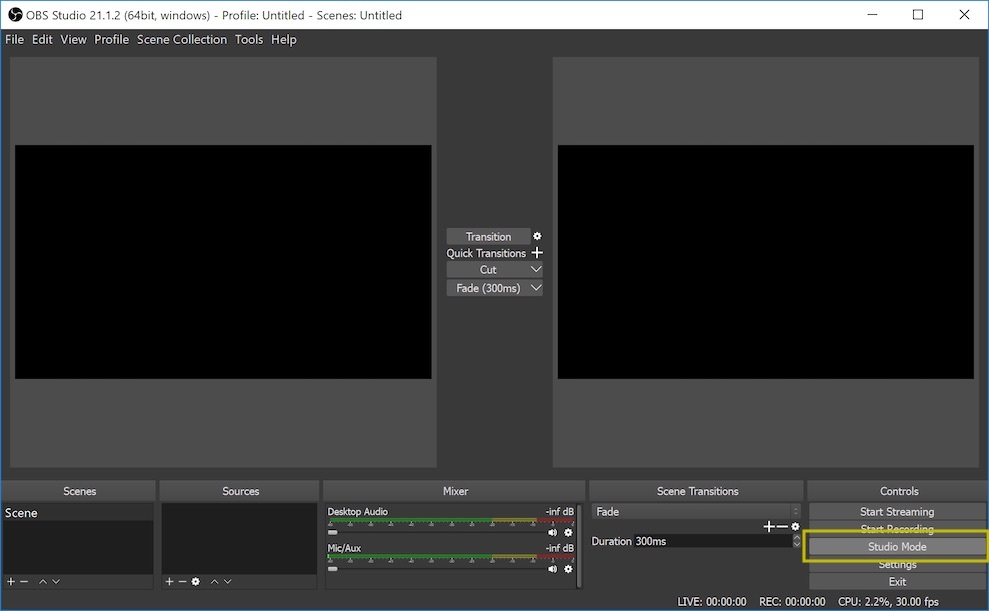 Figure 5. OBS Studio Mode
 - Under Sources, click the + button to confirm that VLC Video Source is shown in the list. If it is not shown, you either failed to install VLC first or the bit-version (32-bit or 64-bit) you installed does not match the bit-version of OBS that you are running. You must uninstall and reinstall in the correct order.
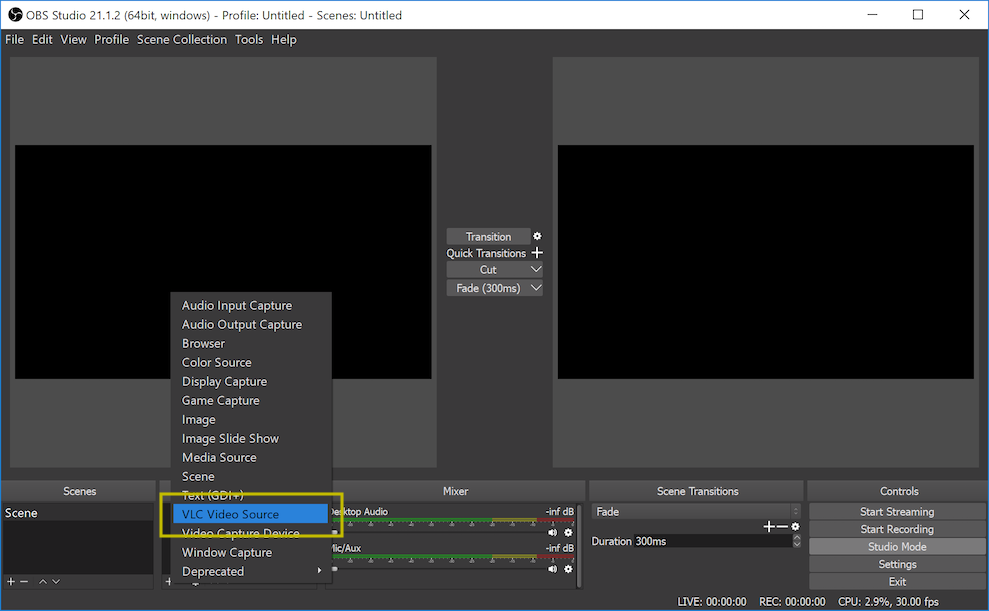 Figure 6. VLC Video Source


Configure the OBS Studio
1. Launch the software if it is not already open.
2. Under Sources, click the + button and choose VLC Video Source.
3. Make sure Create new is toggled on and type a name for your stream output and click OK.

Figure 7. Create New VLC Video Source
4. Select Loop Playlist, if desired.
5. Under Visibility Behavior, select Always play even when not visible.
6. Click the + button to the right of Playlist entry field and click Add Path/URL.
7. Copy and paste the Feed URL here, directly followed by &name=ANY_STREAM_NAME_YOU_CHOOSE.xspf
The URL you enter must end in .xspf to be recognized correctly by OBS.
It is best practice to use the current date and time, for example &name=2019-01-01-1030.xspf. This allows you to easily check when the playlist was added to the system.
8. Click OK.

Figure 8. Configuring Properties for New VLC Video Source and Adding Feed URL
The playlist videos now play in the preview window on the left hand side of the screen. Adjust its size as needed to fill the canvas.
9. Click the upper left hand corner of the screen and choose Settings.
10. Click Video in the list on the left and confirm your streaming settings.
| Base (Canvas) Resolution | Select based on your input resolution. |
| Output (Scaled) Resolution | 1280x720 (Recommended) |
| Downscale Filter | Bicubic (Recommended) |
| Common FPS Values | 30 (Recommended) |
To stream at a resolution higher than 720p, or at a framerate faster than 30fps, please contact your Kaltura representative.

Figure 9. Video Settings
11. Click Output in the list on the left and ensure the Video Bitrate and Encoder settings are as desired.
| Video Bitrate | 2500 (or match to video source) |
| Audio Bitrate | 128 (or match to video source) |
Please review the Encoder Settings section of Kaltura's Live Streaming Best Practices Guide.
12. Click Stream in the list on the left and select Custom Stream Server as the Stream Type.
13. In the URL field, copy and paste the primary Live Entry RTMP URL.
14. In the Stream Key field, copy and paste the Stream Name from the Live Entry parameters.
15. Leave Use Authorization unchecked.
16. Click OK.

Figure 10. Stream Settings
Begin the Stream
- Pull up a Kaltura Player that is looking at the stream. "Currently not broadcasting" displays.
- In the lower right corner of the OBS Studio interface, click Start Streaming.
- In the center of the OBS Studio interface, click Transition.
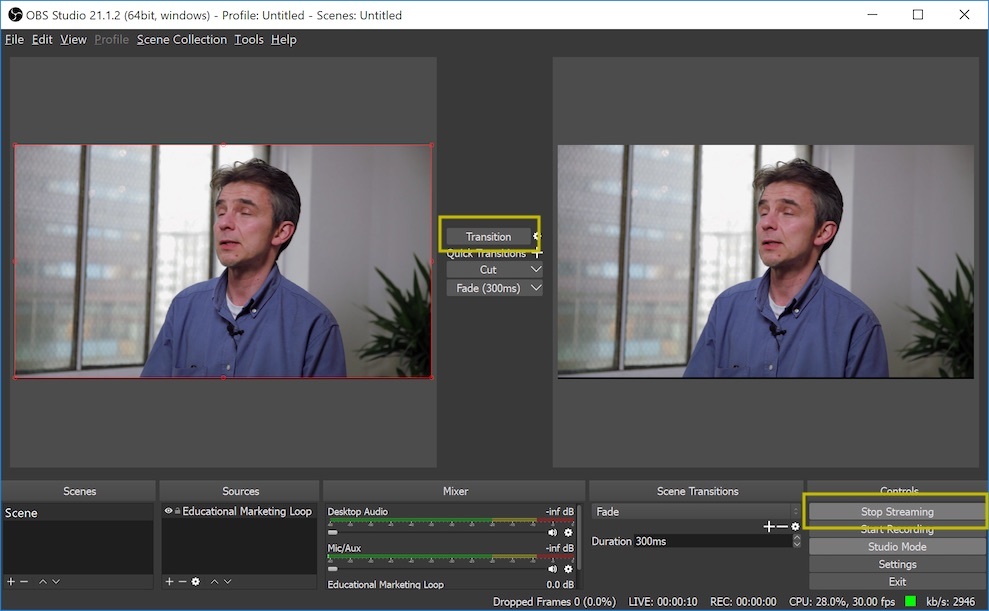
Figure 11. Transition Stream - The Kaltura Player should display that it is live within 1-2 minutes. Click the Play button to play the video.
You may leave the OBS Studio application running as long as you would like the stream to play.

Change/Update the Playlist
The OBS reads the playlist once and keeps a copy of it to play when looping.
To change your playlist
- Edit the Manual playlist using the Kaltura Playlist Editor. See the article Creating and Configuring Playlists.
- Edit the VLC Video Source in OBS Studio.
- Update the Feed URL with a new &name=NEW_STREAM_NAME.xsfp parameter. Save the Feed.
Note: A different &name= parameter must be appended to the URL, and the URL must end in .xspf
The feed switches immediately so be mindful about the timing of your action.
