About
Hero banners control the top area of a landing page and provide the main entry experience for users. Hero banners can only be displayed at the top of the page because they interact with the navigation bar and transparent page styling.
Hero banners can be used to:
- Highlight featured content
- Display event messaging
- Add countdown timers
- Promote registration or login flows
- Direct users to featured destinations
Available hero types:
- Player carousel
- Text and counter
To learn more, visit Create and use a template page.
Applies exclusively to Content Hubs and requires the Theming module to be enabled.
Access hero settings
- Go to your Configuration Management console, and select the Templatepages module. You can also navigate directly using a link: https://{your_site_url}/admin/config/tab/templatepages.
- Click Edit next to an existing page template to open it, or click the +Add TemplatePage button to create a new one.
- In the TemplatePage section, select a hero type:

The 'Templatepages' page displays.

To learn how to create and publish a landing page, see Templatepages module.

- Player Carousel
- Text & Counter

Follow the instructions below for the selected hero type.
Configure a player carousel
The Player Carousel displays live media, playlists, or images in an animated carousel at the top of the landing page.
By default, analytics are disabled for hero carousel playback. To turn on analytics, enable heroPlayerAnalytics at the top of the Templatepages module.
In the Herotype dropdown, select Player carousel.

Configure live media
liveCategory - Use this field to select the category containing live sessions. (Leave this field empty to hide live media from the hero section.)
- Click Select Category to open the category selector window.
- Enter a category name or ID, then select it from the results list.

When selecting a category by name or ID, entitlement rules may hide media that is not published to the site.
Configure fallback content
fallbackOption - Select an option from the drop-down menu: VOD Playlist or Images and CTA list.
- If VOD Playlist is selected, use the type drop-down menu to select the playlist behavior.
- Custom Playlist
- Channel Content
- Dynamic playlists such as Most Recent, Most Viewed, and Trending
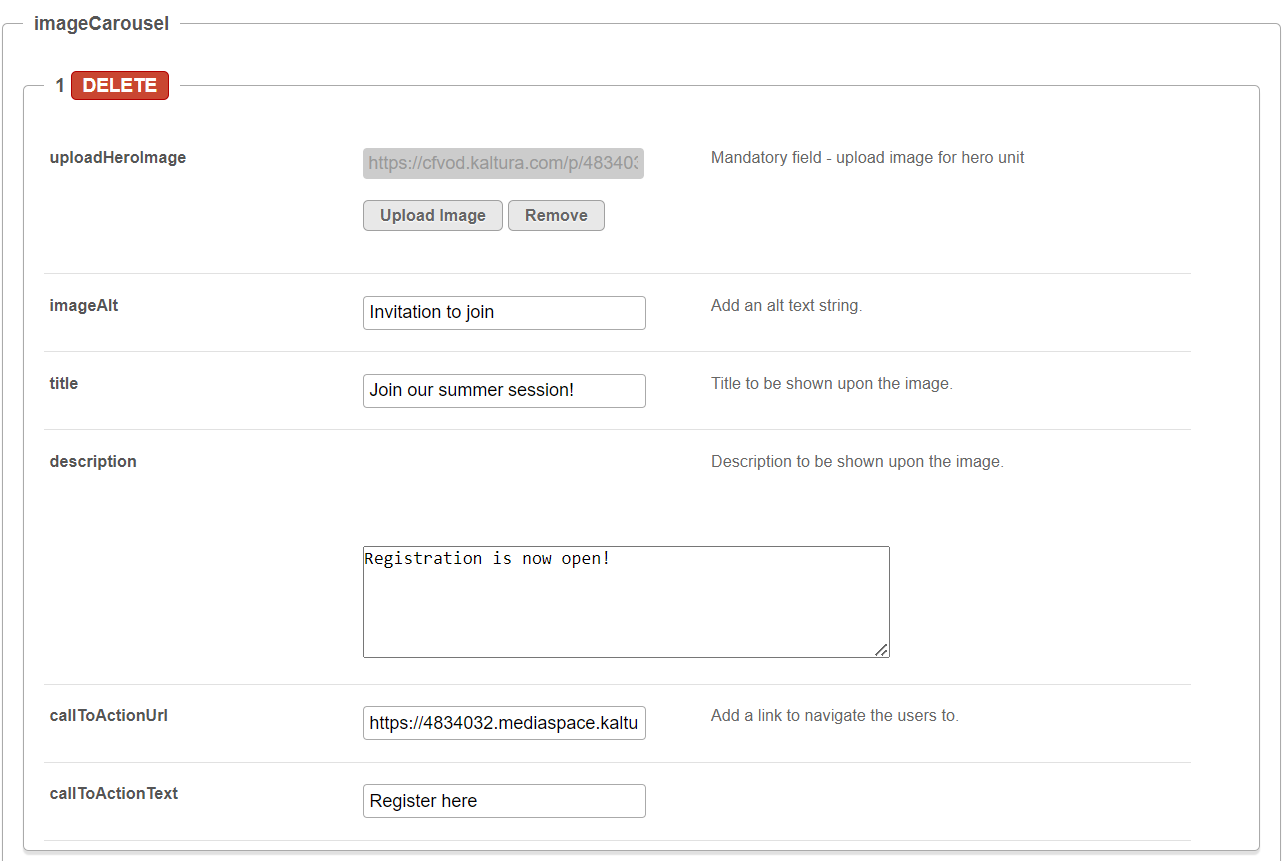
- In the imageCarousel window, configure the following:
- uploadHeroImage - Uploads the image you want in your hero.
- imageAlt - Defines alternative text for the image.
- Title - Displays title text on the image.
- Description - Displays descriptive text on the image.
- callToActionUrl - Defines the CTA destination URL.
- callToActionText - Defines the CTA button text.

Supported playlist types include:

Scheduled Room type media is not supported.
If Images & CTA List is selected, scroll down to the imageList section.

Click +Add "imageCarousel" to add additional carousel images. You can add up to eight images.
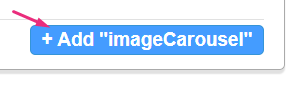
Use the DELETE button to remove an image from the carousel.
Configure carousel timing
Use the carouselInterval field to define the transition interval between carousel items in seconds.
We recommend using a value greater than 5 seconds. For best results, use a 30-second interval.

Users can pause or manually navigate carousel items.
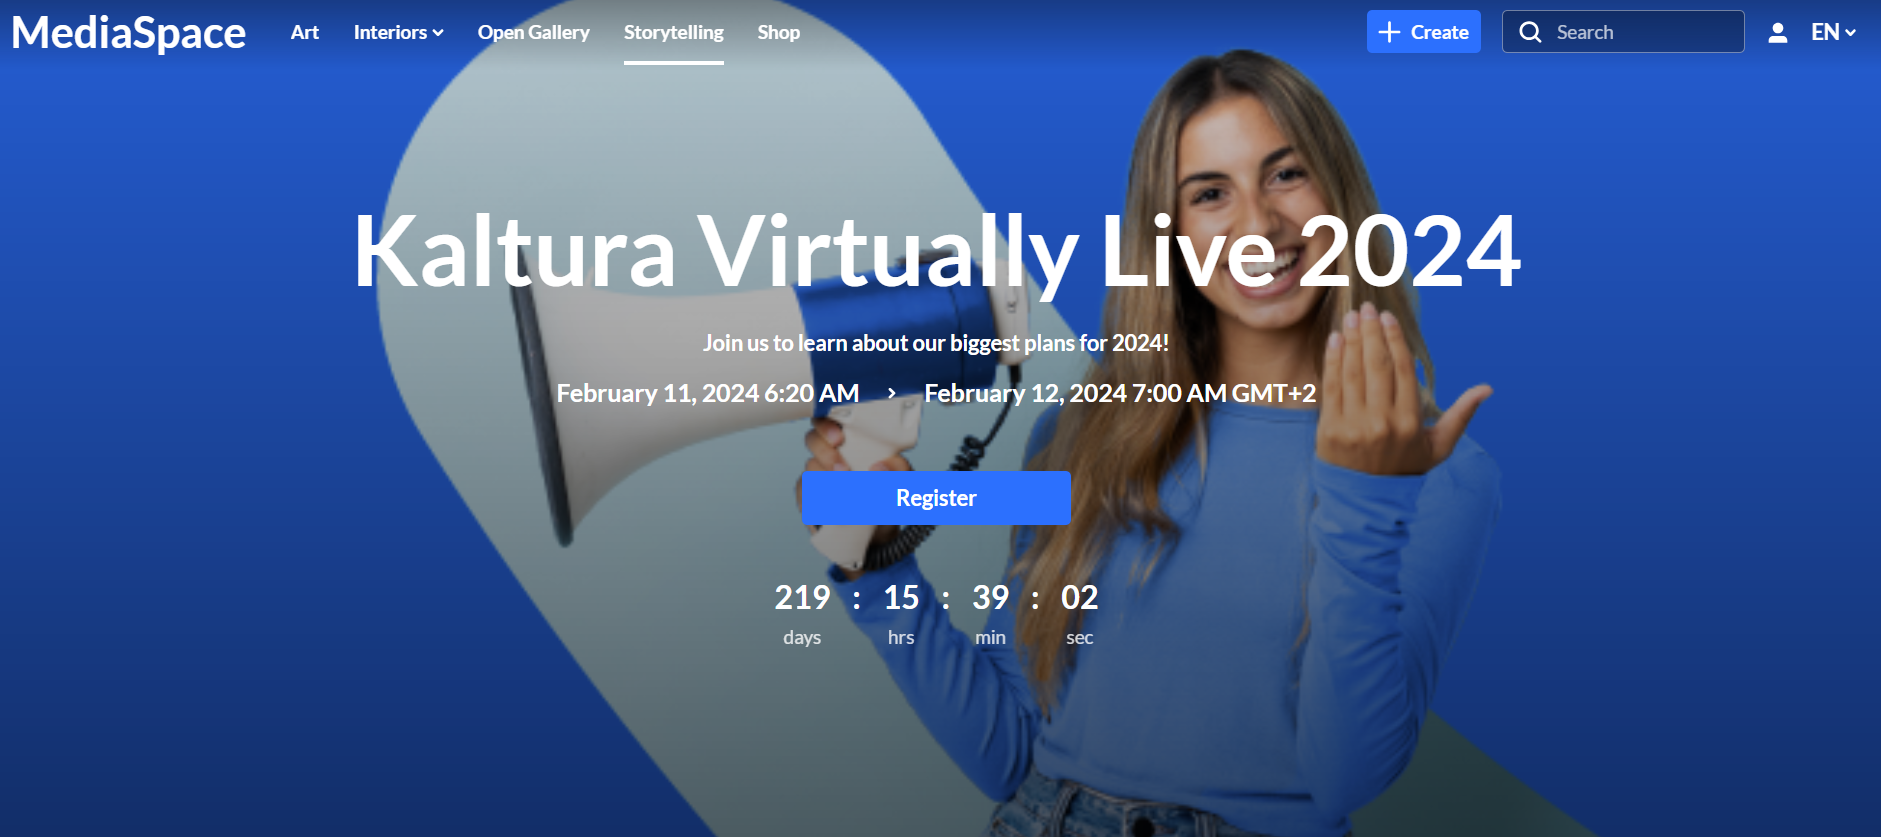
 Hero configured with an image carousel
Configure a Text & Counter
The Text & Counter displays text, CTA buttons, countdown timers, and a background image.
- Enter the Title and Description to display at the top of the hero.
- Use the DateStart and DateEnd fields to display a date range below the description. Fill in both fields to display the date range.
In the Herotype dropdown, select Text & counter.

All elements on this hero unit are optional and can be hidden by leaving the fields empty.
Supported date formats:
- Unix Timestamp (Example: 1580518923)
- UTC date string (Example: 2026-02-01T01:02:03)
Configure CTA buttons
Use the PrimaryCTAType and SecondaryCTAType fields to configure CTA buttons.
Available CTA types include:
- URL - Displays a button linked to a custom URL.
- Registration - Displays a registration button based on the Siteregistration module configuration.
- Enter Site - Displays a login button that opens the site login flow. See Enter site login flow below for additional configuration details.

- PrimaryCallToActionText - Defines the primary CTA button text.
- PrimaryCallToActionLink - Defines the primary CTA destination URL.
- PrimaryCallToActionUrlParams - Defines additional URL parameters for the primary CTA button.
Secondary CTA fields
- SecondaryCallToActionText - Defines the secondary CTA button text.
- SecondaryCallToActionLink - Defines the secondary CTA destination URL.
Configure the countdown timer
Use the CounterDate field to configure a countdown timer.
The countdown timer automatically disappears after reaching the configured date.
Supported formats include:
- Unix timestamp (Example: 1580518923)
- UTC date string (Example: 2020-02-01T01:02:03)
Configure the background image
Use the BackgroundImage field to upload a background image for the hero section.
The image is automatically cropped based on the hero section layout.
For best results:
- Use a 1920x1080 image.
- Avoid adding text directly to the image.
- Use high-resolution images optimized for large displays.
 Hero with 'Text & Counter'
Enter site login flow
This feature requires the Login module to be enabled.
When the CTA button type is set to Enter site, users can log in directly from the landing page without being redirected to the site login page.

This behavior applies to:
- Primary CTA buttons
- Secondary CTA buttons
The login form opens in a side drawer on the same page.
Login drawer behavior
The login drawer uses the same authentication flow and configuration as the site login page, including:
- Login text and labels
- Authentication providers
- Forgot password flow
- Multi-authentication selection
- SSO / SAML authentication
- Alternative login methods
If the Login module's showCallToAction feature is enabled, the additional CTA section appears below the login form.
Supported authentication flows
The following authentication flows are supported within the same side drawer:
- Forgot password
- Multi-authentication selection
- Alternative login methods
- Registration flow when configured
Registration flow
If the Emaillogin module is configured with /register in the additionalLink > linkURL field, the registration form opens in the same side drawer.
SSO / SAML behavior
For SSO / SAML authentication:
- Single authentication provider login redirects the page after login.
- SSO providers configured as part of multi-authentication are displayed inside the drawer, then refresh the page after authentication.
Alternative login methods
If the showAlternativeLogin setting is enabled in the Emaillogin module, alternative authentication methods also open in the same side drawer.
 Login drawer opened from the landing page using the 'Enter Site' CTA option.
