This guide describes how to upgrade the Kaltura Video Extension for Blackboard Ultra supporting LTI 1.1 to LTI 1.3. This guide is intended for Kaltura and Blackboard administrators.
This guide describes the upgrade of Kaltura tools implemented with LTI 1.1 and and does NOT include instructions to upgrade the Kaltura tools or entries embedded using the Kaltura Video Building Block for Blackboard Learn.
Before you begin
Confirm your KAF Type is Compatible
IMPORTANT - Kaltura has developed two types of KAFs to support the integration with Blackboard.
- KAF type = Blackboard (KAFbb) - supports the integration with the Kaltura Video Building Block for Blackboard.
- KAF type = Bbultra (KAFbu) - supports the integration using LTI 1.1 and LTI 1.3.
- This upgrade requires a KAF of type 'Bbultra'. The steps below will walk you through how to confirm your KAF is the correct type before proceeding. If after you go through these steps you confirm that your KAF is type 'Blackboard', stop here and contact your Kaltura Customer Success Manager to request a KAF type 'Bbultra' and to discuss your upgrade plan.
How to Confirm the KAF type
Use the following steps to determine the KAF type.
- Log into the KAF Configuration Management page for the instance that will be used for your deployment.
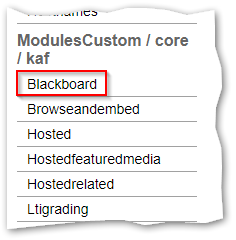
- Scroll down the list of modules on the left side of the Configuration Management page to the ModulesCustom / core / kaf section
- The first module of that section determines the KAF type that is supported.
- If the first module in the section is Bbultra then you can proceed.
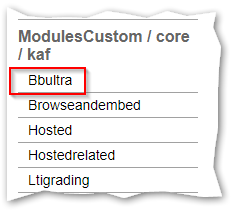
- If the first module in the section is Blackboard then STOP, and contact your CSM to request a KAF type 'Bbultra'.
- If the first module in the section is Bbultra then you can proceed.


Note Regarding LTI 1.1 support when upgrading to LTI 1.3
As of August 8, 2022, with the release of KAF version 5.108.10x, Kaltura has added the capability for KAFs configured for LTI 1.3 to continue supporting the launch of old embed codes added using the Kaltura Browse Search and Embed tool which supported LTI 1.1 with the same KAF.
Backup Your KAF Configuration
You should perform the following tasks before upgrading your Kaltura Video Extension for Brightspace Kaltura Application Framework (KAF) from LTI 1.1 to LTI 1.3.
- Login to your KAF Configuration Management page (https://{your_KAF_base_URL}/admin).
- Under Server Tools, click on Backup Configuration.
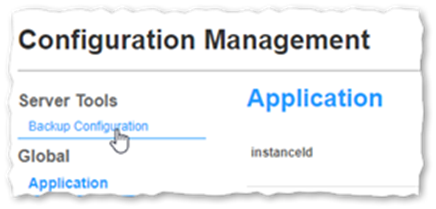
- Click Save Backup.
- In the Configuration Backup popup, click Yes, then Save.
The Configuration Backup displays “Configuration file was saved successfully.” A message displays on the Backup Configuration page listing the Last Configuration save date. - In the Configuration Backup popup, click OK.

Prerequisites
- Access to your organizations Blackboard Developer Portal
- Administrator access to the Blackboard account that is integrated with Kaltura.
- Administrator access to the Kaltura Management console for the account that is integrated with the Blackboard instance.
- Administrator access to the Kaltura Application Framework (KAF) instance of type 'BlackboardUltra' (minimal KAF version v5.108.10x) that is integrated with the Blackboard instance.
- The KAF instance should contain the following modules:
The Blackboard Ultra LTI 1.1 to LTI 1.3/Advantage Migration Tool
Blackboard Ultra includes a migration tool which will automatically migrate your Kaltura LTI 1.1 tools to LTI 1.3/Advantage tools. Steps for using the migration tool for this update can be found in section 3 of this guide.
The migration tool requires that the domain value when you register the Kaltura application in Section 1 Step 3c below be the same value as the Provider Domain used for the LTI 1.1 Kaltura Tool Provider you are upgrading.
If you are implementing a new KAF instance as part of this upgrade, or will be changing the KAF domain by implementing an alias or a vanity URL at this time, the Blackboard Ultra LTI 1.1 to LTI 1.3/Advantage migration tool will not run. You will need to follow the instructions for a new LTI 1.3 installation provided in the Kaltura Video Tool for Blackboard Deployment Guide - LTI 1.3.
Deployment Instructions
This section describes how to deploy the Kaltura Video Extension for Blackboard using Application Registration and Deployment settings provided by Blackboard which will allow you to upgrade and deploy the Kaltura external tools that have been implement in Blackboard using LTI 1.1 to LTI 1.3. The following sections provide the steps to:
- Register the Kaltura Application in the Blackboard Developer Portal.
- Enable and configure LTI 1.3 support within your KAF (Kaltura Application Framework) instance and upgrade the Kaltura LTI tools in Blackboard Ultra from LTI 1.1 to LTI 1.3.
Section 1: Registering the Kaltura Application
To implement the Kaltura LMS Integration with Blackboard using LTI 1.3 you will need to first Register the Application in the Blackboard Developer Portal. This process provides you with the ID, key, secrets, and URLs needed to support the LTI 1.3 implementation.
You will need a separate registration for each KAF integration using LTI 1.3.
To execute the steps in this section you will need to have an account on the Blackboard Developer Portal and have a Production Group to assign the application to. For more information on Blackboard Developer Portal Groups please go to https://docs.blackboard.com/rest-apis/learn/admin/production-groups.
- Login to your Blackboard Developer Portal account at https://developer.blackboard.com.
- On the My Applications page, click on the "+" button to create a new application.
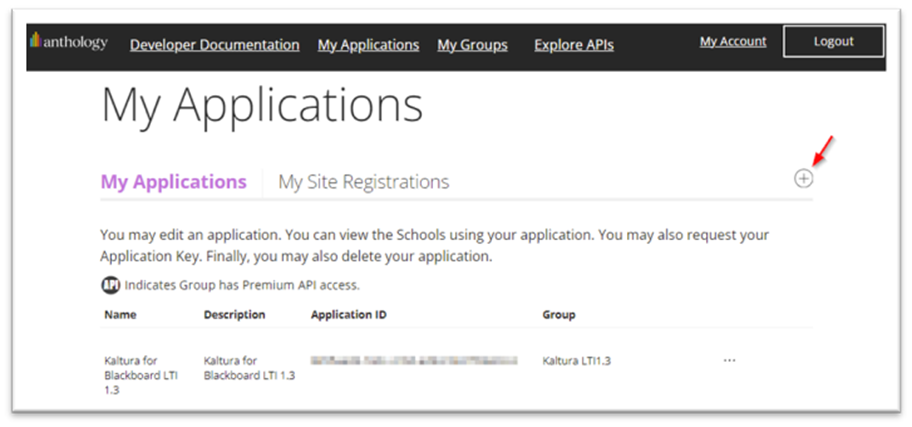
- On the Register a New Application page enter the following:
- Application Name – Kaltura recommends you use an application name that is unique for the KAF you are using for the integration.
- Description – add descriptive information for the new application.
- Domain(s) – set to your KAF URL. e.g. bb-lti13-2964661-test1.kaf.kaltura.com. Do NOT include https:// or a / at the end.
In order to use the Blackboard Ultra LTI 1.1 to LTI 1.3 migration tool (Section 3) you must use the Provider Domain value used by your LTI 1.1 Kaltura Tool Provider for the Domain value.
- Group – select the production group to assign the application to.
- Click on the switch to the right of “My Integration supports LTI 1.3” to expose the LTI 1.3 settings.
Fill in the fields as follows:
Login Initiation URL = https://{your_KAF_URL}/hosted/index/oidc-init
Tool Redirect URL = https://{your_KAF_URL}/hosted/index/oauth2-launch
Tool JWKS URL = https://{your_KAF_URL}/hosted/index/lti-advantage-key-set
Signing Algorithm = RS256 - Click Register Application
The settings for your registered application will be displayed.
- Copy the settings and store in a safe and secure location.
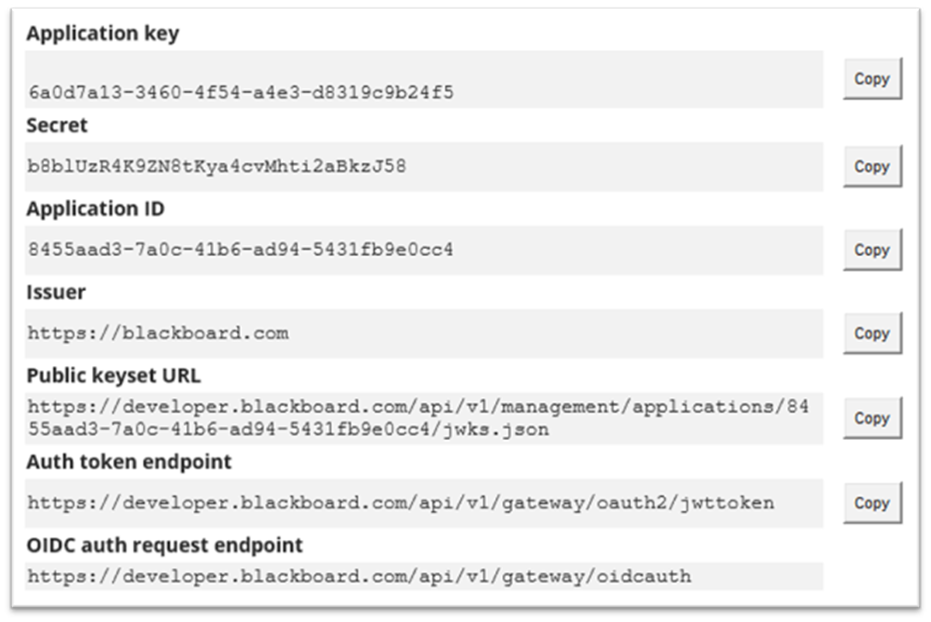
- Keep this page open to use the settings for the next section of the implementation.


Section 2: Setting the LTI 1.3 Configuration in Your KAF Instance
In this section you will configure your KAF to support LTI 1.3 and connect with your Blackboard instance.
- Login to your BlackboardUltra KAF Configuration Management page. (https://{your_KAF_URL}/admin).
- Navigate to the Hosted Module.
- In the Hosted Module set authMethod to “lti1.3”.
This will expose the fields listed in steps 4. - Fill in the following fields using the values from Section 1, step 4.
- lti13PlatformOidcAuthUrl = OIDC auth request endpoint
- lti13AuthTokenUrl = Auth token endpoint
- lti13KeysUrl = Public keyset URL
- lti13ClientId = Application ID
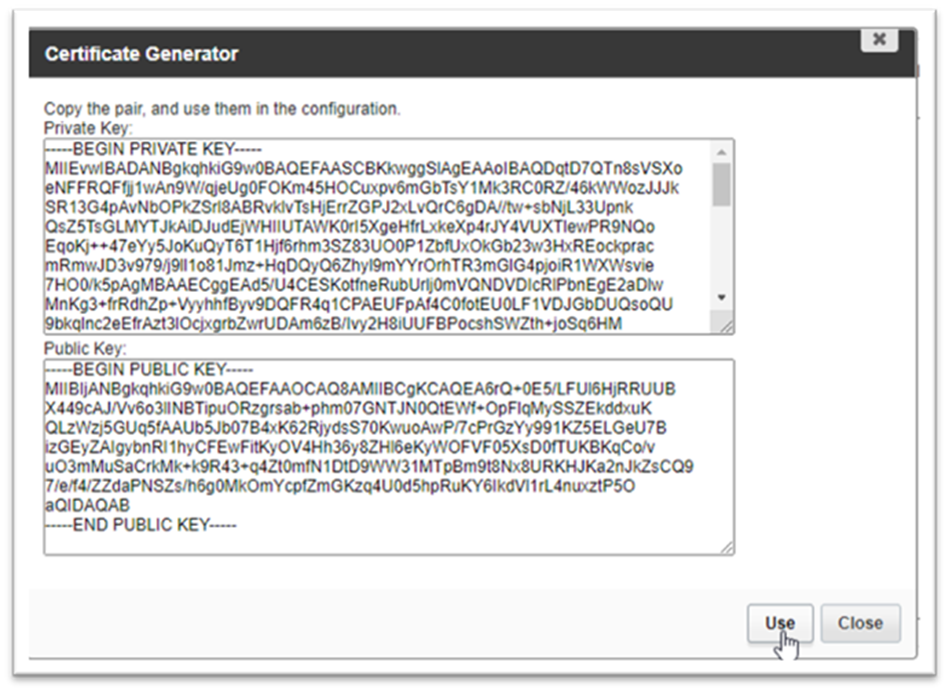
- For the "lti13ServicePrivateKey", click the 'generate key pair here' link. This will generate the keys.

- In the Certificate Generator frame click Use to have the key pairs saved to the lti13ServicePrivateKey and lti13ServicePublicKey fields.
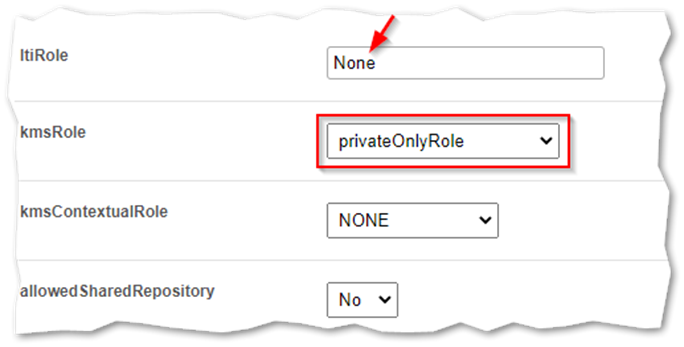
- In the ltiRolesMapping section, scroll to ltiRole = None.
- Set the kmsRole to privateOnlyRole.
- Scroll to the bottom of the Hosted module settings and click Save.


Section 3: Adding the LTI 1.3 Tool Provider in Blackboard
In this section you will create the LTI Advantage Tool Provider in Blackboard and use the Blackboard LTI migration tool to update your Kaltura LTI 1.1 tools to LTI Advantage.
- Login to your Blackboard instance with an Account Admin user account.
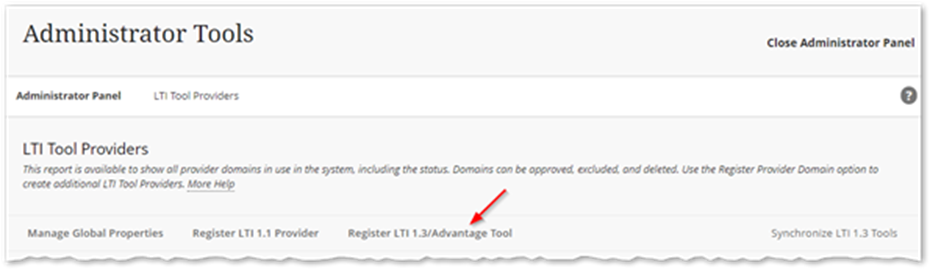
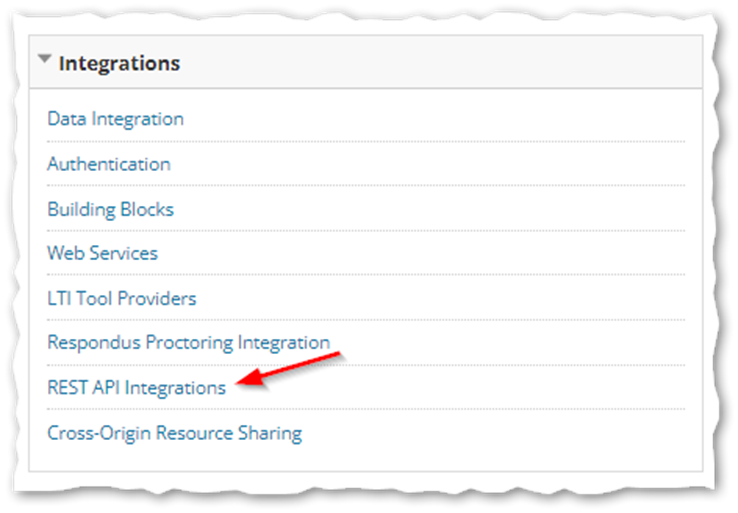
- Navigate to Administrator Tools > Integrations > LTI Tool Providers
- In the LTI Tool Providers Page click on Register LTI1.3/Advantage Tool
- In the Client ID field insert the same Application ID used for the lti13ClientId in step 4d in the previous section.
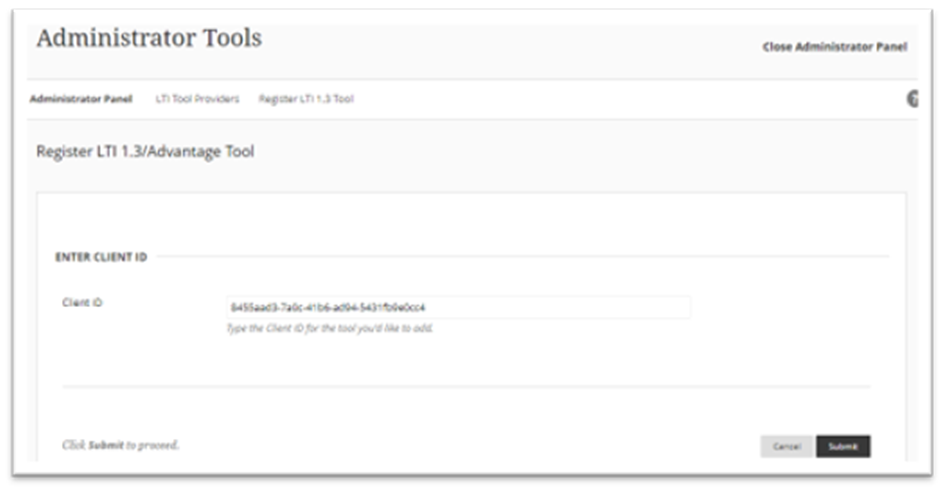
- Click Submit.
The following popup box will appear.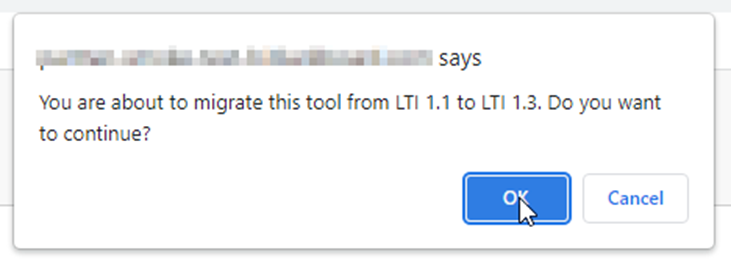
- Click OK to continue.
The Tool Status page will display with fields populated with the settings of the LTI 1.1 Kaltura Tool Provider - Confirm the settings, and update as needed:
Important: Make sure- Client ID – application id value for your registered application
- Name – name for your registered application
- Description – description for your registered application
- Deployment ID – deployment id for your LTI 1.3 tool
- Initiate Login URL – login initiation URL for your registered application
- Tool Redirect – tool redirect URL for your registered application
- Domains – your KAF domain (do not include “https://” or the trailing “/”)
- Tool Status – set to Approved
- Tool Provider Custom Parameters
- Add the following two parameters:
lis_user_username=@X@user.id@X@
lis_course_id=@X@course.id@X@
- Add the following two parameters:
- User Fields to Send
- Role in Course – checked
- Name – checked
- Email Address – checked
- Allow grade service access – set to Yes
- Allow Membership Service Access – set to Yes
- Click Submit.
You receive a Success message.
The LTI 1.1 Tool Provider and the Kaltura tool placements have now been upgrade to LTI 1.3/Advantage


Section 4: Confirm the Configuration of the Kaltura Tool Placements
In this section you will confirm the configuration of the Tool Placements for the following Kaltura tools:
- My Media
- Media Gallery
- Browse Search and Embed
- Interactive Video Quiz
Each tool is independent of the others, and you may select to use any one of them or all of them.
Start by performing the following steps:
- Login to your Blackboard instance with an Account Admin user account.
- Navigate to Administrator Tools > Integrations > LTI Tool Providers.
- On the LTI Tool Providers page locate the Tool Provider you migrated to LTI 1.3.
- Hover over the name for the Tool Provider to expose the icon for the options menu and click on the icon to display the list of options.
- Click on Manage Placements
- Hover over the name of a placement to expose the icon for the options menu and click on the option to edit.
- Review the settings described in each subsection to confirm that the placement for the Kaltura tool is configured properly.
Section 4a: Kaltura My Media Placement
- Label – the name of the tool. This will be the name displayed to users and can be any value. (ex. My Media)
- Description – enter a description for the tool
- Handle – the internal ID for the tool. (ex. KalturaMyMedia)
- Availability – to make the tool available to users set to Yes
- Type – select System Tool
- Icon
- Save the Kaltura icon to a location on your computer.

- Click the browse button to browse to the location you saved the icon to.
- Select the icon file and add to the placement
- Save the Kaltura icon to a location on your computer.
- Target Link URI - Fill in your KAF URL concatenated with the following URL: /bbultra/index/launch/target/my-media
Ex. https://123456.kaf.kaltura.com/bbultra/index/launch/target/my-media - Click Cancel if no changes have been made or Submit to save any changes.

Section 4b: Kaltura Media Gallery Placement
- Label – the name of the tool. This will be the name displayed to users and can be any value. (ex. Media Gallery)
- Description – enter a description for the tool
- Handle – the internal ID for the tool. (ex. KalturaMediaGallery)
- Availability – to make the tool available to users set to Yes
- Type – select Course Tool
- Check Allow student access
- Icon
- Save the Kaltura icon to a location on your computer

- Click the browse button to browse to the location you saved the icon to.
- Select the icon file and add to the placement
- Save the Kaltura icon to a location on your computer
- Target Link URI - Fill in your KAF URL concatenated with the following URL: /hosted/index/course-gallery
Ex. https://123456.kaf.kaltura.com/hosted/index/course-gallery - Click Cancel if no changes have been made or Submit to save any changes.

Section 4c: Kaltura Browse Search and Embed Placement
- Label – the name of the tool. This will be the name displayed to users and can be any value. (ex. Kaltura Embed Media)
- Description – enter a description for the tool
- Handle – the internal ID for the tool. (ex. KalturaBSE)
- Availability – to make the tool available to users set to Yes
- Type – select Deep Linking content tool
- Check Allow student access
- Icon
- Save the Kaltura icon to a location on your computer

- Click the browse button to browse to the location you save the icon to.
- Select the icon file and add to the placement
- Save the Kaltura icon to a location on your computer
- Target Link URI - Fill in your KAF URL concatenated with the following URL: /browseandembed/index/browseandembed
Ex. https://123456.kaf.kaltura.com/browseandembed/index/browseandembed - Click Cancel if no changes have been made or Submit to save any changes.

Section 4d. Kaltura Interactive Video Quiz Placement
- Label – the name of the tool. This will be the name displayed to users and can be any value. (ex. Kaltura Video Quiz)
- Description – enter a description for the tool
- Handle – the internal ID for the tool. (ex. KalturaVideoQuiz)
- Availability – to make the tool available to users set to Yes
- Type – select Deep Linking content tool
- Check Allow student access
- Icon
- Save the Kaltura icon to a location on your computer

- Click the browse button to browse to the location you save the icon to.
- Select the icon file and add to the placement
- Save the Kaltura icon to a location on your computer
- Target Link URI - Fill in your KAF URL concatenated with the following URL: /browseandembed/index/browseandembed?type=quiz Ex. https://123456.kaf.kaltuar.com/browseandembed/index/browseandembed?type=quiz
- Click Cancel if no changes have been made or Submit to save any changes.

Section 5: Confirm the REST API Integration Configuration for Kaltura
The REST API Integration allows you to use the Blackboard REST API to publish content from My-Media to Media Galleries and to import content from one Media Gallery to another.
For more information on how to implement the REST API Integration using a User Account with a Custom System Role, please refer to Section 5 Option 1 of the Kaltura Video Tool for Blackboard Deployment Guide - LTI 1.3.
Use the following steps to confirm the REST API Integration
- Login to your Blackboard instance with an Account Admin user account.
- Navigate to Administrator Tools > Integrations > REST API Integrations.
- On the REST API Integrations page locate the Kaltura for Blackboard integration.
- Hover over the name to expose the icon for the options menu and click on the option to edit.
- Review the settings listed below to confirm that the REST API Integration for Kaltura is configured properly.
- Application ID - Use the Kaltura Application ID: 8d68a3e5-4643-4152-bded-6bca9eb39312
- Learn User - set to the Blackboard user that will be used
- End User Access - set to YES.
- Authorize To Act As User - set to Service Default (No).
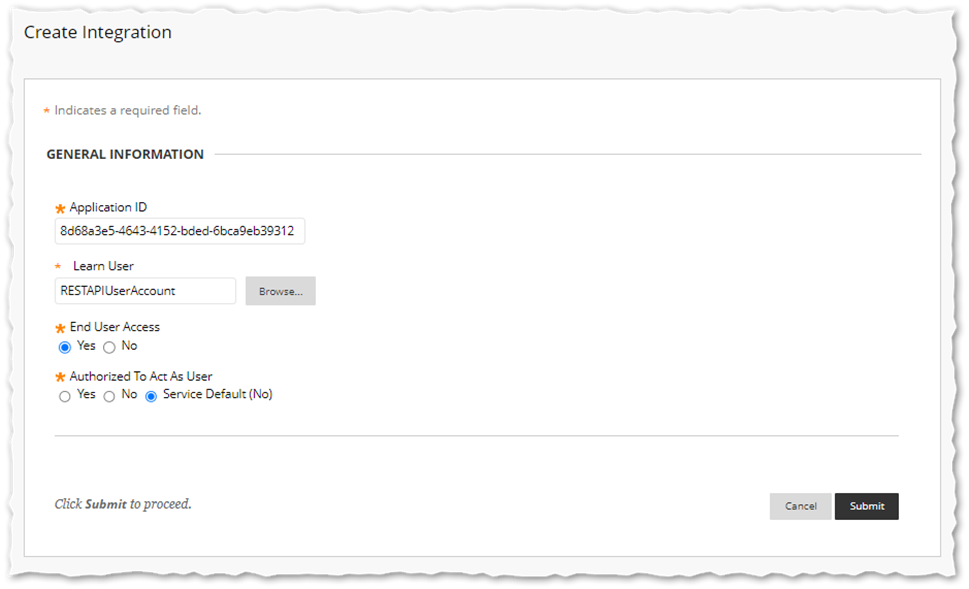
- Click Cancel if no changes have been made or Submit to save any changes.


Section 6: Configure the Kaltura User ID Value
The default Kaltura User ID value will be your Blackboard User ID.
With the Kaltura LMS integration, user ID records are passed from the LMS to Kaltura in the LTI Launch. Kaltura admins can use the Kaltura Application Framework (KAF) Hosted module's "ltiUserIdAttribute" field to set the value for which LTI attribute to use for the user ID value.
When using LTI 1.1 as the authentication method (KAF>Hosted>authmethod=lti) for Kaltura, the default value for the ltiUserIdAttribute is lis_person_sourcedid.
IMPORTANT! If the value for ltiUserIdAttribute in your KAF instance is not set to lis_person_sourcedid then please stop and review Configuring the Kaltura User ID Value to Use with your LMS Integration.
When using LTI 1.3 as the authentication method KAF>Hosted>authmethod=lti1.3) for Kaltura, in order for the User ID to match the value that was used previously in LTI 1.1, Kaltura has implemented a custom parameter in Blackboard (see Section 3 step 7.9) for the LTI attribute that contains the User ID value.
To view and configure the ltiUserIdAttribute setting using the default value for the LTI 1.3 integration.
- Login to your KAF Configuration Management page
(https://{your_KAF_base_URL}/admin). - Navigate to the Hosted Module
(https://{your_KAF_base_URL}/admin/config/tab/hosted). - Scroll down on the page to the ltiUserIdAttribute setting.
- Set ltiUserIdAttribute = custom_lis_user_username
- Scroll to the bottom of the Hosted module settings and click Save.
