About
This article explains how to set up the Kaltura LMS Video integration (LTI 1.3) for Blackboard Ultra (SaaS).
This version replaces the legacy LTI 1.1 integration and provides updated support for gradebook synchronization, role mapping, and enhanced media tools.
The integration connects Blackboard Ultra to your Kaltura Configuration Management console (type BlackboardUltra), enabling the following tools directly within courses:
- My Media – personal media repository
- Media Gallery – shared course-level media space
- Browse, Search, and Embed – add media to discussions, announcements, and assignments
- Video Quizzes – embed graded quizzes directly into the Blackboard gradebook
Prerequisites
- Partner Id (PID) (for example, 12345678)
- Admin secret, for example, f79359d3227f45be73c181489888afc5
- Access to your LMS Video Configuration Management console (for Blackboard Ultra), version 5.99.46 or later, with the following modules enabled:
- Access to the Blackboard Developer Portal to register the integration
Step 1: Register the Kaltura application in the Blackboard developer portal
You’ll need to register a new application in the Blackboard Developer Portal for each LMS Video integration that uses LTI 1.3.
- Log into your Blackboard Developer Portal account.
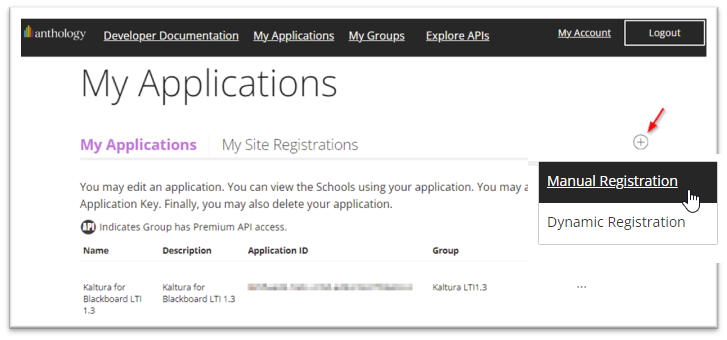
- On the My Applications page, click the "+" button to create a new application.
- Select Manual Registration.
- On the Register a New Application page enter the following:
- Application Name – We recommend using a name that is unique for the KAF you're using for the integration
- Description – Add descriptive information for the new application
- Domain(s) – Set to your KAF URL. e.g., bb-lti13-2964661-test1.kaf.kaltura.com (do NOT include https://)
- Group – Select the production group to assign the application to
- Toggle on the switch to the right of My Integration supports LTI 1.3 to expose the LTI 1.3 settings.
Fill in the fields as follows:
Login Initiation URL = https://{your_KAF_URL}/hosted/index/oidc-init
Tool Redirect URL = https://{your_KAF_URL}/hosted/index/oauth2-launch
Tool JWKS URL = https://{your_KAF_URL}/hosted/index/lti-advantage-key-set
Signing Algorithm = RS256 - Click Register Application
- Important! The settings for your registered application will be displayed. Copy the settings and store in a safe and secure location.
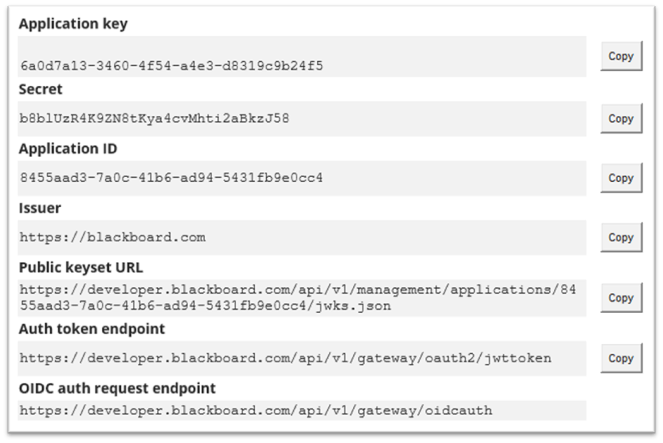
Keep this page open to use the settings for the next section of the implementation.


Step 2: Set the LTI 1.3 configuration in your KAF instance
In this section you will configure your KAF to support LTI 1.3 and connect with your Blackboard instance.
- Login to your KAF Configuration Management console (https://{your_KAF_URL}/admin).
- Navigate to the Hosted module.
- Set authMethod to lti1.3.
- Fill in the following fields using the values from the Developer portal.


- lti13PlatformOidcAuthUrl = OIDC auth request endpoint
- lti13AuthTokenUrl = Auth token endpoint
- lti13KeysUrl = Public keyset URL
- lti13ClientId = Application ID


- ltiUserIdAttribute = custom_lis_user_username
- ltiContextIdAttribute = custom_lis_course_id
These settings ensure that user and course identifiers from Blackboard are consistently passed into Kaltura, especially if standard claims aren't available in LTI launches.
Step 3: Register the tool provider in Blackboard
- Login to your Blackboard instance with an Account Admin user account.
- Click Admin in the left navigation bar.
- Locate the Integrations section and select LTI Tool Providers.
- In the LTI Tool Providers page displays.
- click on Register LTI1.3/Advantage Tool
- In the Client ID field, paste the same Application ID used for the lti13ClientId in the previous section.
- Click Submit.
- Confirm the following settings, and update as needed:

The Administrator Tools page displays.


The Accept LTI 1.3 Tool page displays.

TOOL STATUS
- Client ID – application id value for your registered application
- Name – name for your registered application
- Description – description for your registered application
- Default Deployment ID – deployment id for your LTI 1.3 tool
- Initiate Login URL – login initiation URL for your registered application
- Tool Redirect URLs– tool redirect URL for your registered application
- JWKS URL
- Domains – your KAF domain (do not include “https://” or the trailing “/”)
- Tool Status – set to Approved
- Tool Provider Custom Parameters
- Add the following two parameters:
- lis_user_username=@X@user.id@X@
- lis_course_id=@X@course.id@X@
INSTITUTION POLICIES
User Fields to Send
- Role in Course – checked
- Name – checked
- Email Address – checked
- Allow grade service access – set to 'Yes'
- Allow Membership Service Access – set to 'Yes'
9. Click Submit.
You receive a success message: Success: LTI 1.3 Tool Edited: Kaltura for Blackboard LTI 1.3.
Step 4: Configure tool placements in Blackboard
In this section you will add the tool placements for the following Kaltura tools:
Each tool is independent of the others, and you can select to use any one of them or all of them.
Start by performing the following steps:
- Login to your Blackboard instance with an Account Admin user account.
- Click Admin in the left navigation bar.
- Locate the Integrations section and select LTI Tool Providers.
- In the LTI Tool Providers page displays.
- On the LTI Tool Providers page locate the Tool Provider you created.
- Hover over the name for the Tool Provider to expose the icon for the options menu.
- Click on the icon to display the list of options.
- Click on Manage Placements
- Click on Create Placement
- Complete the steps in each of the following subsections to add a placement for the Kaltura tool you would like to add:
The Administrator Tools page displays.


The Create Placement page displays.

My Media
1. Complete the fields as follows:
- Label – Enter the name displayed to users, for example, My Media (it can be any value)
- Description – Enter a description for the tool
- Handle – Enter the internal ID for the tool, for example, KalturaMyMedia
- Availability – Set to 'Yes' to make the tool available to users
- Type – Select System Tool
- Icon
- Save the Kaltura icon to a location on your computer

- Click the browse button to browse to the location you saved the icon to
- Select the icon file and add to the placement
- Save the Kaltura icon to a location on your computer
- Target Link URI - Enter your KAF URL concatenated with the following URL: /bbultra/index/launch/target/my-media
for example, https://123456.kaf.kaltura.com/bbultra/index/launch/target/my-media
2. Click Submit.

Media Gallery
1. Complete the fields as follows:
- Label – Enter the name displayed to users, for example, Media Gallery (it can be any value)
- Description – Enter a description for the tool
- Handle – Enter the internal ID for the tool, for example, KalturaMediaGallery
- Availability – Set to 'Yes' to make the tool available to users
- Type – Select Course Tool
- check Allow student access
- Icon
- Save the Kaltura icon to a location on your computer

- Click the browse button to browse to the location you saved the icon to
- Select the icon file and add to the placement
- Save the Kaltura icon to a location on your computer
- Target Link URI - Enter your KAF URL concatenated with the following URL: /hosted/index/course-gallery
for example, https://123456.kaf.kaltura.com/hosted/index/course-gallery
2. Click Submit.
Browse, Search and Embed (BSE)
1. Complete the fields as follows:
- Label – Enter the name displayed to users, for example, Embed Media (it can be any value)
- Description – Enter a description for the tool
- Handle – Enter the internal ID for the tool, for example, KalturaBSE
- Availability – Set to 'Yes' to make the tool available to users
- Type – Select Deep Linking content tool
- check Allow student access
- Icon
- Save the Kaltura icon to a location on your computer
- Click the browse button to browse to the location you saved the icon to
- Select the icon file and add to the placement
- Save the Kaltura icon to a location on your computer
- Target Link URI - Enter your KAF URL concatenated with the following URL: /browseandembed/index/browseandembed
for example, https://123456.kaf.kaltura.com/browseandembed/index/browseandembed
2. Click Submit.
Video Quiz
1. Complete the fields as follows:
- Label – Enter the name displayed to users, for example, Kaltura Video Quiz (it can be any value)
- Description – Enter a description for the tool
- Handle – Enter the internal ID for the tool, for example, KalturaVideoQuiz
- Availability – Set to 'Yes' to make the tool available to users
- Type – Select Deep Linking content tool
- check Allow student access
- Icon
- Save the Kaltura icon to a location on your computer
- Click the browse button to browse to the location you saved the icon to
- Select the icon file and add to the placement
- Save the Kaltura icon to a location on your computer
- Target Link URI - Enter your KAF URL concatenated with the following URL: /browseandembed/index/browseandembed?type=quiz
for example, https://123456.kaf.kaltuar.com/browseandembed/index/browseandembed?type=quiz
2. Click Submit.
Step 5: Create the REST API Integration
This enables features like publishing from My Media to Media Galleries.
Option 1: Secure method (recommended)
The REST API Integration for Kaltura will have User level privileges with the addition of privileges to list the courses they are enrolled in.
- Login to your Blackboard instance with an Account Admin user account.
- Navigate to Administrator Tools.
- Under Users, click System Roles.
- Click Create Role.
- In the Create System Role page, fill in the following values:
- Role Name - Enter a unique name for the system role, for example, KalturaRESTAPIRole
- Role ID - Enter a unique ID for the system role, for example, KALTURAREST1
- Description - Enter a description for this system role
- Click Submit.
- To add the additional privileges for this role, click PERMITTED.
- Scroll to the bottom of the page and click the Show All button, to also display all available privileges
- Open the browser page search for the browser you are using (Ctrl-f).
- Enter Administrator Panel (Users) > Users > Edit > View Course Enrollments.
- Click the down arrow on the search to jump to the next search item.
- Click the check box to the left.
- Scroll to the top of the list and click on the Privileges box and select Permit Privileges.
- On the Administrator Tools page, click Users.
- Click Create User.
- Create a new user using the standard settings used by your organization. Kaltura recommends setting the Primary Institution Role to 'Other'. Set the Primary System Role to the system role you have created.
- Click Submit.
- On the Administrator Tools page, under Integrations, click REST API Integrations.
- Click the Create Integration button.
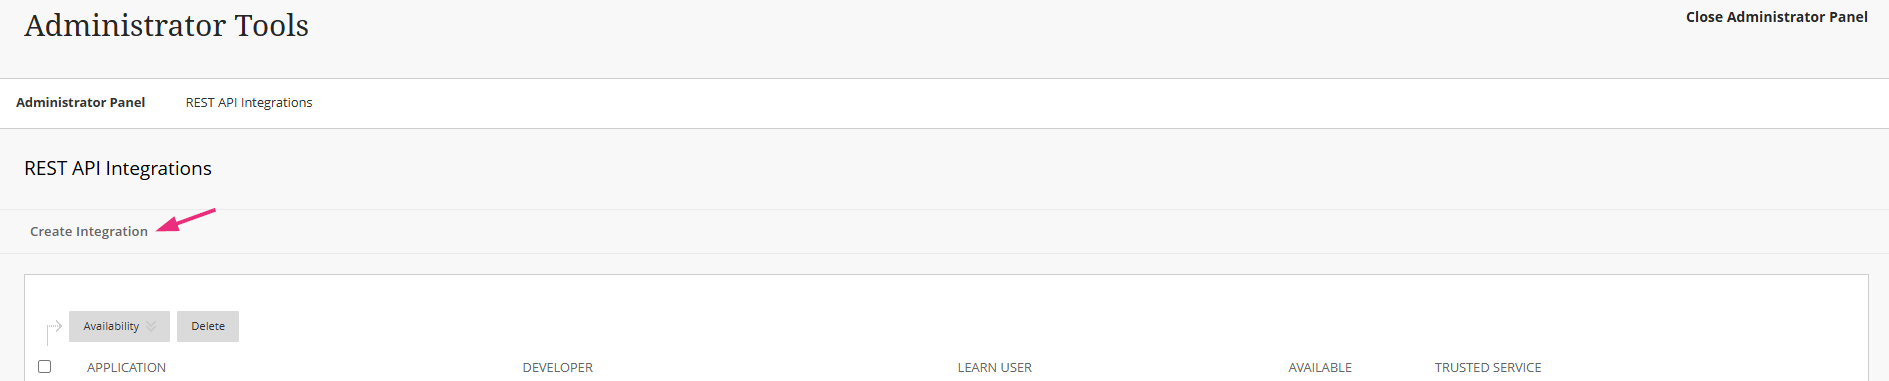
The Create Integration page displays.

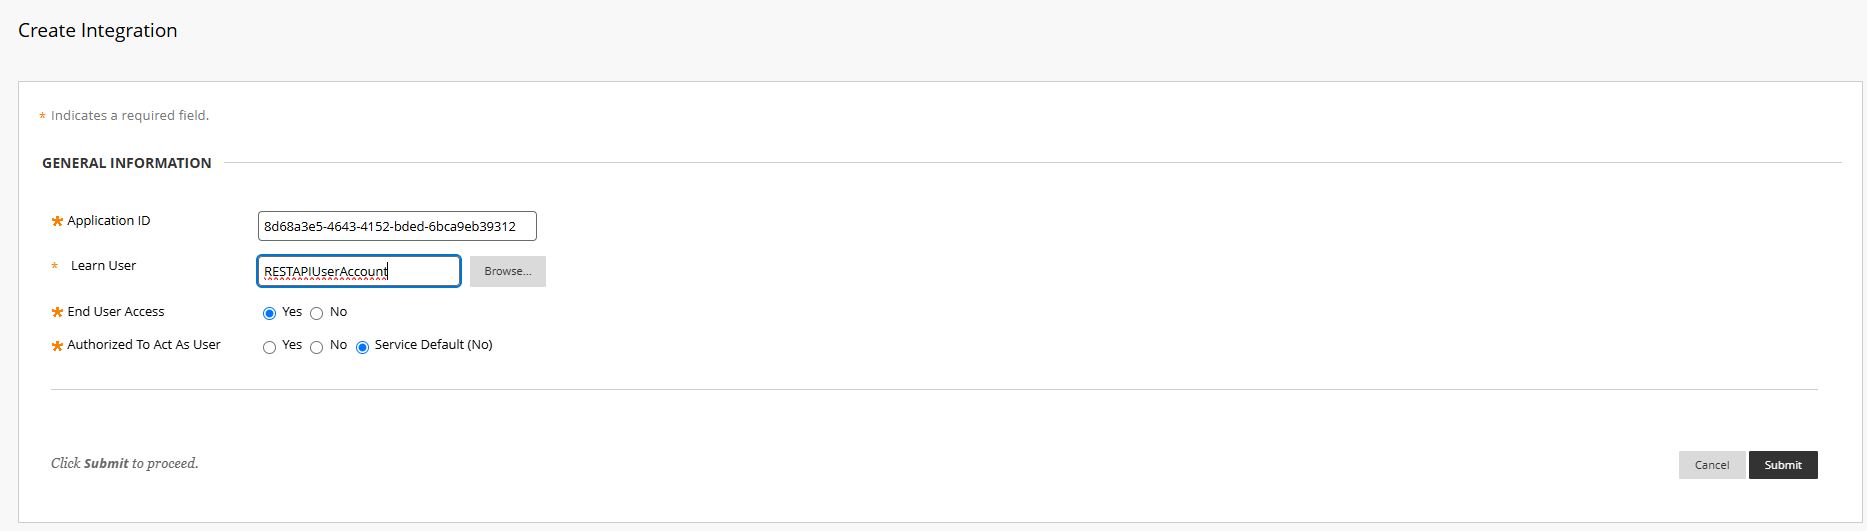
- Complete the following:
- Application ID - Use the Kaltura Application ID: 8d68a3e5-4643-4152-bded-6bca9eb39312
- Learn User - set to the REST API Integration user account you created in steps 7-10 above
- End User Access - set to YES.
- Authorized To Act As User - set to Service Default (No).

The System Roles page displays.

The Create System Role page displays.

A success message will display and state that the System Role has been created, and the Manage Privileges page displays.


A list of the Permitted Privileges that are enabled for this role display.


Repeat the steps (10 - 13) using a search value of Administrator Panel (Users) > Users > Edit > View Organization Enrollments.
The two additional privileges have now been added to the role.

The Users page displays.

The Create User page displays.


21. Click Submit.
Option 2: Admin user method (less secure)
This method grants full system admin privileges to the integration and is not recommended unless absolutely necessary. Use Option 1 whenever possible to minimize access.
- Login to your Blackboard instance with an Account Admin user account.
- Navigate to Administrator Tools.
- Click Create Integration.
Under Integrations, click REST API Integrations.
The REST API Integrations page displays.

4. Set the following:
- Application ID - Use the Kaltura Application ID: 8d68a3e5-4643-4152-bded-6bca9eb39312
- Learn User - Set to a Blackboard Admin user that will be used
- End User Access - Set to 'Yes'
- Authorize To Act As User - Set to Service Default (No)

5. Click Submit.
You're done! The Kaltura tools are now deployed in Blackboard using the latest LTI 1.3 integration.
Need help or migrating from an older setup? Contact your Kaltura representative.
