About
This guide describes how to add the Kaltura Video Extension for Brightspace with LTI version 1.3 to your Brightspace environment. This guide is intended for Brightspace and Kaltura administrators.
The Kaltura Video Extension for Brightspace is implemented as a set of LTI external tools. The tools are added manually through the LTI Advantage Tool Registration and Deployment functionality within Brightspace.
Prerequisites
- A Kaltura account
- A Kaltura Application Framework (KAF) instance of type D2L
- minimal KAF version is v5.99.46
- A Brightspace account
Deployment instructions
This section describes how to deploy the Kaltura Video Extension for Brightspace. The Kaltura Video Extension for Brightspace uses the LTI Advantage Tool Registration and Deployment settings in Brightspace which allows you to create and deploy the Kaltura external tools in Brightspace using LTI 1.3. The following sections provide the steps to:
- Register the Kaltura tool in Brightspace
- Enable and configure LTI 1.3 support within your KAF instance
- Deploy the Kaltura tools in Brightspace
- Configure the Kaltura tools/links in Brightspace
- Insert the Kaltura tool links within the Brightspace navigation bar
Step 1. Register the Kaltura Tool in Brightspace
- Login to your Brightspace instance with an Admin user account.
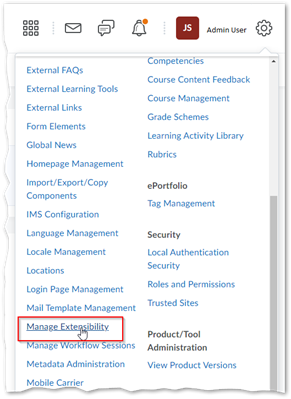
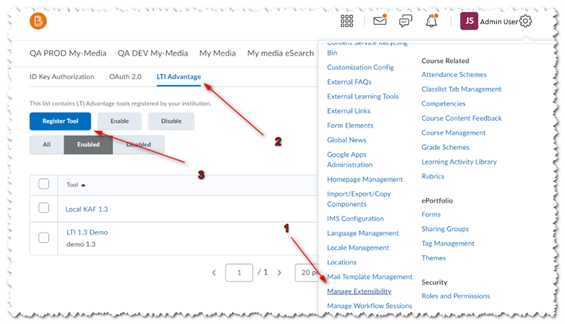
- In Brightspace, click the 'Admin Tools' (little gear on top right) button, and click on "Manage Extensibility".
- In Manage Extensibility page select the “LTI Advantage” tab and click the “Register Tool” button.
- The “Register a Tool” page will display. Click the “Standard” radio button to display the Tool Registration fields. For the following steps please refer to this picture.
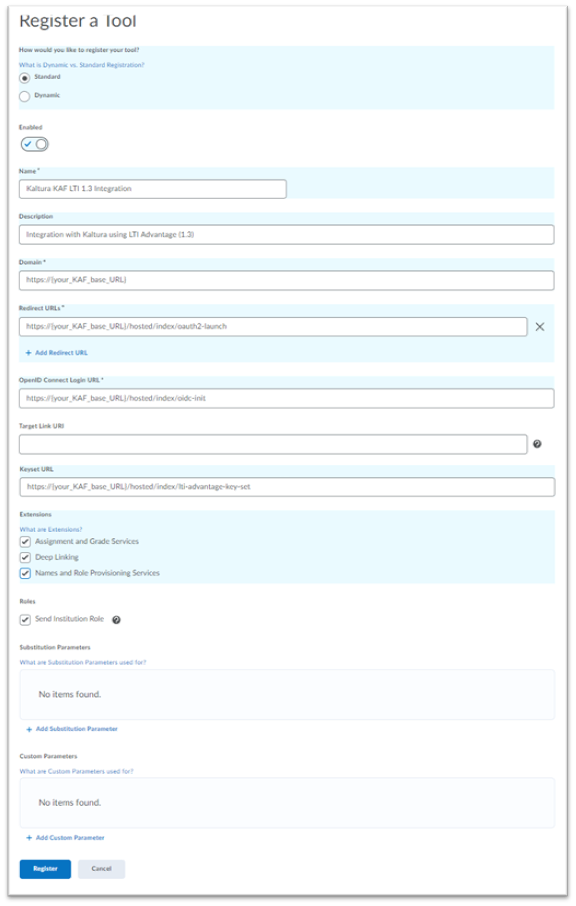
- Enabled should be checked. If it is not, click on the slide button to enable the tool.
- Fill in the following fields:
- Name - give a general name to the tool. E.g: “Kaltura KAF LTI 1.3 Integration”.
- Description - optional.
- Domain - Set to your KAF base URL https://{your_KAF_base_URL}
e.g. “https://12345.kaf.kaltura.com” - "Redirect URIs" - Set to https://{your_KAF_base_URL}/hosted/index/oauth2-launch
e.g. “https://12345.kaf.kaltura.com/hosted/index/oauth2-launch” - OpenID Connect Login URL - Set to https://{your_KAF_base_URL}/hosted/index/oidc-init
e.g. “https://12345.kaf.kaltura.com/hosted/index/oidc-init” - Keyset URL - Set to https://{your_KAF_base_URL}/hosted/index/lti-advantage-key-set
e.g. “https://12345.kaf.kaltura.com/hosted/index/lti-advantage-key-set” - Extensions - check the following items.
i. Assignment and Grade Services
ii. Deep Linking
iii. Names and Role Provisioning Services - Roles - Check the Send Institution Role
- Click the “Register” button. The following alert displays:
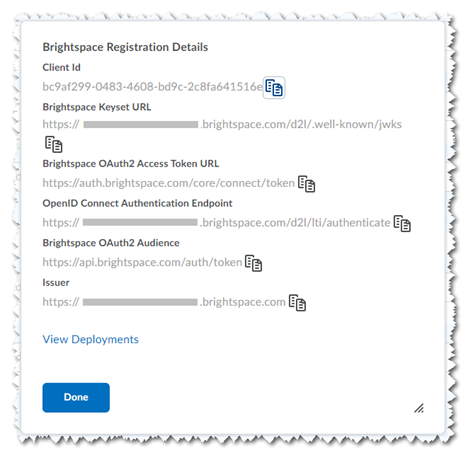
- Click "Done".


Step 2. Set the Configuration in the KAF Instance
- In Brightspace navigate to the LTI Advantage page - Admin Tools > Manage Extensibility > LTI Advantage (refer to steps 1 – 3 in the Register the Kaltura Tool in Brightspace section.)
- Click on the name of the tool your created.
- In the page to edit the tool, scroll down to the “Brightspace Registration Details”.
- In a separate browser tab or window login to your D2L KAF Configuration Management page (https://{your_KAF_base_URL}/admin).
- Navigate to the Hosted module (https://{your_KAF_base_URL}/admin/config/tab/hosted).
- Perform the following steps using the information listed under the “Brightspace Registration Details”.
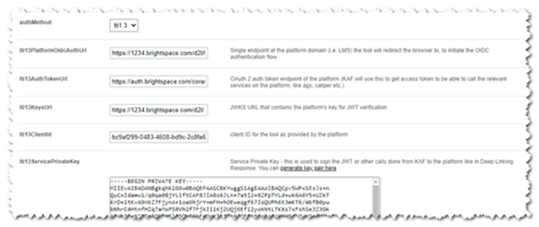
- Set “authMethod” to "lti1.3"
This will expose the fields listed in steps a – f. - Set the lti13PlatformOidcAuthUrl value to the value listed for the OpenID Connect Authentication Endpoint.
(e.g. https://{your_D2L_Domain}/d2l/lti/authenticate) - Set the lti13AuthTokenURL value to the value listed for the Brightspace OAuth2 Access Token URL.
(e.g. https://auth.brightspace.com/core/connect/token) - Set the lti13KeysURL value to the value listed for the Brightspace Keyset URL.
(e.g. https://{your_D2L_domain}/d2l/.well-known/jwks - Set the lti13ClientId to the value listed for the Client Id
- In the lti13ServicePrivateKey section click the “Generate key pair here” link. This will generate the private and public keys.
- In the Certificate Generator frame click the “Use” button to have the key pairs saved to the lti13ServicePrivateKey and lti13ServicePublicKey fields.
- Set “authMethod” to "lti1.3"
- Scroll to the bottom of the Hosted module settings and click Save.

Step 3. Configure the Kaltura User ID value.
The default Kaltura User ID value will be your Brightspace User ID.
With the Kaltura LMS integration, user ID records are passed from the LMS to Kaltura in the LTI Launch. A Kaltura admin can configure settings in KAF which will determine which claim:property pair to use from the launch as the Kaltura User ID.
With the implementation of LTI 1.3 Kaltura has added fields in the Hosted module to support the user ID assignment in Kaltura.
lti13UserIdClaim - The LTI Claim from which the user ID should be taken from
lti13UserIdClaimProperty - The property from the claim that the user ID should be taken from
When using LTI 1.3 as the authentication method KAF>Hosted>authmethod=lti1.3) for Kaltura, admins used the KAF Hosted module's "lti13UserIdClaim" and lti13UserIdClaimProperty field to set the value for which LTI attribute to use for the user ID value.
LTI 1.3 default values:
- ltiUserIdAtrribute = blank
- lti13UserIdClaim = http://www.brightspace.com
- lti13UserIdProperty = username
For advanced information on how to configure the Kaltura User ID value using other LTI 1.3 launch attributes please read the following Kaltura Knowledge Center article before proceeding. Configuring the Kaltura User ID Value to Use with Your LMS Integration.
To view and configure these settings using the default values:
- Login to your KAF Configuration Management page
(https://{your_KAF_base_URL}/admin). - Navigate to the Hosted Module
(https://{your_KAF_base_URL}/admin/config/tab/hosted). - Scroll down on the page to the ltiUserIdAttribute setting.
- If the value for ltiUserIDAttribute is set to ext_d2l_username then proceed to step 5.
Otherwise please read the following Kaltura Knowledge Center article before proceeding. Configuring the Kaltura User ID Value to Use with Your LMS Integration. - Set ltiUserIdAttribute = blank
- Set lti13UserIdClaim = http://www.brightspace.com
- Set lti13UserIdProperty = username
- Scroll to the bottom of the Hosted module settings and click Save.
Step 4. Adding the LTI Tool in Brightspace
- In Brightspace navigate to the LTI Advantage page - Admin Tools > Manage Extensibility > LTI Advantage (refer to steps 1 – 3 in the Register the Kaltura Tool in Brightspace section.)
- Click on the name of the tool your created and navigate to the bottom of the page.
- Click on the “View Deployments” button.
- Click on the “New Deployment” button.
- Enabled should be checked. If it is not, click on the slide button to enable the tool.
- Fill in the configuration values as follows:
- Tool – Select the tool registered in the Register the Kaltura Tool in Brightspace section.
- Name – enter a name for the tool set (e.g. “Kaltura LTI 1.3 Tools”)
- Description – optional
- Extensions – check all 3 check boxes:
i. Assignment and Grade Services
ii. Deep Linking
iii. Names and Role Provisioning Services - Security Settings – check the following boxes, and their child boxes
i. Org Unit Information
ii. User Information
iii. Link Information
iv. Classlist including users not know to tool - Configuration Settings – check the following box:
i. Auto Create Grade Items - Make the tool available to – Select your org unit, and add “All descendants”.
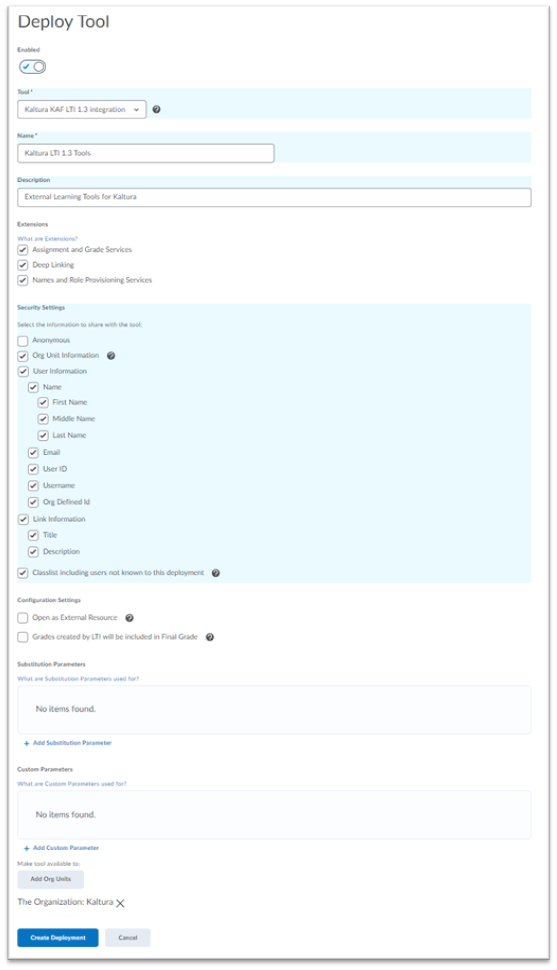
- Click the “Create Deployment” button. The following confirmation alert displays:
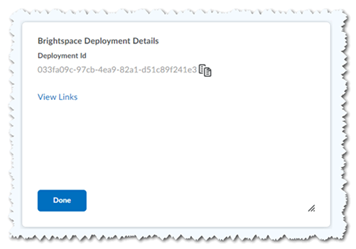
- Click “View Links” to move to the next steps.
Note: If you click “Done” by mistake, you will be able to access the links view in the next section.


Step 5. Adding the Kaltura Tools/Links in Brightspace
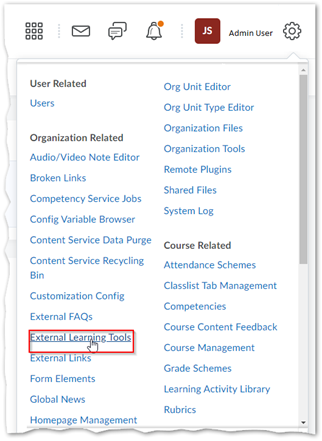
- In Brightspace, click the 'Admin Tools' (little gear on top right) button, and click on "External Learning Tools".
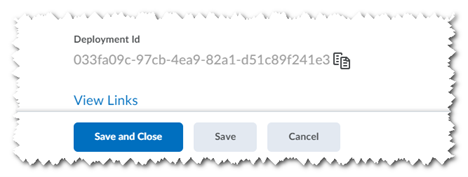
- On the LTI Advantage page click on the tool you created, scroll to the bottom of the page, and click on “View Deployments”. This is where you will see the tool Deployment Id, and a “View Links” link. Click on the “View Links” link, a new browser tab opens.
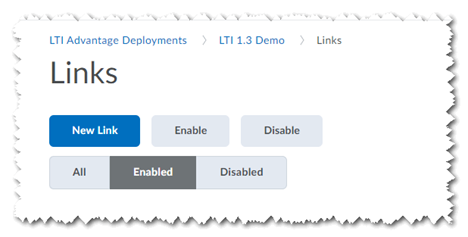
- Click on the “New Link" button, and fill in the configuration for each of the Kaltura tools you would like to create:


Kaltura Tools - Browse, Search, and Embed (BSE) - Quick Link
Use these steps to add the Kaltura BSE tool as a Brightspace Quick Link.
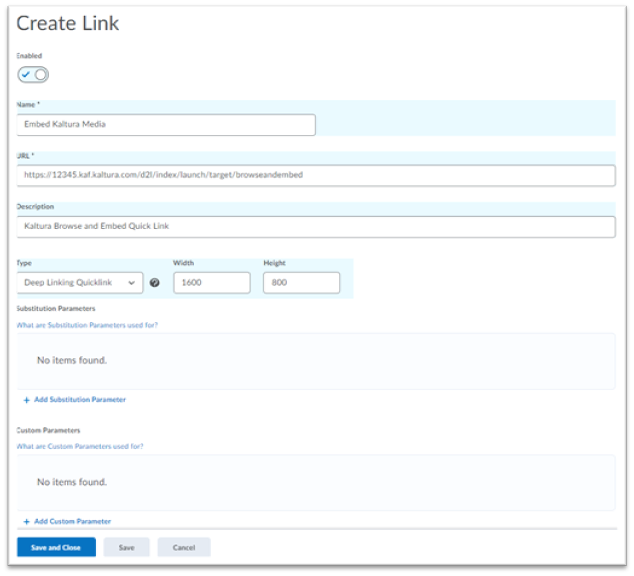
- Clicking the “New Link” button will display the Create Link page.
- Enabled should be checked. If it is not, click on the slide button to enable the tool.
- Fill in the following information:
- Name – the name that users will see for the tool: “Embed Kaltura Media”
- URL - https://{your_KAF_Base_URL}/d2l/index/launch/target/browseandembed
(e.g. https://12345.kaf.kaltura.com/d2l/index/launch/target/browseandembed) - Description – optional
- Type – select “Deep Linking Quicklink”, set Width 1125, Height 600
- Substitution Parameters - optional
- Custom Parameters – options
- Click “Save”.

Kaltura Tools - Browse, Search, and Embed (BSE) - Insert Stuff
Use these steps to add the Kaltura BSE tool to the Brightspace Insert Stuff tool.
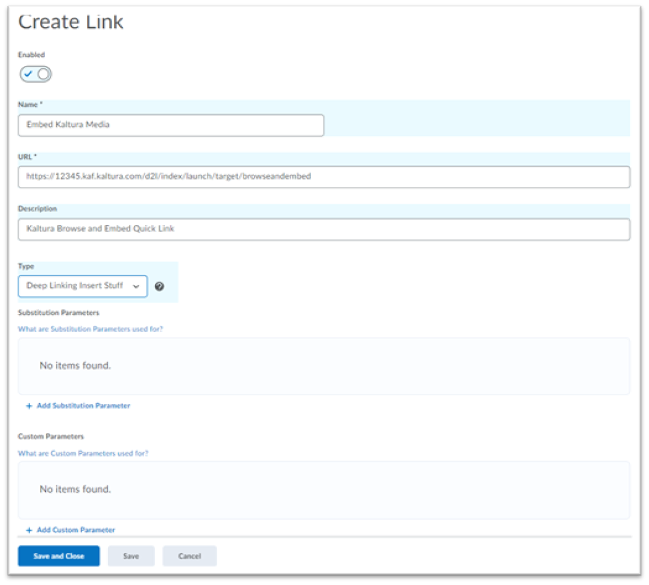
- Clicking the “New Link” button will display the Create Link page.
- Enabled should be checked. If it is not, click on the slide button to enable the tool.
- Fill in the following information:
- Name – the name that users will see for the tool: “Embed Kaltura Media”
- URL - https://{your_KAF_Base_URL}/d2l/index/launch/target/browseandembed
(e.g. https://12345.kaf.kaltura.com/d2l/index/launch/target/browseandembed) - Description – optional
- Type – select “Deep Linking Insert Stuff”
- Substitution Parameters - optional
- Custom Parameters – options
- Click “Save".

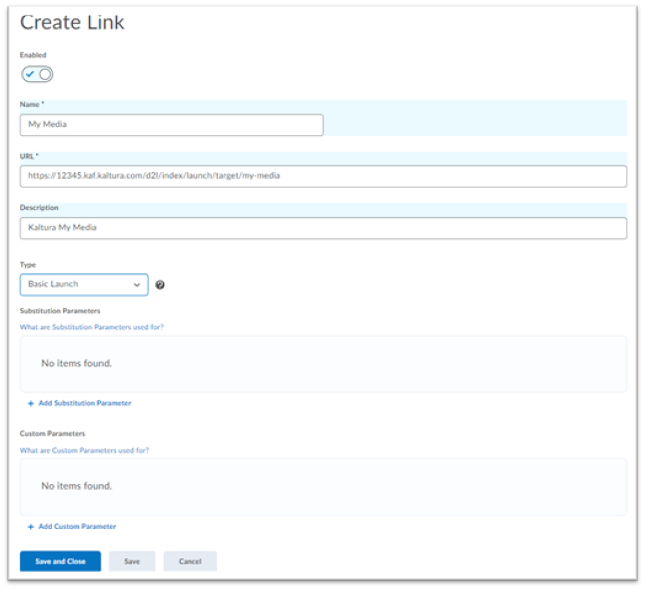
Kaltura Tools - My Media
Use these steps to add the Kaltura My Media tool to Brightspace.
- Clicking the “New Link” button will display the Create Link page.
- Enabled should be checked. If it is not, click on the slide button to enable the tool.
- Fill in the following information:
- Name – the name that users will see for the tool: “My Media”
- URL - https://{your_KAF_Base_URL}/d2l/index/launch/target/my-media
(e.g. https://12345.kaf.kaltura.com/d2l/index/launch/target/my-media) - Description – optional
- Type – select “Basic Launch”
- Substitution Parameters - optional
- Custom Parameters – options
- Click “Save”.

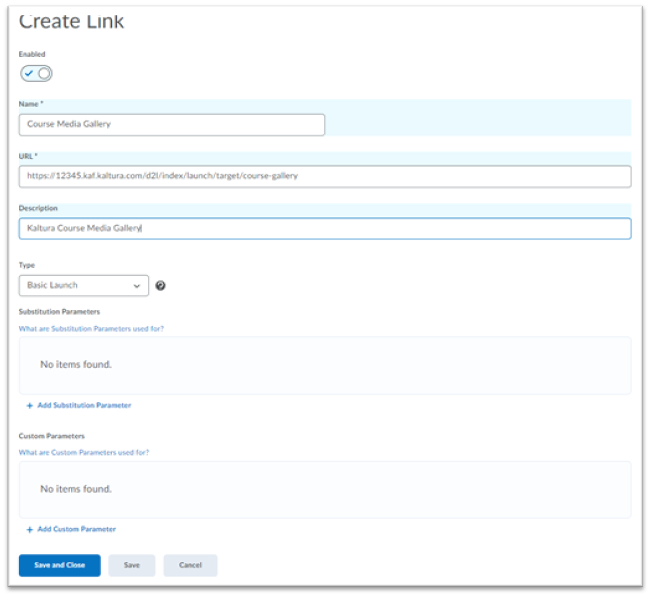
Kaltura Tools - Media Gallery
Use these steps to add the Kaltura Media Gallery tool to Brightspace.
- Clicking the “New Link” button will display the Create Link page.
- Enabled should be checked. If it is not, click on the slide button to enable the tool.
- Fill in the following information:
- Name – the name that users will see for the tool: “Course Media Gallery”.
- URL - https://{your_KAF_Base_URL}/d2l/index/launch/target/course-gallery
(e.g. https://12345.kaf.kaltura.com/d2l/index/launch/target/course-gallery) - Description – optional
- Type – select “Basic Launch”
- Substitution Parameters - optional
- Custom Parameters – options
- Click “Save”.

Step 6. Add My Media to the org unit navigation bar
- Login to Brightspace as the administrator of the org unit you want to add the My Media link to and go to the org unit home page.
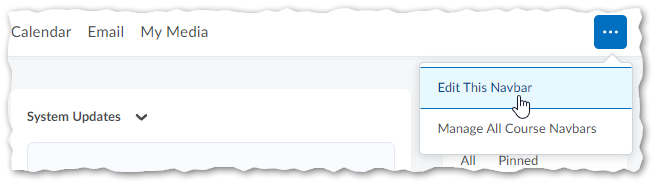
- Hover over the navigation bar in order for the Actions for Navbar button to appear and click on the Edit This Navbar option.
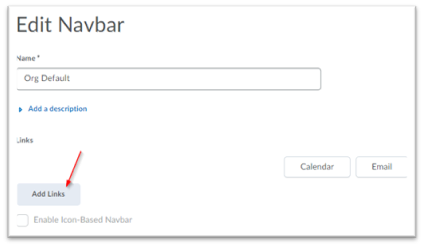
- In the Edit Navbar page, click on Add Links.
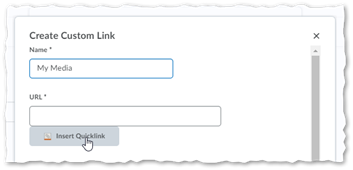
- In the Add Links window, click on Create Custom Link.
- In the Create Custom Link window:
- Name - the name that users will see for the navbar link: “My Media”
- Click on Insert Quicklink.
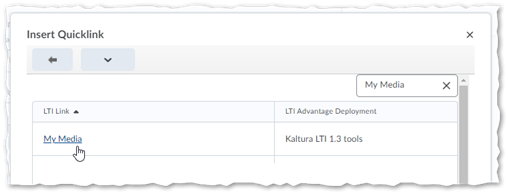
- In the Insert Quicklink window, click on External Learning Tools.

- In the Insert Quicklink window, search for My Media and click on it. The URL for the My Media tool for your LTI Advantage Deployment will be added to the URL setting in the Create Custom Link window.
- On the Create Custom Link page under Behavior, select the iframe behavior for My Media. Kaltura recommends selecting Same window.
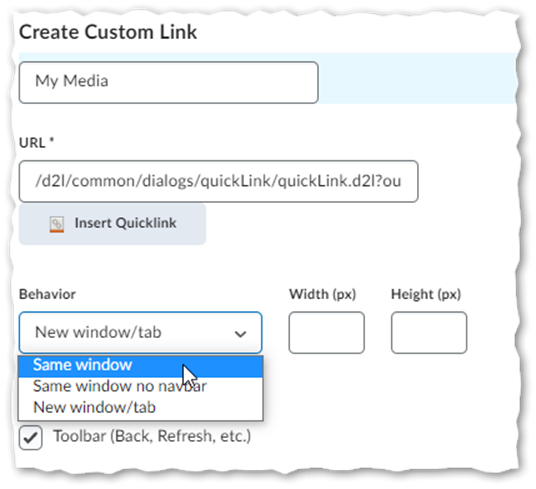
- Click Create.
- Click Add.
- In the Edit Navbar window click Save and Close. The My Media link is now added to the Org Unit Navbar.


Step 7. Add Course Media Gallery to the course navigation bar
Adding the Course Media Gallery Tool can be done either by the admin in the course template, or by the individual course admin.
- Login to Brightspace as the administrator of the org unit you want to add the My Media link to and go to the org unit home page.
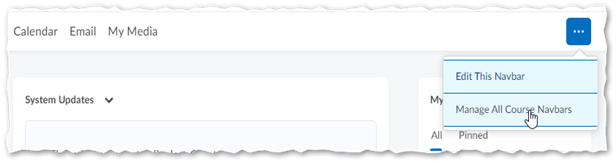
- Hover over the navigation bar in order for the Actions for Navbar button to appear and click on the Manage All Course Navbars option.
- Select the Course Navbar that you would like to add the Course Media Gallery link to. The Edit Navbar window opens.
- In the Edit Navbar window, click on the Add Links button.
- In the Add Links window, click on Create Custom Link.
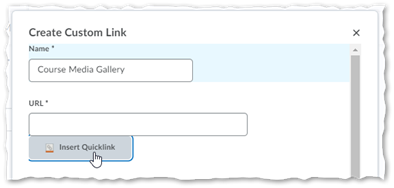
- In the Create Custom Link window:
- Name - the name that users will see for the navbar link: “Course Media Gallery”
- Click on Insert Quicklink
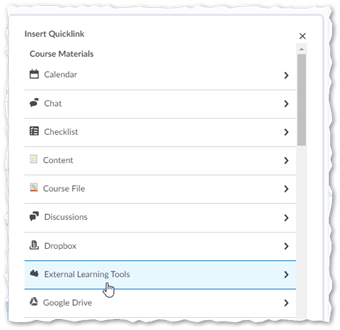
- In the Insert Quicklink window, click on External Learning Tools.
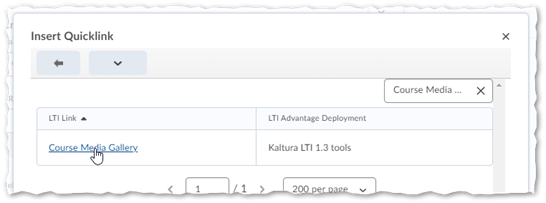
- In the Insert Quicklink window, search for Course Media Gallery and click on it. The URL for the Course Media Gallery tool for your LTI Advantage Deployment will be added to the URL setting in the Create Custom Link window.
- On the Create Custom Link page under Behavior, select the iframe behavior for the Course Media Gallery. Kaltura recommends selecting Same window.
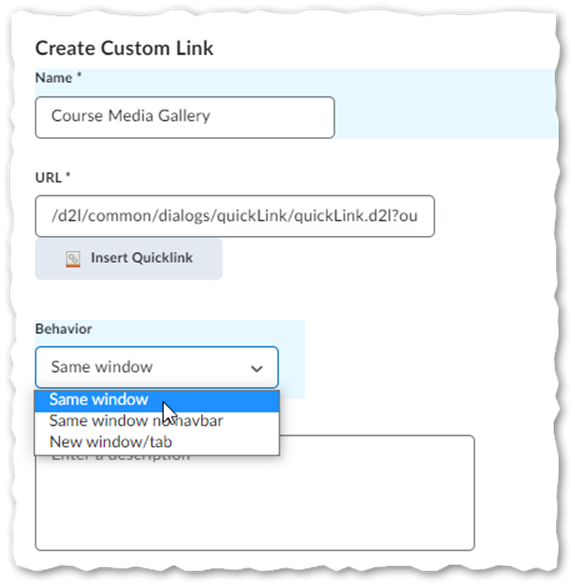
Click Create.
Click Add.
In the Edit Navbar window click Save and Close. The Course Media Gallery link is now added to the Course Navbar.


