About
This article provides solutions to common issues with Capture, including installation, recording, uploading, and configuration problems.
Capture isn't available from app stores or public download sites. You can only download it from your institution's Content Hubs / Video Portal or LMS.
Capture isn't supported on mobile devices, tablets, or Chromebooks. For supported operating systems and hardware requirements, see Capture Prerequisites and system requirements.
Installation and startup issues
Can’t find Capture
Capture is available through your institution’s Content Hubs, legacy Video Portal or LMS using the 'Add New' or '+ Create' menu.
Capture is not available in app stores or public download pages.
If you don't see the Capture option or the download doesn't start, contact your institution's IT department or support team.
 +Create menu showing Capture in an LMS site
Capture download doesn't start
If clicking 'Download' reloads the page instead of downloading Capture, the issue is typically caused by your organization's network or system configuration.
Contact your IT administrator to make sure software downloads aren't blocked by your organization's firewall or endpoint security software.
If the issue continues after your administrator confirms the configuration, contact Kaltura Support.
Capture won't install
If Capture won't install or won't open, perform a clean installation.
Before uninstalling Capture, back up any recordings you want to keep.
Back up your recordings
- Open the Recordings folder (see Access the Recordings folder further down this guide if you're not sure how).
- Locate the recordings you want to keep (.mp4 files).
- Select the files, right-click, and select Copy.
- Paste the files into another location, such as your Desktop or Documents folder.
Reinstall Capture
- Open Settings > Apps > Installed apps.
- Search for Kaltura Capture in the list.
- Click the three dots next to it and select Uninstall.
- Confirm when prompted.
Delete the following folders from the Capture installation directory if they remain after uninstalling:
- Bin
- Settings
- Setup
Restart your computer.
Download and install the latest version of Capture. See Capture Release Notes and Install Capture for Windows or Install Capture for Mac.
Uploading issues
Uploaded recording appears green
If your recording plays correctly on your computer but appears green after upload, configure Capture to use the CPU encoder.
Windows
- Right-click on your desktop and select Display settings.
- Scroll down and click Graphics.
- Under “Choose an app to set preference,” select Desktop app.
- Click Browse. When File Explorer opens, do the following:
- Double-click Local Disk (C:).
- Go to Program Files > Kaltura > Capture.
- Select KalturaCapture.exe and click Add.
5. Once it's added, click Options.
6. Click Save.
Disable hardware optimization
- Open the Settings folder (see Access the Settings folder further down this guide if you're not sure how).
- Open localSettings.json in a text editor like Notepad (right-click the file and choose Open with > Notepad).
- Under the captureEngine section, add:
- Save and restart the app.
"hwOptimisations": false

Upload stuck in 'Pending'
If an upload remains in the Pending state, you can reset the upload status.
- Go to the Recordings > completed folder (see Access the Recordings folder further down this guide if you're not sure how).
- Locate the .json file that matches the recording (the name and time should be similar), and open it using a text editor like Notepad (right-click the file and choose Open with > Notepad).
- Look for the line that starts with "uploadStatus" and delete everything below that line, leaving the closing } at the end of the file.
- Replace the line with:
- Save the file.
- Move both the recording file and the edited .json file back to the main Recordings folder (replace 'username' with your Windows user name): C:\Users\user name\AppData\Local\Kaltura\Capture\Recordings.
- Select the edited .json file and the matching video file (usually .mp4)
- Right-click and choose Cut.
- Go back to the main Recordings folder (see Access the Recordings folder further down this guide if you're not sure how)
- Right-click in the folder and choose Paste.
"uploadStatus": "auto"

|
How to move the files: |
7. Open Capture.
Capture detects the recording and attempts the upload again.
Upload stuck in 'Cancelling'
If an upload remains in the Cancelling state, you can reset it and restore the Upload button.
- Open the Recordings folder (see Access the Recordings folder further down this guide if you're not sure how).
- Find the .json file that matches your recording and and open it using a text editor like Notepad (right-click the file and choose Open with > Notepad).
- Look for the line that starts with "uploadStatus" and delete everything below it, leaving the closing } at the end.
- Replace the line with:
- Save the file.
- Open Capture.
"uploadStatus": "manual"
(this tells the app to allow manual upload)

You should now see the Upload button appear next to the recording, allowing you to re-upload it.
Recording and input issues
Recording won't start
If you receive the message "Failed to start recording. Please try again.", the issue is often related to your screen resolution or display scaling.
Try the following:
- Set your screen resolution to 1024 × 768
- Set your display scaling to 100%.
- Restart Capture and try recording again.
If the issue persists, verify that your computer meets the requirements described in Capture prerequisites and system requirements.
Camera or microphone isn't working (Mac)
If Capture can’t access your camera or mic, macOS may be blocking it due to privacy settings.
- Open System Settings (or System Preferences, depending on your macOS version).
- Select Privacy & Security.
- Select Camera.
- Make sure Kaltura Capture is enabled.
- Select Microphone.
- Make sure Kaltura Capture is enabled.
- Restart Capture.
On macOS Mojave and later, macOS requires your permission before applications can access the built-in camera and microphone. If permission wasn't granted when Capture first launched, you can enable it here. Learn more on Apple Support.
Capture doesn’t work over Remote Desktop
Capture isn't supported in Remote Desktop (RDP), Citrix, VMware, or other virtual desktop infrastructure (VDI) environments.
You might see errors like:
- "Fail to load settings"
- "Failed to preview primary/secondary device"
Run Capture directly on your local computer instead of through a remote desktop session.


Can’t record system audio (Mac)
macOS doesn’t allow apps to record system audio by default. This is a known limitation and not something Capture can override.
If you need to capture system audio on a Mac, talk to your CSM or Kaltura Support to discuss available options.
Downloading and locating recordings
Download both streams (desktop view and presenter view)
Each Capture recording creates two separate streams: Desktop (Primary) and Camera (Secondary).
To download both recordings:
- Go to My Media in your Video Portal.
- Search for the recording using its entry ID.
- Open one of the entries, then click the Downloads tab.
- Next to Available Formats select Source.
- Click Save then click Go To Media.
- Use the Download option to download the file.

This will bring you to both entries of the Capture recording, the ‘Desktop View' and the 'Presenter’ view.


Repeat for the second entry.
Capture stores the desktop and camera recordings as separate files. They can't be downloaded as a single combined video. If you need a single video, we suggest combining the files using video editing software.
Recover the original recording files
The original recording files remain on the computer where the recording was created.
If you're using a different computer, these files won't be available.
To recover the original files:
- Open the Recordings folder (see Access the Recordings folder further down this guide if you're not sure how).
- Locate the two .mp4 files created for the recording.These are your original screen and camera recordings. Their names will look similar and have the same timestamp.
- Right-click each file and select Copy.
- Paste the files into another location, such as your Desktop or Documents folder.
From there, you can rename, edit, or upload the files wherever you need.

Configuration tips
Change Capture settings manually
Some advanced settings can only be changed by editing the app’s configuration file.
- Open the Settings folder (see Access the Settings folder further down this guide if you're not sure how).
- Open the file called localSettings.json using a text editor like Notepad (right-click the file and choose Open with > Notepad).
- Update the required setting.
- Save the file.
- Restart Capture if required.
For example, to disable automatic uploads, change:
"LoadUploaderInApp":true
to
"LoadUploaderInApp":false
Stop Capture from launching automatically
Windows
Option 1:
- Open Settings > Apps > Startup.
- Locate Kaltura Capture in the list
- Turn off the startup toggle.
Option 2:
- Open File Explorer.
- Paste this path into the address bar (replace 'username' with your Windows user name): C:\Users\user name\AppData\Roaming\Microsoft\Windows\Start Menu\Programs\Startup
- If a Kaltura Capture shortcut exists, right-click on it and select Delete.
Mac
- Go to System Settings (or System Preferences) > Users & Groups.
- Click the Login Items tab.
- Select Kaltura Capture in the list.
- Click the remove button (-).
Alternative (both Windows and Mac)
You can also disable automatic startup by editing the configuration file.
- Open the Settings folder (see Access the Settings folder further down this guide if you're not sure how).
- Open the file called localSettings.json using a text editor like Notepad (right-click the file and choose Open with > Notepad).
- Change:
- Save the file and close the editor.
"silentStart": false
to
"silentStart": true
Error messages
If you receive any of the following error messages while recording, verify that Capture has permission to access your screen, camera, and microphone:
- Failed to start recording. Please try again.
- Failed to stop recording. Please try again.
- Failed to load secondary device. Please restart the application.
- Failed to load audio device. Please restart the application.
- Failed to close recording file.
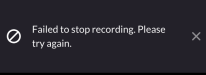

To learn how to adjust permissions, see Install Capture for Windows or Install Capture for Mac.
After updating the required permissions, restart your computer and try again.
Logging and diagnostics
Upload logs and get a Token ID
If Kaltura Support asks for logs, you can upload them directly from Capture.
- Open Kaltura Capture.
- Click Manage > Settings.
- Click Upload Logs.
- Copy the displayed Token ID and send it to Kaltura Support.
Need more detailed logs? If Support requests additional diagnostic information, see Increase log level in Capture.
Admin and deployment
Get latest version for managed deployment
- Download the latest installer from Kaltura Capture Release Notes.
- Copy the direct download link (e.g., https://cdnapisec.kaltura.com/.../KalturaCapture_admin_4.x.x.msi) and provide it to your IT team or whoever is responsible for software deployment at your organization.
Monitor Capture with Process Monitor (advanced)
If you're troubleshooting an advanced issue, Microsoft Process Monitor (Procmon) can help identify files, folders, and registry keys that Capture is attempting to access.
- Download Microsoft Process Monitor.
- Open Procmon64.exe.
- Go to Tools > Process Tree.
- Locate KalturaCapture.exe, right-click it, and select Add Process and children to Include Filter.
Review the captured events to identify access failures or other errors. If the issue persists, contact Kaltura Support.
Access the recordings folder
Some troubleshooting procedures require access to the folder where Capture stores recordings.
Windows
Option 1
- Open File Explorer (click the folder icon in your taskbar).
- In the left-hand sidebar, click (replace 'username' with your Windows user name): This PC > Local Disk (C:) > Users > username > AppData > Local > Kaltura > Capture > Recordings
If you don’t see the AppData folder, you may need to enable hidden files: click View > Show > Hidden items in the File Explorer toolbar.
Option 2
- Open File Explorer (click the folder icon in your taskbar).
- Copy this path (replace 'username' with your Windows user name): C:\Users\user name\AppData\Local\Kaltura\Capture\Recordings
- Paste it into the address bar at the top and press enter.
In Capture version 4.2.141 and later, you can also view the Recordings folder path on the Settings tab.
Mac
If you're using a Mac, follow these steps to find your Capture recordings.
Option 1
- Open Finder (the blue-and-white face icon in your Dock).
- Click Go (in the top menu bar), then select Go to Folder.
- Paste this path (replace 'username' with your Mac user name): /Users/user name/Library/Preferences/Kaltura/Capture/Recordings
- Click Go.
Option 2
- Open Finder (the blue-and-white face icon in your Dock).
- Click Macintosh HD > Users > [your username].
- Hold the Option key, then click the Go menu and choose Library.
- Browse to Preferences > Kaltura > Capture > Recordings.
Access the settings folder
Some troubleshooting procedures require access to the Settings folder, which stores Capture configuration files.
Windows
- Open File Explorer and paste the following path into the address bar (replace 'username' with your Windows user name):
- Press enter.
C:\Users\user name\AppData\Local\Kaltura\Capture\Settings
Mac
- Open Finder > Go > Go to Folder, then paste in this path (replace 'username' with your Mac user name):
- Click Go.
/Users/user name/Library/Preferences/Kaltura/Capture/Settings.
