About
The Player Studio in Kaltura’s KMC lets you customize players with ease. Rename, favorite, duplicate, or delete players, adjust settings, and preview across devices. Use the search tool to quickly find and edit specific settings.
This guide walks you through all essential features for managing your player configurations.
Access the edit view
- In your KMC, click the Studio tab.
- Click on the desired player in the list.

The Player studio page displays.


The player settings page displays.

Editing options
Change the player's name
- Click the pencil icon to the right of the name.
- Type the name.
- Click out of the field or press enter on your keyboard. The new name displays.

The player name field displays.
Mark or unmark as a favorite
To mark this player as a favorite, click the star in the upper-right corner. When marked, the star turns yellow. Click again to unmark it.

Delete a player
- Click the three dots in the upper right corner of the page and choose Delete.
- Click Delete to confirm.

A confirmation message displays: Are you sure you want to delete [name]?
Duplicate a player
- Click the three dots in the upper right corner of the page and choose Duplicate.
- Type a name for the new player.
- Click Duplicate. The new player is added to the players List.

A confirmation message displays: Are you sure you want to duplicate [name]?

Change device for preview
Preview the player on desktop or mobile by clicking your preferred format in the lower-left corner of the screen.

Change resolution for preview
Set a custom resolution by entering values in the fields in the lower-left corner.

Choose a demo or account video for preview
To test your player setup, choose from demo or account videos.
- Click the arrow next to the preview video name.
- Browse single videos or playlists with built-in features like captions, dual screen, quizzes, and hotspots. The list of demo and account videos is displayed. Both single entries and playlists are available with demo and account videos.
- Select a video to preview your player configuration.

Search
Click the magnifying glass icon in the top left of the screen.

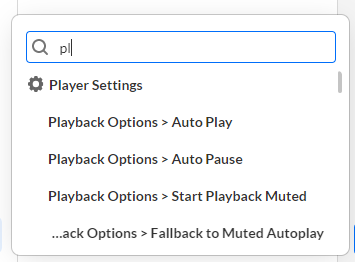
The search box displays.
Type part or all of a setting's name in the search box to find it quickly. Results will show the setting’s location path - just click the one you need, and it’ll jump straight to that setting, open, and highlight it for you. For example, try searching for “pl.”

To close the search box, click the magnifying glass again.
