About
This article explains how to configure quiz settings for new and existing video quizzes in the quiz editor.
This feature requires the following to be enabled:
If you're using a site with Theming enabled, this feature also requires the Theming module to be enabled, with the 'quizcreation' feature set to 'Yes'.
Access the quiz settings
Accessing the quiz editor varies depending on the Kaltura application you're using.
- For a new quiz, see Start creating a video quiz to access the quiz editor and its settings.
- For an existing quiz, see How to launch Kaltura's quiz editor.
Configure quiz settings
In the quiz editor, the settings are organized into three tabs: Details, Scores, and Experience.

Details
Click the Details tab.

You can configure the following settings:
- Quiz Name - Change the quiz name.
- Welcome Message - Edit or remove the welcome message displayed before participants begin the quiz. To hide the welcome page, clear Show Welcome Page.
- Allow Download of Questions List - Allow participants to download the question list before starting the quiz. When enabled, a Download Pre-test button appears on the welcome page. Participants can download the questions and answer options as a PDF.
- Instructions - Edit the instructions displayed to participants.
Scores
Click the Scores tab.

You can configure the following settings:
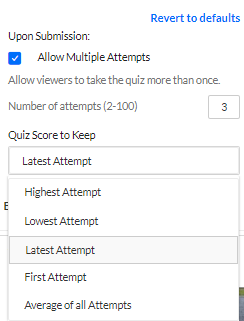
Allow Multiple Attempts - Allow participants to take the quiz more than once and select which score to keep:
- Highest attempt
- Lowest attempt
- Latest attempt
- First attempt
- Average of all attempts
This feature requires the Quiz module to be enabled, with the 'QuestionsV3' field set to 'Yes'.
If the Welcome page is enabled, the number of allowed attempts displays on that page.
 Welcome page displayed in Content Hubs
After submitting the quiz, participants see the Submitted page, which displays the final score.
 Quiz score displayed in Content Hubs
If participants choose Retake, they cannot view their previous answers.
Do Not Show Scores - Participants see a thank you message after submitting the quiz.
Show Scores - Participants see their quiz score after submission.
Include Answers - Participants can review correct and incorrect answers, along with any rationale added during quiz creation.
For more information, see Add questions to your video quiz.
Click Revert to defaults to restore the default settings.
Experience
Click the Experience tab.

You can configure the following settings:
- Allow Answers Change - Participants can change answers before submitting the quiz.
- Allow Skip - Displays a Skip for Now button so participants can return to a question later.
- Do not Allow Skip - Participants must answer a question before continuing.
- No seeking forward - Participants can't use the seek bar to move beyond the point they have already viewed.
You can choose Revert to defaults at any time.
