About
The Languages module in Kaltura's Video Portal and LMS integrations provides powerful tools for customizing and localizing text across the platform. It enables administrators to adapt the user interface for regional specificity, support multi-language events, and make modifications to preconfigured text as needed.
Using the Languages module, admins can:
- Replace text anywhere in the environment to reflect local preferences or meet client requirements.
- Configure localization for multi-language events, ensuring a seamless user experience for diverse audiences.
- Modify system-generated text to align with specific branding or terminology.
The module is case-sensitive.
Watch the video tutorial for information on customizing languages and text in the video portal.
Before you start
In the Application module, set the following:
- languageConfiguration – Set the instance configuration: multi-language instance or single language instance.
- languageSelection - When the instance is configured to multi-language, select the languages available.
- language - Choose the default language for a new user in this specific instance.

The available languages in the languageSelection field are built from the out-of-the-box Kaltura languages in addition to custom languages that were created by the admin previously.
Configure
1. Go to your Configuration Management console and click on the Languages module. You can also navigate to it directly using a link: https://{your_KMS_URL}/admin/config/tab/languages.

The Languages page displays.

2. Configure the following:
DownloadLocaleText
Click Download Texts to download a zip file containing all the latest UI text strings for all languages used in this instance. These text resources represent the words and phrases displayed on the site's user interface (UI) and can be used to create or update custom languages.

Example of PO file in English

Select the desired language and modify the text as necessary. You can use translation editors available on the web, for example, poedit, to modify text. The final result should be a binary .mo file.
UploadCustomLanguage
If a required language is not available, you can add it here.
Click +Add "UploadCustomLanguage".

Additional fields display.

languageAdminName - Insert the name of the language to be presented in the language drop-down list for admin, in the Application module's 'languageSelection' and 'language' fields.
languageClientName - Insert the name of the language to be presented in the language drop-down list for the users.
languageCode - (for LMS integrations only) Select the formal language code for syncing the instance language with the hosting application (LMS, CMS, SBS).
localeFile - Upload your customize .MO file.
You can use online tools to convert .PO files to .MO.

localeIcon - Click Upload Flag to upload a custom language flag icon to display in the Video Portal's drop-down list when the language is selected. The icon should be in one of the following formats: *.jpg, *.jpeg, *.bmp, *.png, *.gif, *.tif, *.tiff, *.ico, and sized to 30px x 26px for best visual results (images will be resized automatically if needed). You can also choose from this library of icons: http://freebiesbug.com/psd-freebies/100-flat-flag-psd-icons/

You can also select icons from this icon library.
languageId - Unique language id for application usage.
Language settings in LMS integrations
When you’re using Kaltura’s LMS integrations (like with Sakai, Blackboard, Canvas, Brightspace, or Moodle), the interface language comes from the LMS (it’s set by the LMS admin or the user).
However, you can still add custom languages (see Upload Custom Language). Just make sure the languageCode matches the LMS’s language code; this way, your custom version will override the default.
In short, the LMS decides the language, but your custom version can override it if needed.
LanguageException
Use this section to customize site text for translations in multi-language events or to modify existing terminology. Download the English PO file to retrieve all relevant text in the form of msgid.
Click +Add LanguageException.

Additional fields display.

Language - Select the language you want to apply the exception to.
msgid - This is the text you would like to change. You should copy the EXACT msgid text from the PO file.

Exception - Enter the new text (the translation) to replace the existing one.
You can change words and expressions from the same language according to clients request, for example:

Click Save.
The list of languages displayed is from the available POs. Note if a PO is removed, the exception may remain however the application will not render the changed text string.
Below is an example:

importAndExportExceptions
You can manage language exceptions for your site.
Click Expand.

Click Export Exceptions to download a file of all exceptions you have configured.

The file format is CSV, without a header line, and contains three columns: the selected language, the msgid, and the Exception. An example is shown below:

Import - You can upload a list of all language exceptions. Click Choose file and upload the CSV document from your computer.
If you choose to upload your own list of language exceptions, it will override all the existing exceptions in the LanguageException section above.

CustomToken
Custom tokens provide a simple way to replace variables in KMS text. They are especially useful for creating and personalizing email templates or other text sent to users, such as disclaimers.
You can insert custom tokens into the body of an email template or other text fields, and the system will automatically populate their values. Additionally, you can set a language for each custom token, ensuring that when the KMS instance language is changed, the token value updates automatically to match the selected language.
The following System Tokens are saved and cannot be used as custom token IDs: {FIRSTNAME} {LASTNAME} {TITLE} {COMPANY} {COUNTRY} {EMAIL} {URL}
Click +Add "CustomToken".

An additional field displays.

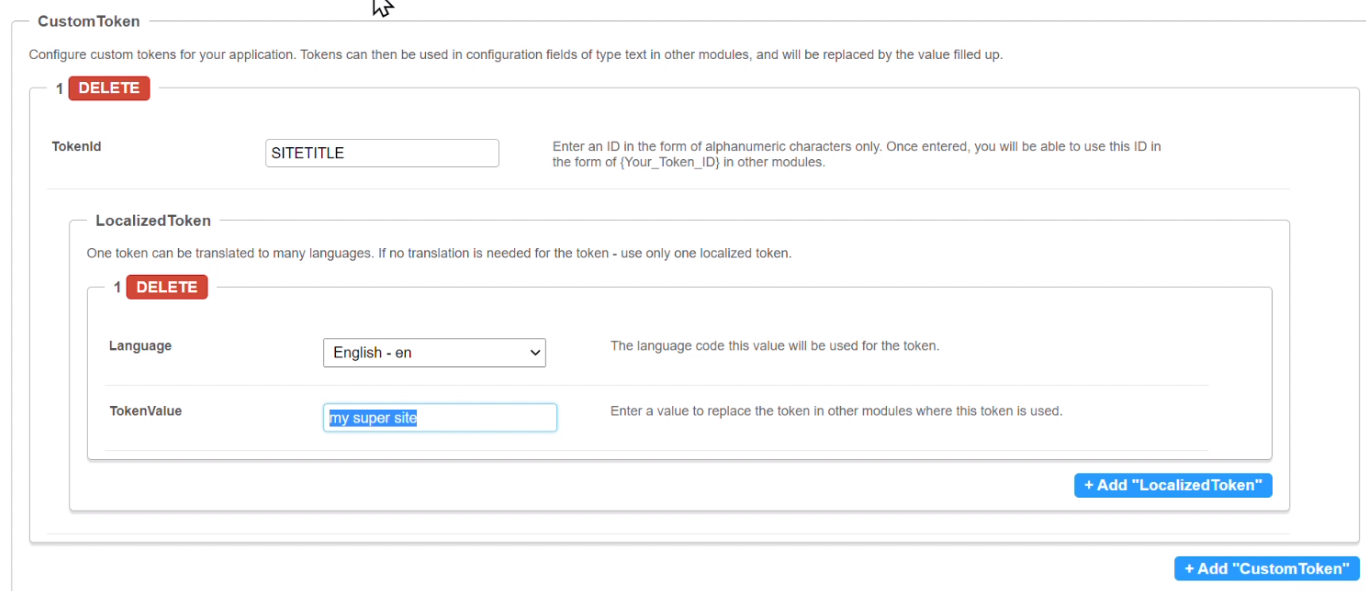
TokenID - Enter an alphanumeric ID. This will be used as {Your_Token_ID} in other modules.
LocalizedToken - Use this to translate the token into multiple languages, if needed. If no translation is needed for the token - use only one localized token.
Click + Add "LocalizedToken".

Additional fields display.

Language - Specify the language code for the token.
TokenValue - Enter the replacement text for the token. This is the value that is displayed wherever the custom token is used.
Example
In the following screen, SITETITLE is used as the TokenID.

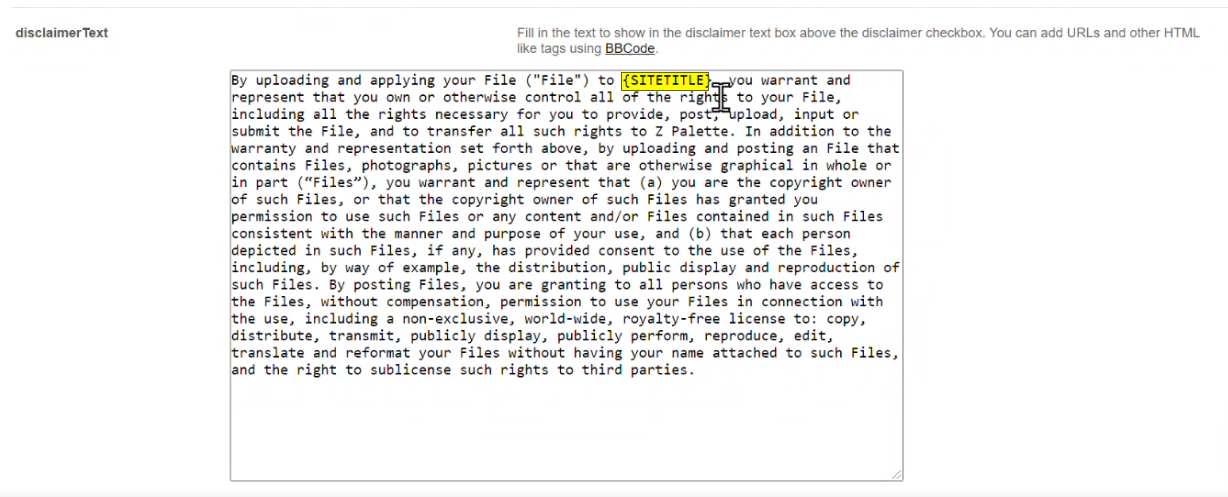
The custom token (enclosed in curly brackets) is applied in the Disclaimer text.

The TokenValue, in this case, "my super site," replaces every instance of the TokenID. You can substitute different TokenValues as needed without modifying the Disclaimer text or Email Templates directly.
Custom tokens can be configured for all available languages. For example, you can select a language and input a TokenValue (for example, "Los Videos").

When you change the language of your instance, the custom token automatically updates with the corresponding TokenValue, eliminating the need to manually adjust the Disclaimer or Email Template text.

3. When you have finished configuring the module, click Save.
