Read this article to learn about how to enable Hive for Kaltura webcasting, including configuring the Hivestreaming module, and enabling Hive when creating a webcast.
Introduction
Kaltura and Hive have developed an integration that allows Kaltura Webcasts to be streamed on Hive-enabled networks. This integration requires the enablement and configuration of a Kaltura MediaSpace plugin. This plugin allows Webcasts to be designated as “Hive-enabled”. This article includes instructions on the following:
- Enable and configure the Hivestreaming module in the Configuration Management section of MediaSpace, as a MediaSpace Administrator.
- Enable Hive when creating and scheduling a webcast event in the MediaSpace legacy Video Portal as a Webcast Administrator.
- Troubleshooting tips and instructions.
Prerequisites
MediaSpace Administrators should create a Hive Customer organization in the Hive portal and obtain the customerId of the organization.
You must have a valid Hive account. Your Hive account manager will provide you with your customerID.
The current version of Kaltura’s integration with Hive supports working with the Java client and webRTC. When working with the Java client, you should ensure that the Hive client is installed across your organization, or on those computers where you will be testing Hive.
Technical Limitations
A technical limitation currently prevents the use of Hive with Webcasts that have multiple audio streams. If you are using Kaltura Cloud Transcode and your transcoding profile includes multiple “Audio only” flavors for different language streams, disable these audio flavors.

Enable and Configure the Hivestreaming Module
If the Hivestreaming module is not in your MediaSpace application, please contact your Kaltura representative to inquire about adding it.
- Login to your Kaltura Admin page using your Kaltura user ID and password.
The Configuration Management Section of MediaSpace displays.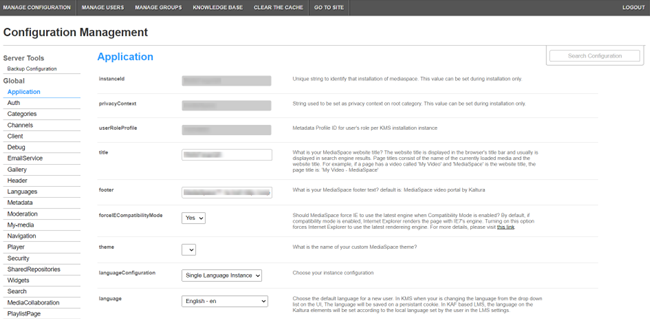
- Search for the Hivestreaming module. It may be crossed out because it is disabled by default.
The Module Info box displays the module name, a description of the module (what enabling this module allows users to do), and a version number.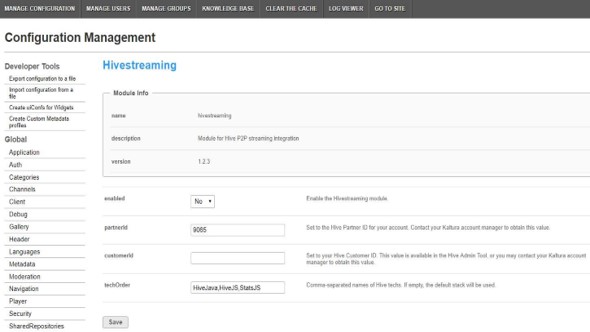
- In the enabled pull-down list, select Yes to enable the Hivestreaming module.
- Other configurable items following the enabled pull-down list are as follows.


| Field Name | Description | Default |
| enabled | Enable/disable the module | No |
| partnerId | ID used to identify MediaSpace association with Hive services. The default value should not be changed unless otherwise instructed by Hive. | 9065 |
| customerId | Customer ID used to identify your account on Hive services. You may obtain this value from the Hive Admin dashboard (see screen shot below). You may also contact your Kaltura or Hive account manager to obtain this value. | |
| techOrder | Comma-separated names of peer-to-peer technology, in order of fallback. Advanced users may consult the techOrder table below. Consult with your Hive account manager before changing this field. | HiveJave, HiveJS, StatsJS |

The number before the slash is the partnerId. The string after the slash is the customerId. In the screenshot above, the partnerId is 1234 and the customerId is a0b1c2d3.
7. Click Save. You receive a notice that your configuration for Hivestreaming was saved and the cache was cleared.
The order of the techOrder items determine the fallback sequence. As an example, for techOrder ‘HiveJava, HiveJS, StatsJS’ the plugin will first check if a Java client is installed. If not, then the plugin will check if the current browser support webRTC. If not, then the player will play directly from the account CDN.
Technology Ordering Options
The following options are available for the techOrder configuration. Consult with your Hive account manager to understand which option is right for your account.
techOrder Option |
Description |
HiveJava, HiveJS, StatsJS |
Attempt to use a local HIVE P2P agent. Fallback to WebRTC if a local agent is not available. Fallback to the account CDN if neither option is available, and collect HIVE Insights analytics. |
HiveJava, StatsJS |
Attempt to use a local HIVE P2P agent. Fallback to the account CDN if a local agent is not available, and collect HIVE Insights analytics. |
HiveJS, StatsJS |
Attempt to use WebRTC for P2P connectivity. Fallback to the account CDN if WebRTC fails, and collect HIVE Insights analytics. |
StatsJS |
Use the account CDN and collect HIVE Insight analytics. |
When the HIVE P2P Agent is installed, it is best to use it first in the tech order (HiveJava) since it is more mature and more “tuned up” for the specific customer network.
HIVE silent testing is supported only with the HIVE Agent, so HiveJava should be in the tech order to support silent testing.
Enable Hive When Creating and Scheduling a Webcast Event
- Login to your legacy Video Portal using your Kaltura user ID and password.
- Click Sign In. The home page of the legacy Video Portal displays.
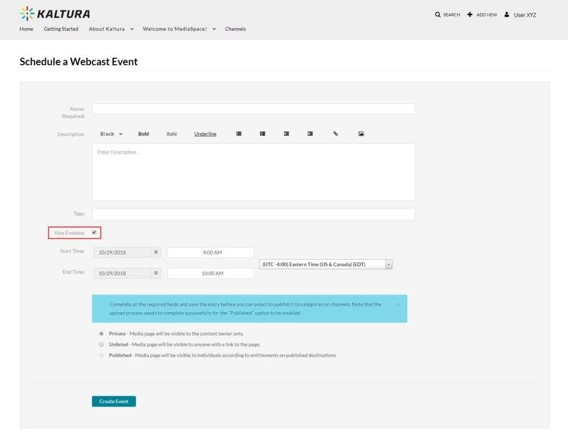
- In the upper right corner of the screen, click Add New and select Webcast Event. The Schedule a Webcast Event Screen displays.
- Follow instructions in Scheduling Management - Adding Events to create a webcasting event. In addition, you will notice a Hive-enabled checkbox. Leave this checked (as it is by default) to enable Hive.
- Save the Webcast.


If you are having trouble creating a Hive-enabled Webcast, please reference the Troubleshooting section.
Confirm Hive Streaming Details
Event View Page
- Find the relevant Webcast in My Media.
- View the Event Page.
- For Hive-enabled Webcasts, the following indicator will be displayed:

This indicator is visible only to the Webcast owner and any co-editors.

Event Edit Page
- Find the relevant Webcast in My Media.
- Enter the Webcast’s Edit page by clicking the
 button.
 - Select the “Hive Streaming” tab.
- Confirm that “Enabled” is checked and ensure that the HIVE Ticket URL is listed.
You may change whether a Webcast is Hive-enabled or not up until the start of the event.
Access HIVE Analytics
Owners of Hive-enabled Webcast events can access Hive's Insights analytics page:
- Access the Webcast event edit page. See Event Edit Page.
- Click on the HIVE Insights URL link.

Troubleshooting
Symptom |
Resolution |
HIVE Streaming is not shown as enabled after a Webcast is created. |
Check the Hivestreaming module configuration in MediaSpace Configuration Management (see Enable and Configure the Hivestreaming Module). Ensure that the partnerId, customerId, and apiToken values are entered correctly – without any extraneous spaces or characters. |
Webcast does not play after the stream has begun. |
Check the selected flavors of the account’s Cloud Transcode profile. Ensure that no “Audio only” language flavors are selected (see Technical Limitations). |
HIVE Client is installed, but a HIVE-enabled Webcast is not streaming using the HIVE Client. |
Confirm that no HIVE-enabled streams are playing in any browser. The HIVE Client can only support a single Webcast or other HIVE-enabled stream at a time. |
