Prerequisites and Workflow
The following components must be configured on your site:
- Microsoft Office 365 account with SharePont Process. Please contact your Kaltura representative to create a instance for you or be certain you have a Kaltura Application Framework (KAF) instance you can access.
- A KAF instance. Before starting the deployment process, please contact your Kaltura representative to create a KAF instance for you.
You should receive the following:
- The launch point base URL that will be used for deployment.
- The Administration application login page URL.
Step 1 - Register the Details of the New Application
Targeted for - SharePoint Administrators
Description: This step is required to provide the Kaltura Application Framework (KAF) with the security details of the application.
To register the details of the new SharePoint application
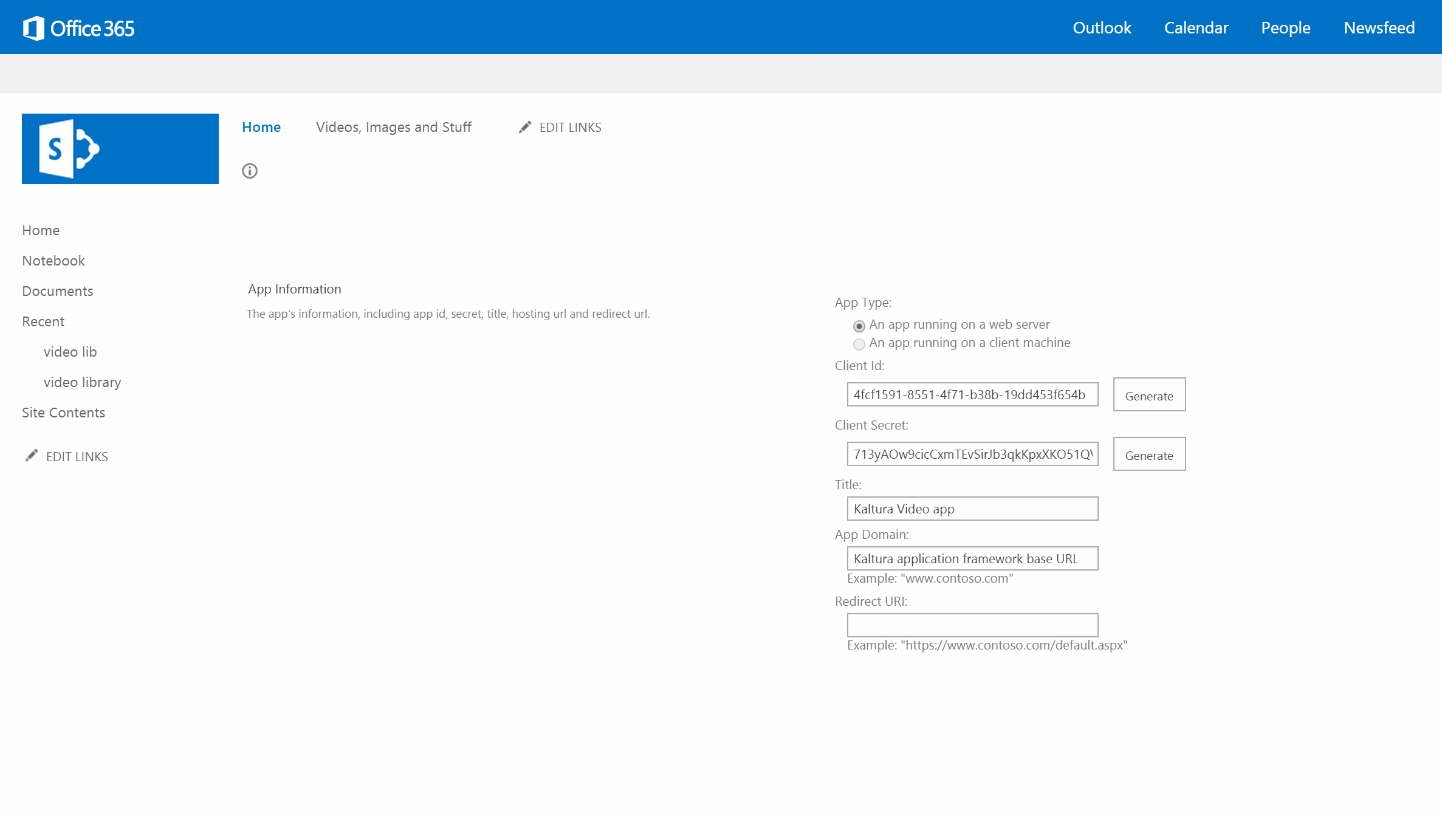
- Visit the SharePoint apps registration page. Navigate to the apps registration page in Office 365.
- Paste the following address in your browser: http://{SharePointWebsite}/_layouts/15/AppRegNew.aspx
- Replace “{SharePointWebsite}” with the address of your Office 365 SharePoint site. You may choose any of the sites in your Office 365. The application will be visible to all sites.
- Client Id - Click “Generate” to automatically fill-in this field.
- Client Secret - Click “Generate” to automatically fill-in this field.
- Title – Enter a title for the application, for example: “Kaltura Video Solution”.
- App Domain – Fill-in the base URL of the Kaltura Application Framework (KAF) instance you received from your Kaltura representative. Do not add HTTP(S) to the URL.
- Redirect URL – This field should contain the KAF instance’s service URL.
- Fill the registration form. Enter the following information:
- Copy and save the form details. After completing the form, the details you filled-in are presented to you.
- Copy and save these details aside as they will be necessary in the following step.

Step 2 - Download the Application
Targeted for: SharePoint Administrators
Description: Add the solution (WSP) to SharePoint solution store using PowerShell. This is a common SharePoint action that uploads the solution to SharePoint to make it available for deployment.
To download the SharePoint Application
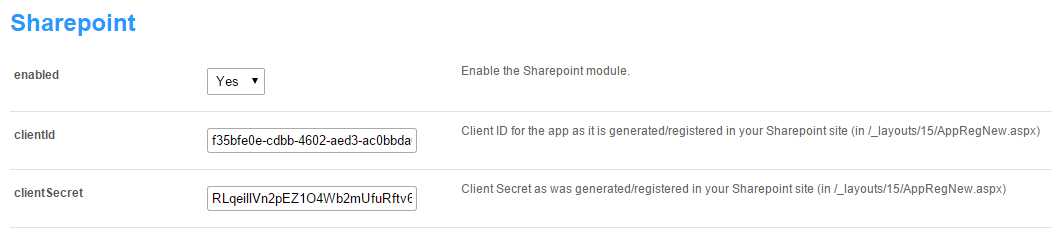
- Browse to Kaltura Application Framework (KAF) administration login page.
- Navigate to https://[your-kaf-domain]/admin/config/tab/sharepoint and replace “[your-kaf-domain]” with the URL of your KAF instance (This address was provided to you by your Kaltura representative).
- Fill-in the details of the app registration.
- Within the app download page, paste the following details you received when registering the application.
- Client Id
- Client Secret
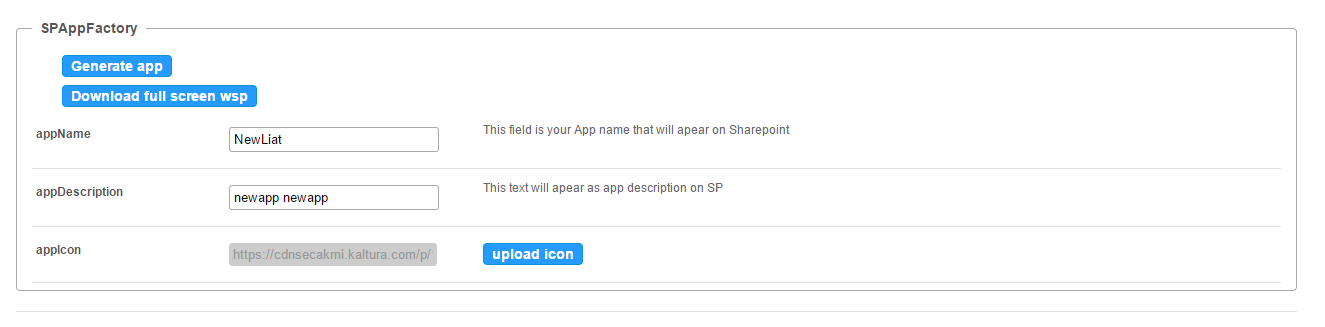
- Click on “Generate App” button. The download should begin.
- Save the file to a directory within your computer.
- (Optional) Fill in the appName and appDescription to customize your App. You can also upload the App’s icon from that screen.
- (Optional) Click on Download the Full Screen WSP file to facilitate the player with full screen capability. Kaltura recommends to download and install this feature. The download should begin. When complete, save the file to a directory within your computer.


Step 3 (Optional) - Create an App Catalog Site (if one does not exist)
Targeted for: SharePoint Administrators
Description: Deploying apps in SharePoint sites require an “App Catalog” site to register details of new SharePoint applications. You may already have the App Catalog site in your Office 365 account, in which case you do not have to create a new App Catalog site.
To set up an app catalog on SharePoint Online
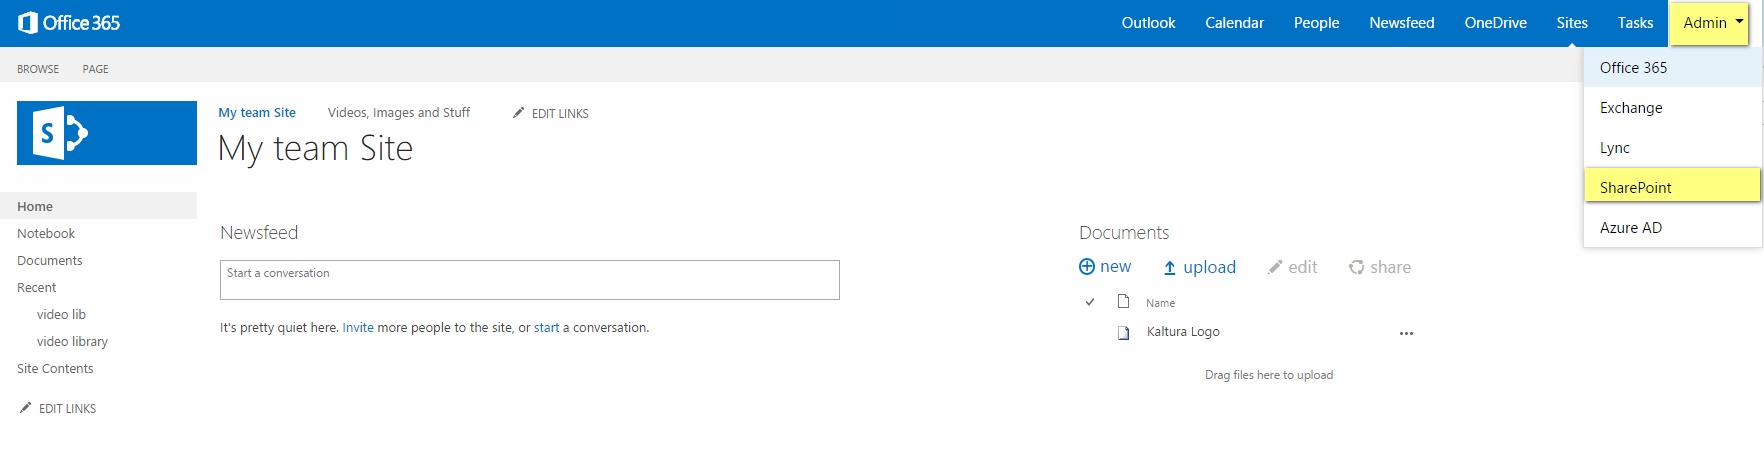
- Navigate to the Office 365 SharePoint administration page from any site in your Office 365 SharePoint sites.
- On the Office 365 admin center page, choose Admin, and then choose SharePoint.
- In the left task pane, choose apps.
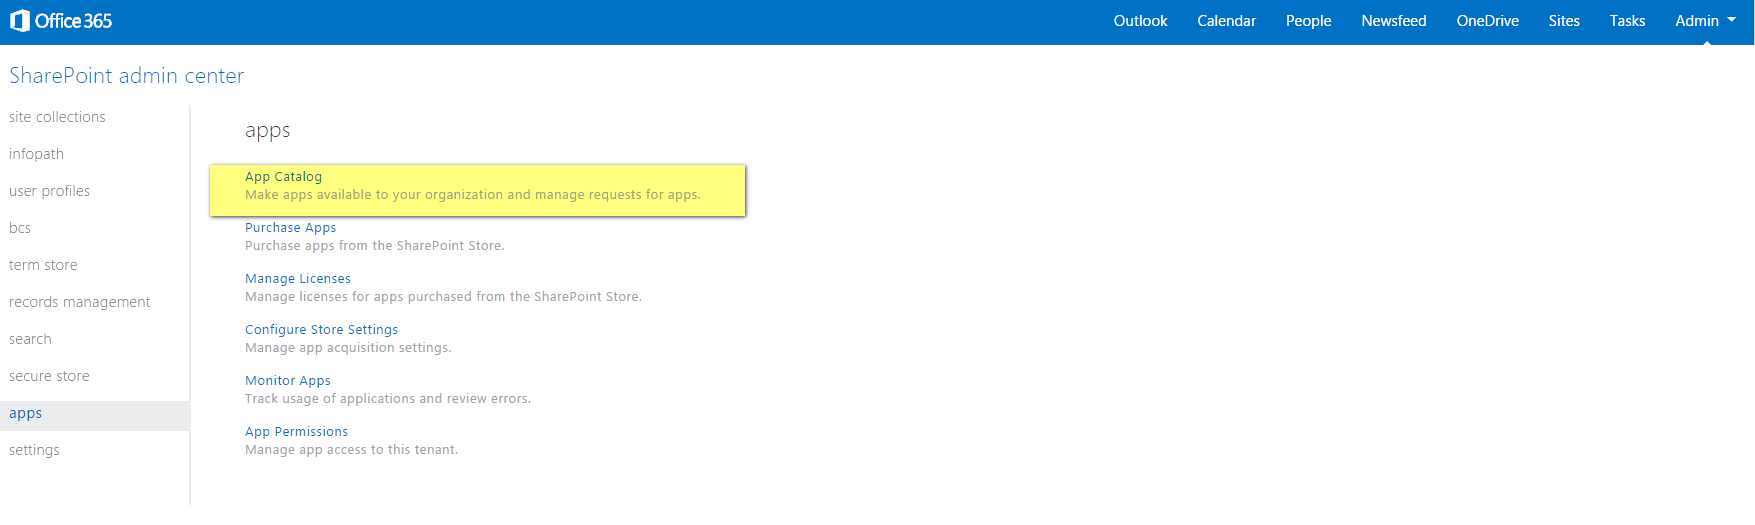
- On the apps page, choose App Catalog.
- You are presented with either your App Catalog site or a form to create a new App Catalog site. If you have an App Catalog site skip to Step 4 - Upload the App to the Catalog. If not, fill the form to create an App Catalog site.
The following screen is the App Catalog log site. If you see this after clicking on “App catalog” then you already have an App Catalog site and should go to Step 4 - Upload the App to the Catalog.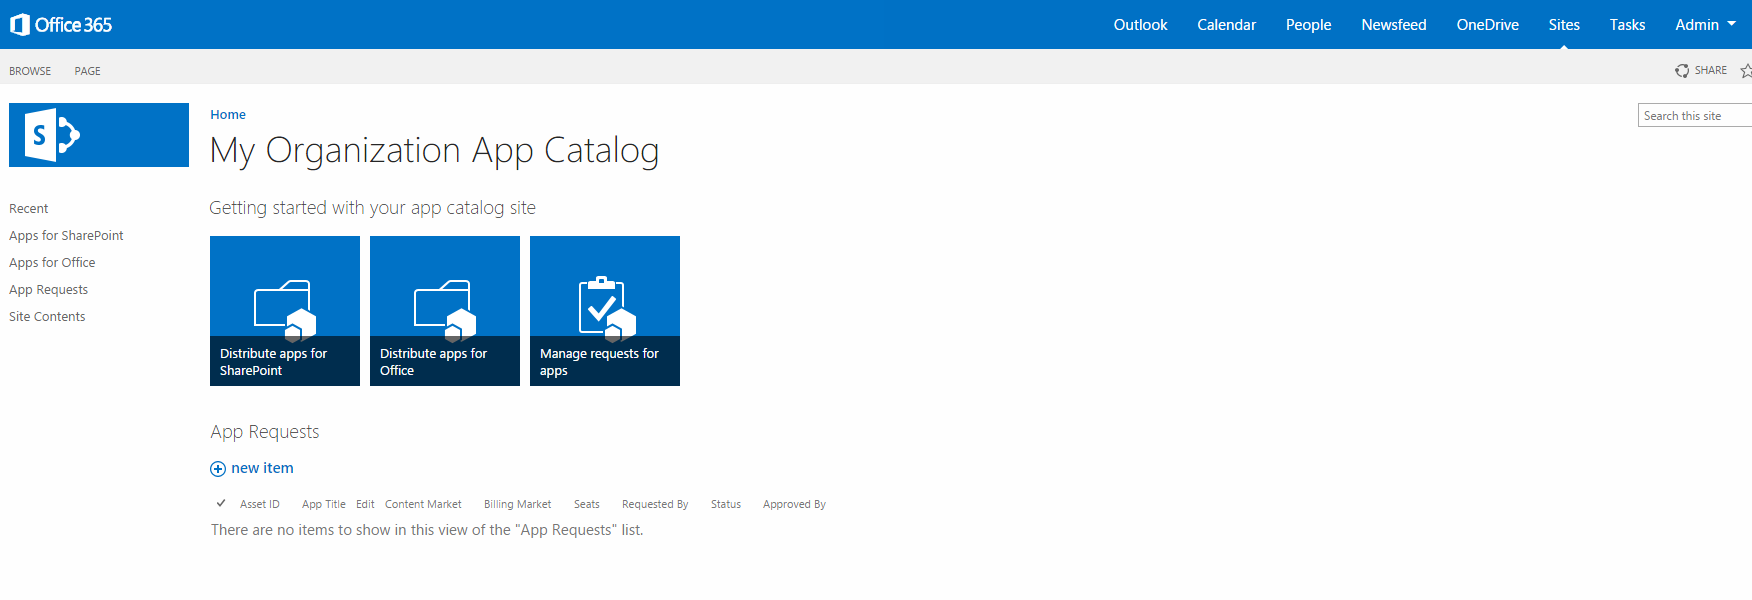
- On the App Catalog Site page, choose OK to accept the default option and create a new app catalog site.
- On the Create App Catalog Site Collection page, specify the title of your App Catalog site.
- Specify the web site address.
- Specify the time zone, administrator, storage quota, and server resource quota, and then choose OK.


Step 4 - Upload the App to the Catalog
Targeted for: SharePoint Administrators
Description: After you have the App installation file and an App Catalog site, this step is performed to upload the App to the App Catalog.
To upload the Kaltura App to the App Catalog
- Browse to the App Catalog site. From within the SharePoint administration page navigate to the App Catalog site as described in Step 3 - (Optional) - Create an App Catalog Site (If one does not exist)
- Navigate to the SharePoint Apps management. Choose “Apps for SharePoint” in the left task pane.
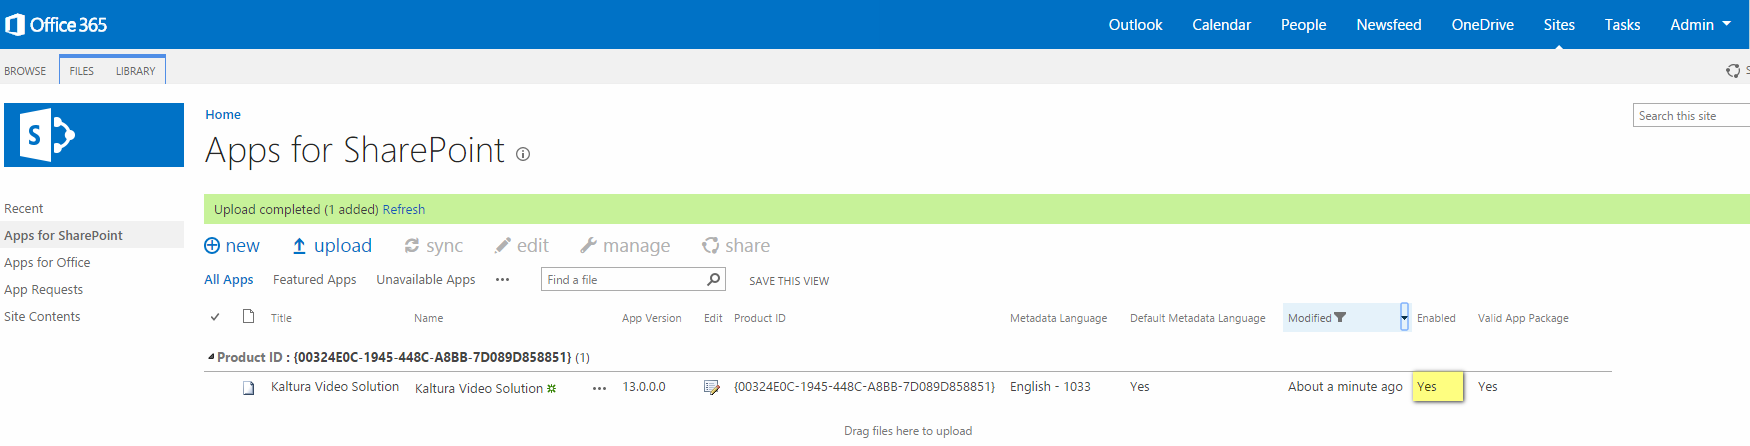
- Upload the application file. Click “Upload”, and then choose the application file you downloaded in Step 2 - Register the Details of the New App and confirm.
- Confirm the application was uploaded successfully.
- After a few seconds of processing, the new application should appear in the application list and the column “Enabled” should have the value “Yes” to indicate that the application was accepted successfully and is now available to site owners.

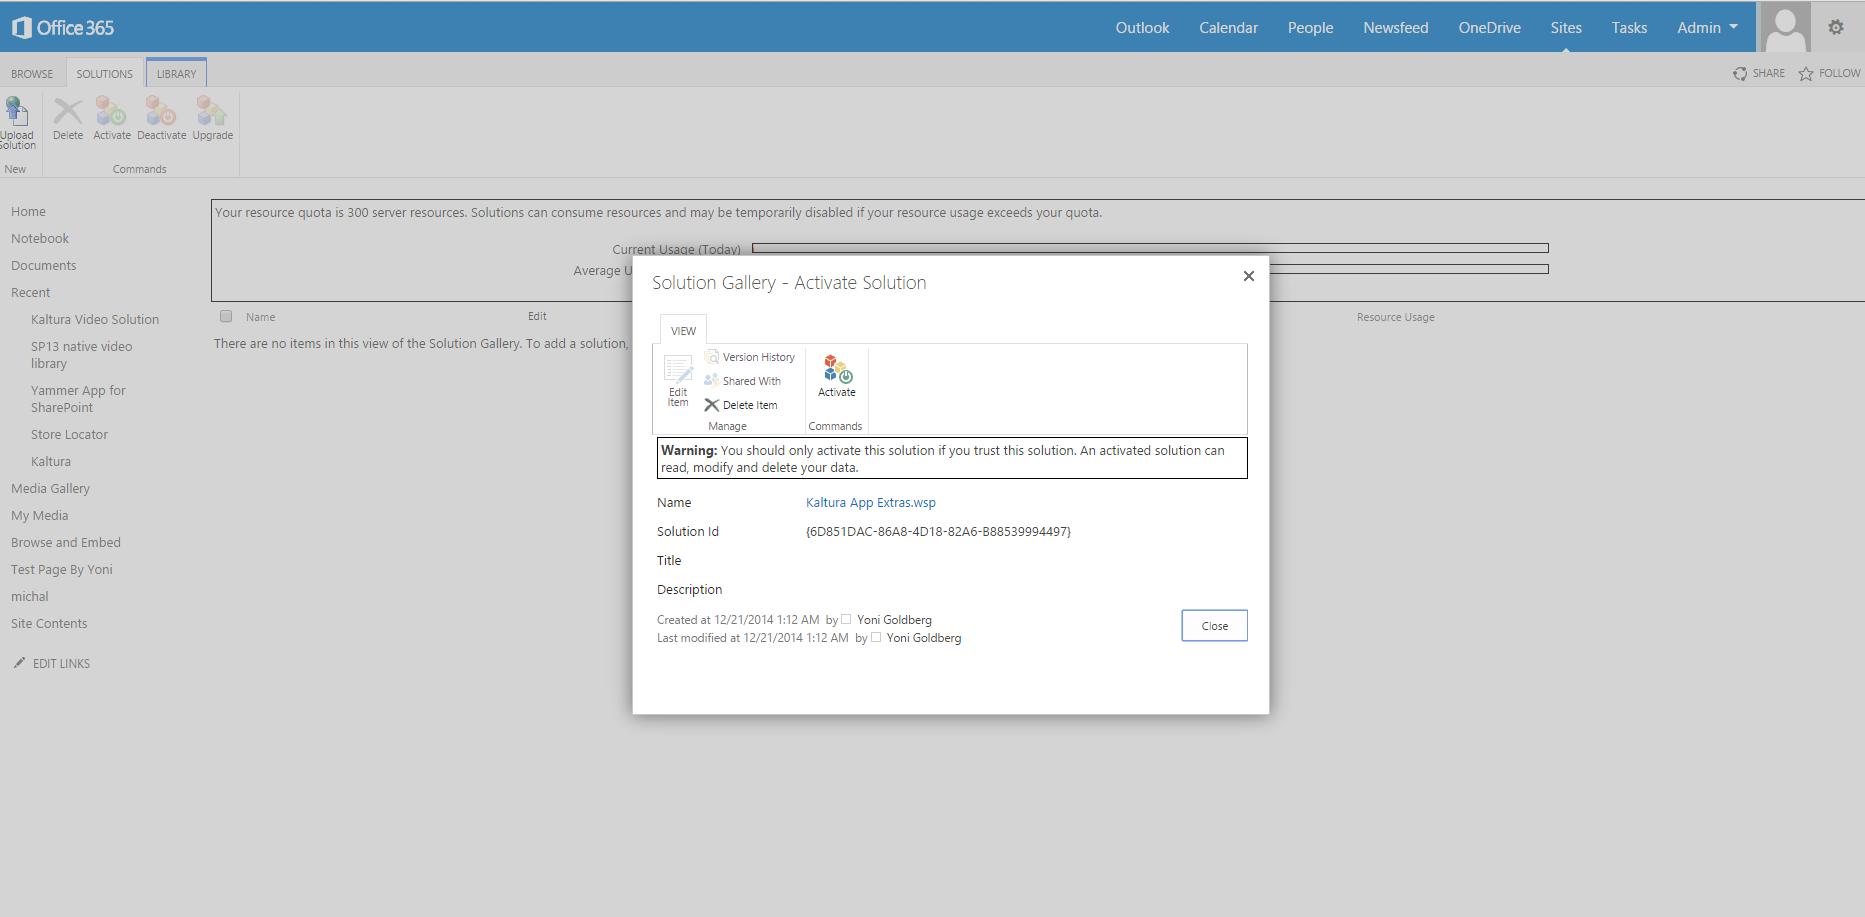
Step 5 (Optional) - Install the Full-Screen WSP
Targeted for: SharePoint Administrators, Site Owners
Description: A special web-part should be placed within the page to enable watching media in full-screen. This web-part is installed using a sandboxed solution file (WSP) that is uploaded to the ‘Solutions’ site.
To install the WSP
- Navigate to “Site Settings” by clicking on the gear icon (on the top corner) and clicking on “Site Settings”. Ensure that you are on the root site of the Site Collections as solutions can only be installed on the root site.
- In the Site Settings menu click “Solutions”.
- In the Solutions Gallery, click “Upload Solution” on the top menu (ribbon).
- Browse and locate the .WSP file “Kaltura App Extras.wsp” that you downloaded in Step 1 and click OK.
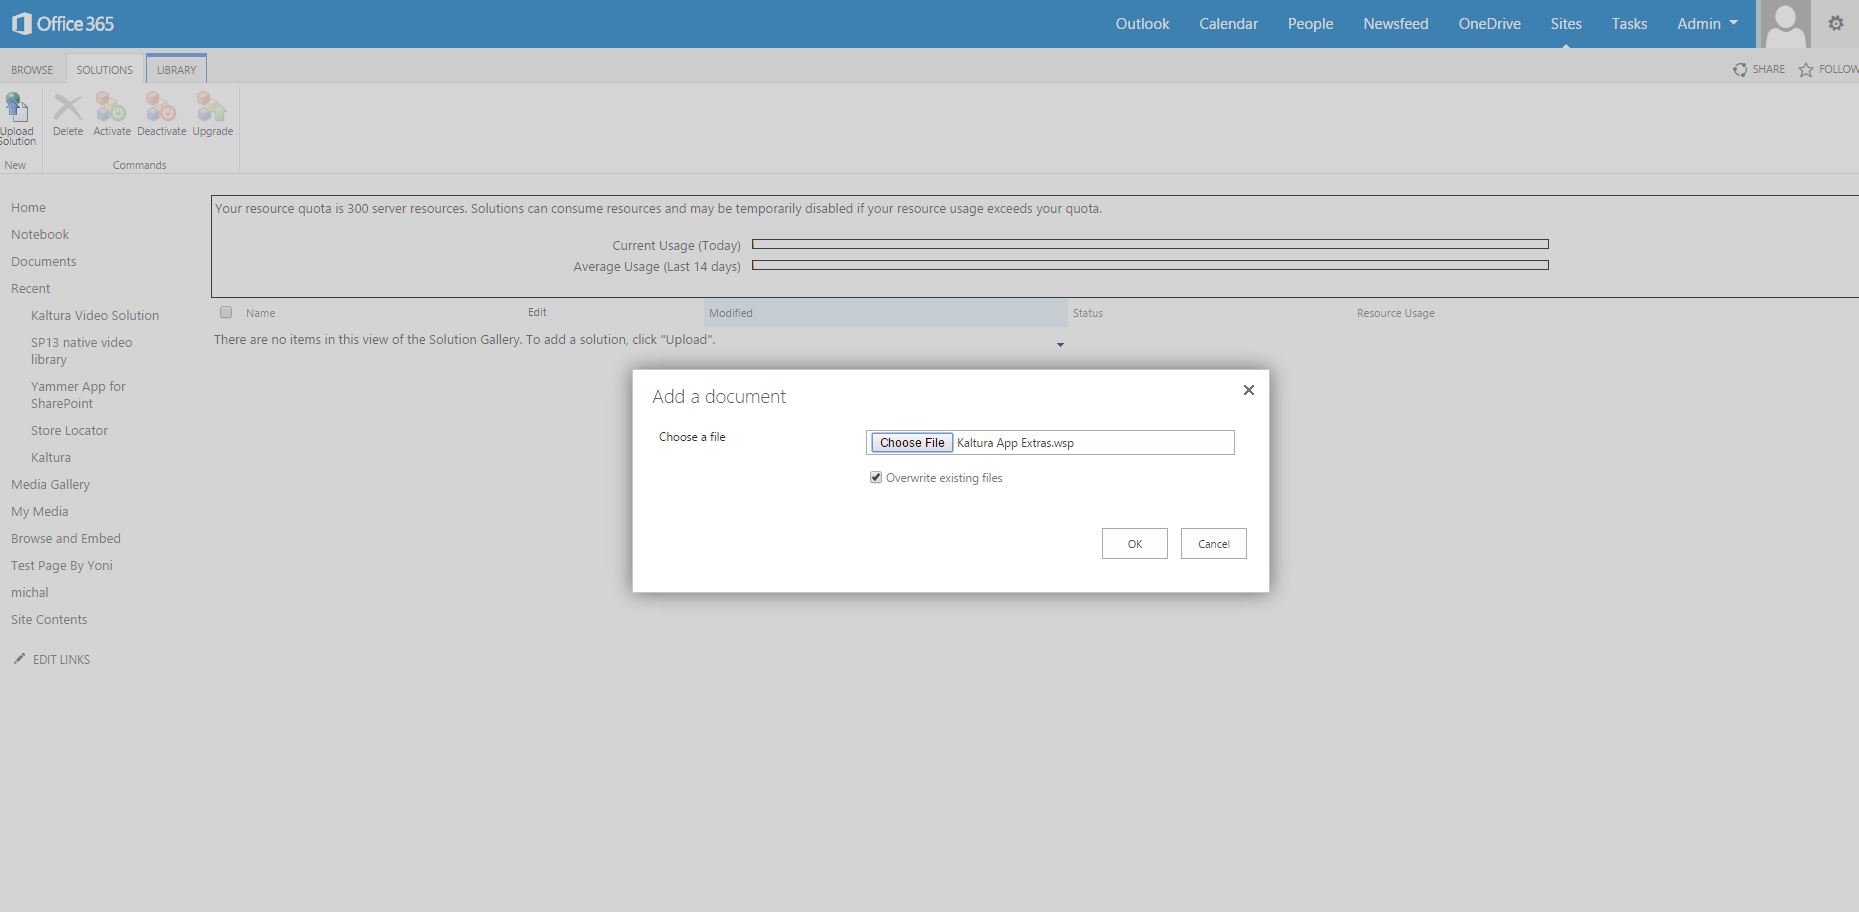
- Click ‘Upload Solution’ in the Solutions Gallery to enable full-screen display in the media playback. A confirmation dialog is displayed.
- On the dialog top click “Activate” to activate the solution.


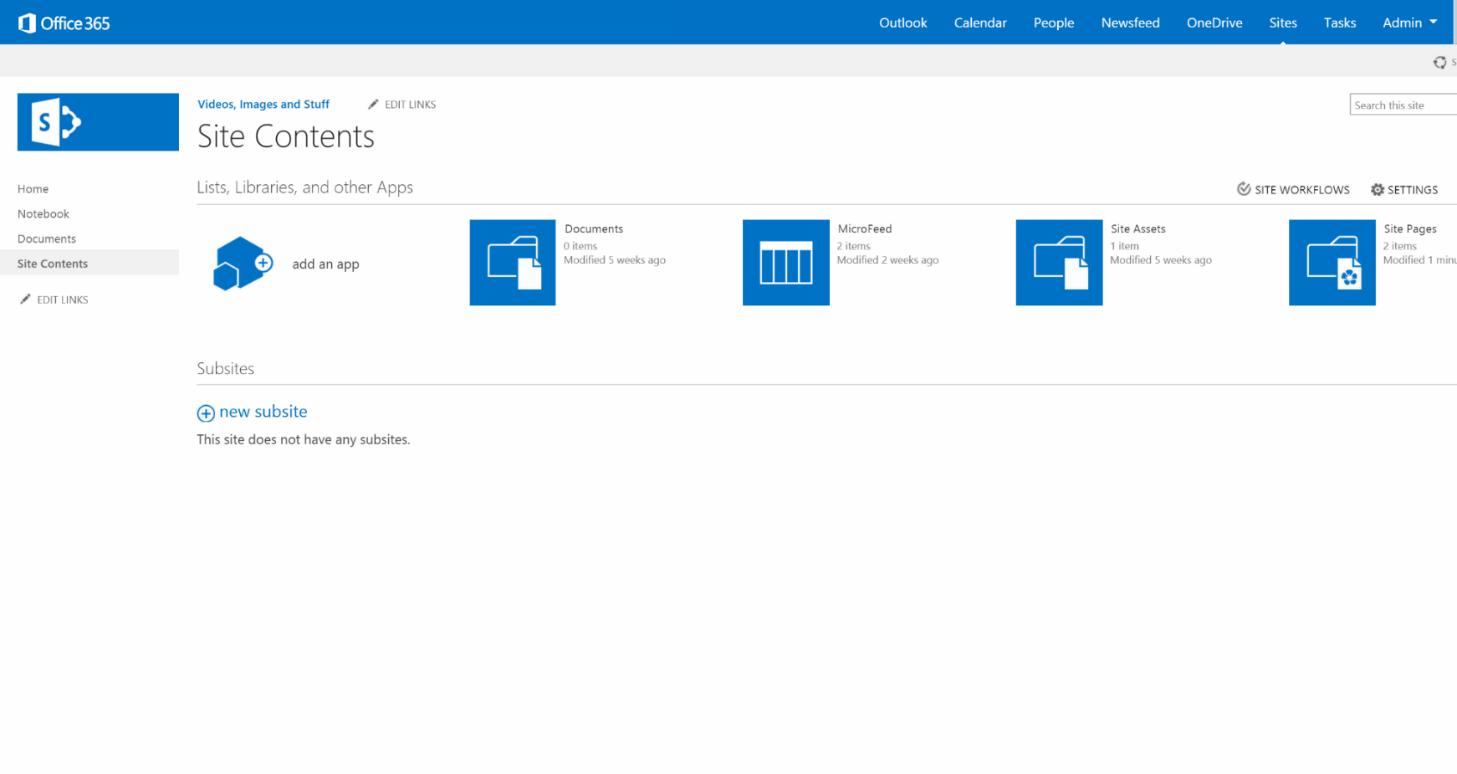
Step 6 - Add the App to One or More Sites
Targeted for: SharePoint Administrators, Site Administrators
Description: After the application is installed, this step is performed to allow site owners to add the application onto their sites.
To add the app to a site
- Click on Site Contents to navigate to any site that you want to add the application to.
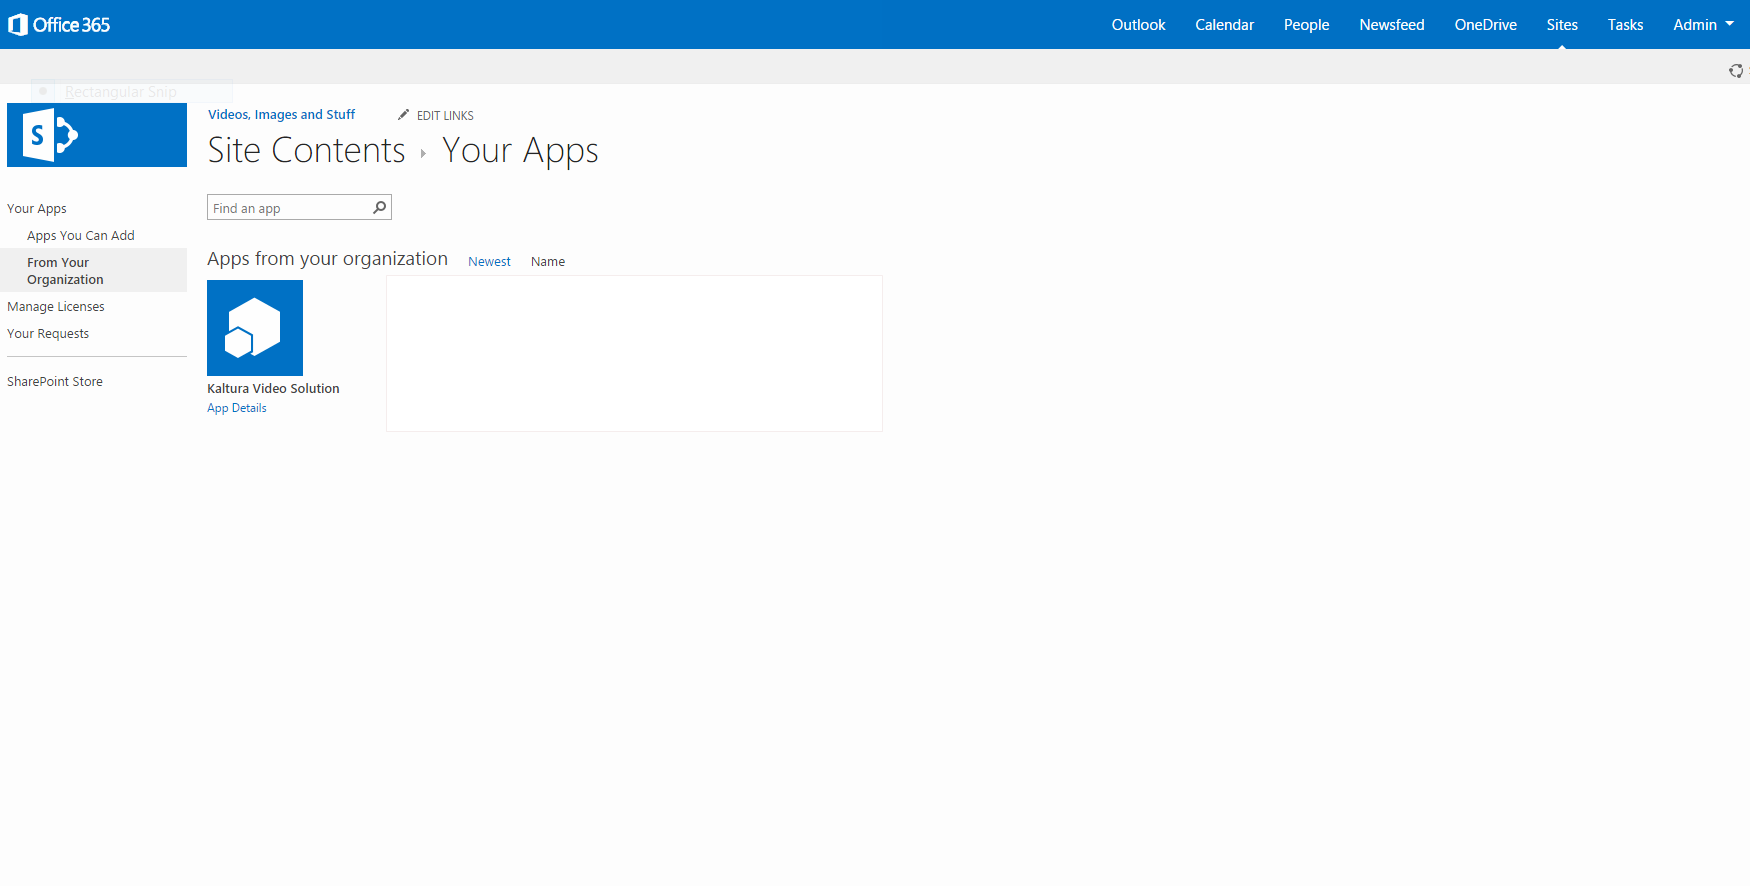
- Click “add an app”.
- On the side menu, choose “From Your Organization” to display only apps from the App Catalog.
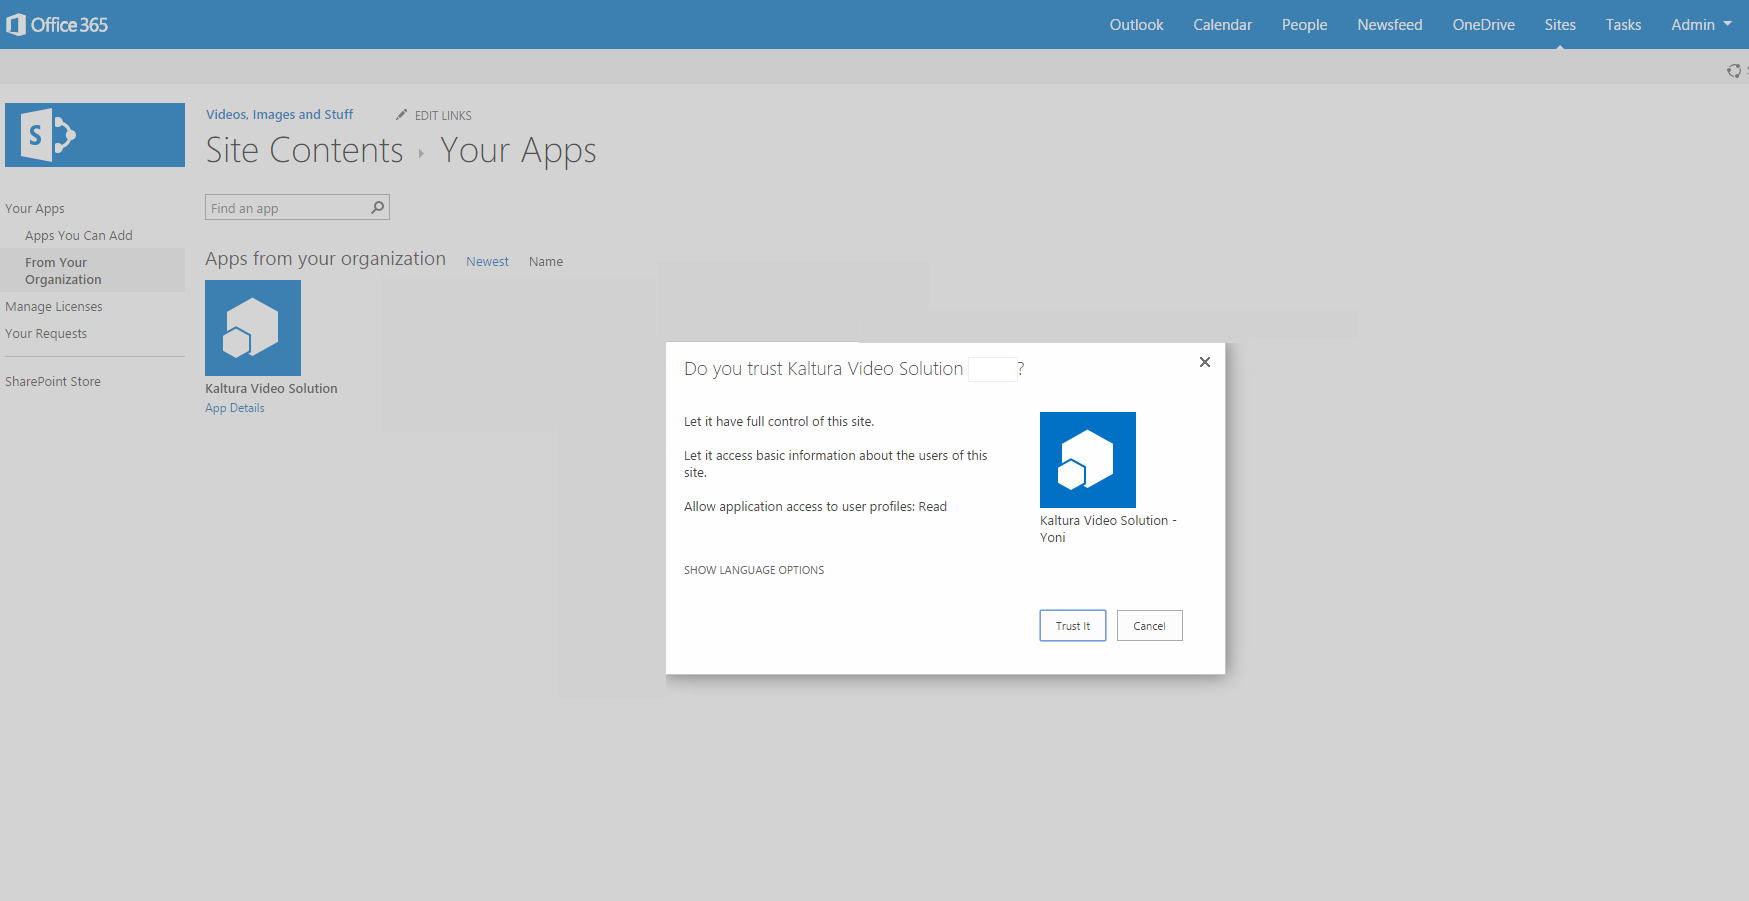
The Kaltura Video Solution application should appear on the list of available apps. - Click to install the application by clicking on ‘Kaltura Video Solution’ application.
A modal window pops up that allows you to confirm that you trust the application. - Click “Trust it” to install the app at the site.
- After few seconds the application should appear in the site content. You may now use the application in your site pages.


Step 7 (Optional) - Assign Permissions to Users
Targeted for: SharePoint Administrators, Site Owner, Site Designers
Description: Kaltura widgets inherit their permission from SharePoint and display the content according to the user’s permission. This step enables you to use SharePoint built-in security groups and permissions to set what the user is allowed to see and do.
To assign permissions to users
- Add users to groups in SharePoint.
Similarly to any other content solution in SharePoint, users must be added to site groups that have some associated permission level.
If your site users are already added to the built-in SharePoint groups – no other actions are required, Kaltura widgets take into account the SharePoint user permissions and authorizes users accordingly.
By default, without changing SharePoint out-of-the-box permission’s settings and Kaltura Application Framework settings, the following security principles are applied:- Users that are part of the “[Site Name]Members” group are assigned Kaltura “Contributor” contextual role.
- Users that are part of the “[Site Name]Visitors” group are assigned Kaltura “Member” contextual role.
- Users that are part of the “[Site Name]Owners” group are assigned Kaltura “Manager” contextual role.
- Change the default SharePoint-KAF permission mapping.
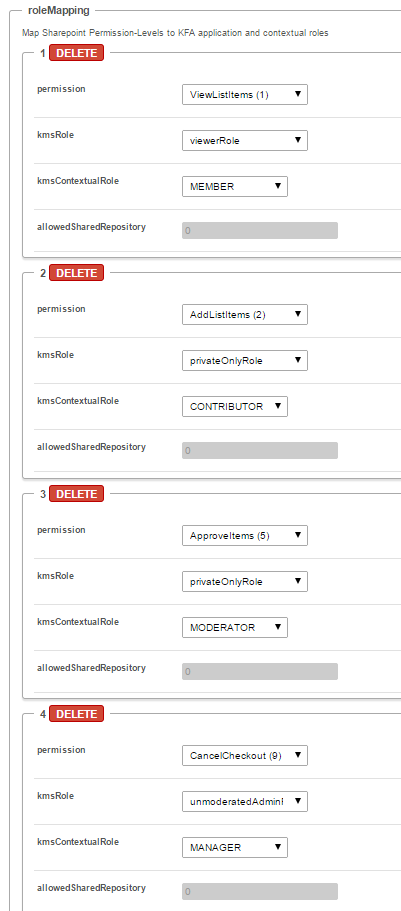
Typically, you do not need to change the default permission settings to satisfy your security requirements. However, for some complex scenarios, you may want to granularly set, for example, which permission (for example, role) in SharePoint is mapped to which KAF (Kaltura Application Framework) role. Should you want to achieve that level of control, it is possible to do so via the KAF admin console, under the ‘SharePoint’ tab. We recommend that you contact your Kaltura representative to get further technical assistance.
Default Mapping
The following table lists the default mapping from SharePoint groups and their permission levels to the Kaltura Application and Contextual roles.
SharePoint Group | SharePoint Permission Level | SharePoint Permission | Kaltura Role | Kaltura Contextual Role |
Visitors | Read | ViewListItems | viewerRole | Member |
Members | Edit | AddListItems | privateOnlyRole | Contributor |
Owners | Full Control | ApproveItems | privateOnlyRole | Manager |
Designers | Design | CancelCheckout | unmoderatedAdminRole | Manager |
Kaltura differentiates between application roles and contextual roles.
Application Roles
KAF application roles apply globally and include:
- anonymousRole– Can browse your site anonymously until trying to access pages/actions that require login: My Media, My Playlists, and Add New.
- viewerRole
- Not authorized to upload new content
- Does not have a My Media page
- privateOnlyRole
- Can upload content to My Media
- Can add media
- adminRole
- Can publish content
- Can upload content
- unmoderatedAdminRole– Can upload content and bypass moderation (when moderation is enabled for an account)
Contextual Roles
Contextual roles apply to actions that are in relevant to a media gallery widget.
- Member: Can access a media gallery but cannot add a new content
- Contributor: Can add content to a media gallery
- Moderator: In addition to the Contributor permission, can moderate content.
- Manager: In addition to the Contributor permission, can moderate content and access settings, including change metadata, edit members, change appearance, and delete channel.
For more information see Kaltura MediaSpace/Kaltura Application Framework (KAF) Roles and Permissions.
