The Kaltura Video Extension for SharePoint 2013 allows employees to easily upload and create video content directly from within SharePoint without worrying about file size limitations or various video formats. Employees can then easily embed their contributed videos inside SharePoint pages and workflows, create playlists, make their video searchable and social, and reuse their videos beyond SharePoint in other enterprise applications (CMS, LMS, corporate Video Portals, etc.). In addition to on-demand video, Kaltura allows you to engage employees by streaming live events directly within SharePoint.
All of the elements within the Kaltura Extension for SharePoint 2013 are standard SharePoint elements that can be deployed, monitored, isolated and uninstalled by SharePoint. For example, it is possible to deploy the elements into a dedicated web application that will isolate all the solution artifacts from other SharePoint solutions. It is also possible to apply the features only to a specific site collection.
Following are SharePoint elements included in the Kaltura Video Extension for SharePoint 2013:
- DLLs - Three DLLs are deployed to the (Global Assembly Cache) GAC, all of which start with the word "Kaltura" and can be easily identified.
- Farm Feature - A single farm feature that adds a Secure Store Application and a Business Data Connectivity Model.
- Site collection feature - A site collection level feature that deploys web parts.
- Design elements- standard SharePoint design manager package and search configuration file which are manually uploaded per site collection.
Prerequisites and Workflow
The following components must be configured on your site:
- A Kaltura Application Framework (KAF) instance. Before starting the deployment process, please contact your Kaltura representative to create a KAF instance for you.
You should receive the following:
- The launch point base URL that will be used further in the process
- The Administration application login page URL
- Server Requirements
- SharePoint 2013 Server (Standard or Enterprise)
- SharePoint Secure Store Service configured
- For search purposes only: SharePoint Search Service and SharePoint Business Connectivity Services
For additional information, see How to gather diagnostic information from a SharePoint 2013 On-Prem site.
Step 1 - Download the Installation Package
Targeted for - SharePoint Administrators
Description: Download the SharePoint installation package from the KAF admin site. If you already have an installation package (WSP or ZIP file), please skip this step.
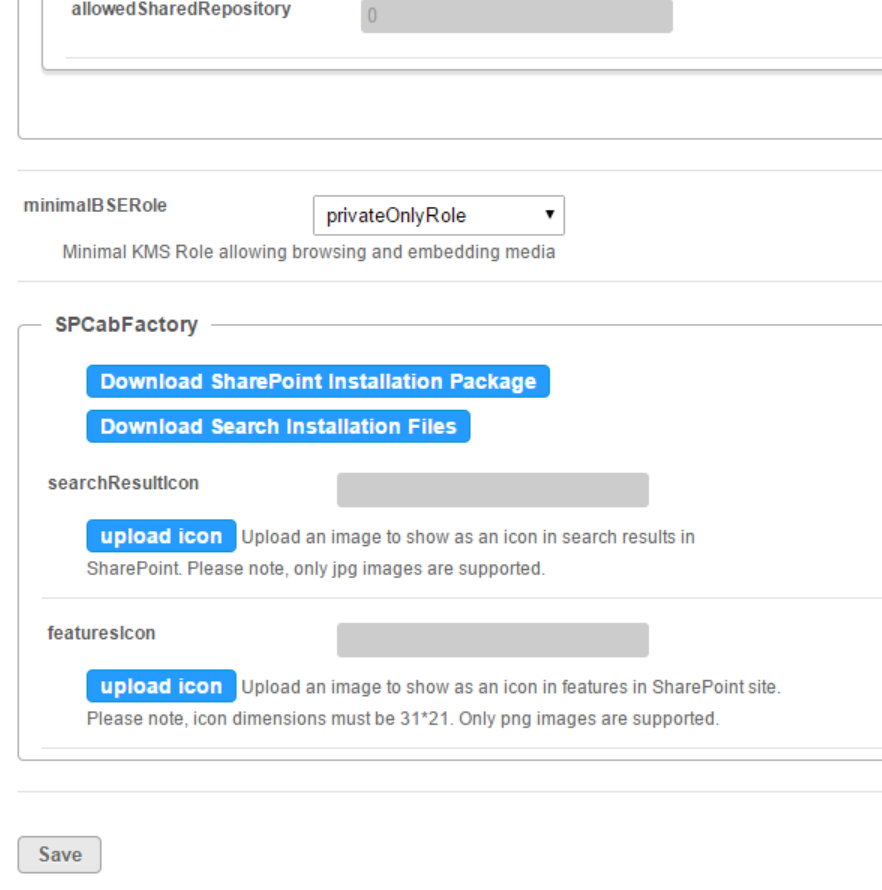
Icons (PNG files) must be uploaded before the installation package can be created.
To download the installation package
- Browse to KAF admin panel https://[your-kaf-domain]/admin/config/tab/sharepoint.
- Replace “[your-kaf-domain]” with the URL of your KAF instance.
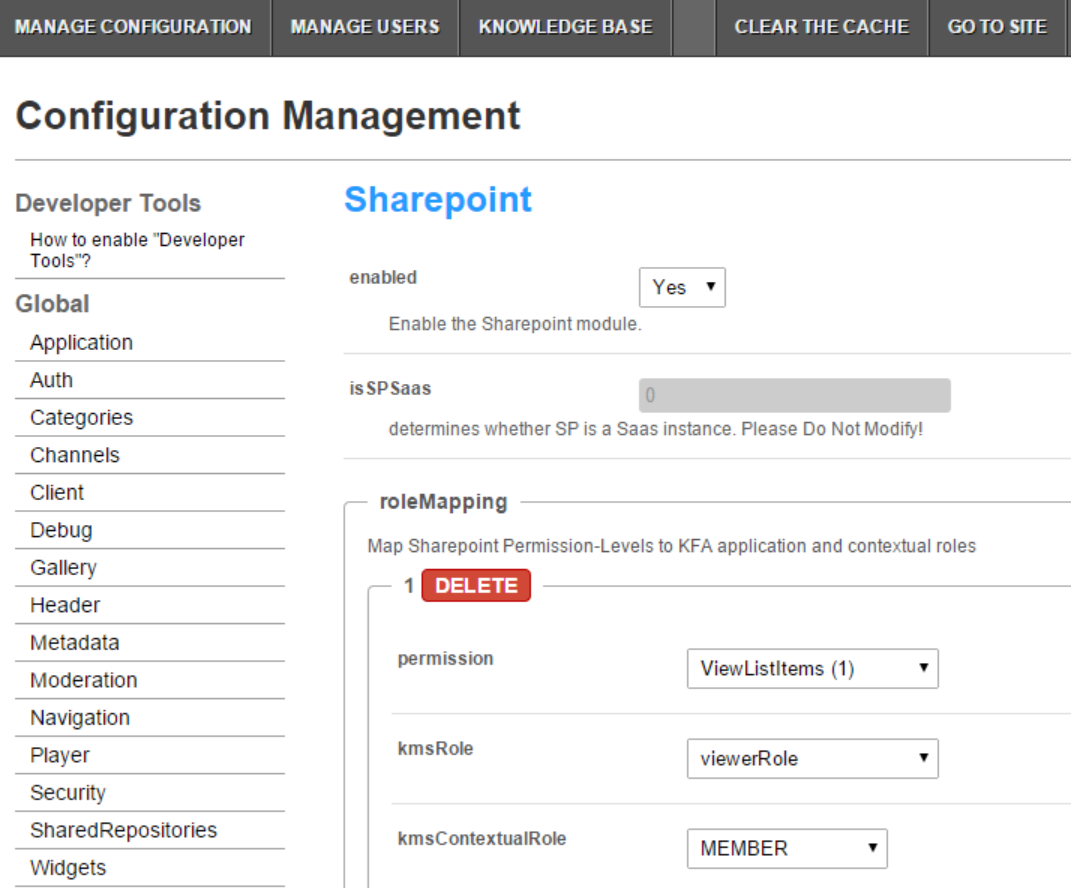
- Click on “Download SharePoint Installation Package”, to initiate the download and save the file to a directory within your SharePoint server.
- Click on ‘Download Search Installation files” to initiate the download and save the file to a directory within your SharePoint server.


Step 2 - Install the Solution (WSP)
Targeted for: SharePoint Administrators
Description: Add the solution (WSP) to SharePoint solution store using PowerShell. This is a common SharePoint action that uploads the solution to SharePoint to make it available for deployment.
To install the WSP
- Verify that the user you are now logged-in with, that is being used to install the solution, is using the SharePoint farm account, or is a member of the farm administrator’s group.
- Open PowerShell Management Shell. Click Start (Windows Icon) -> Type “SharePoint 2013 Management Shell”.
- Right click on the item “SharePoint 2013 Management Shell” and choose “Run as administrator”. As a result, the PowerShell window opens as displayed.
NOTE: Running the PowerShell shell as administrator is required only if you have “User Access Control” (UAC) activated within Windows. If UAC is disabled then you may open the PowerShell shell by clicking on the “SharePoint 2013 Management Shell” item.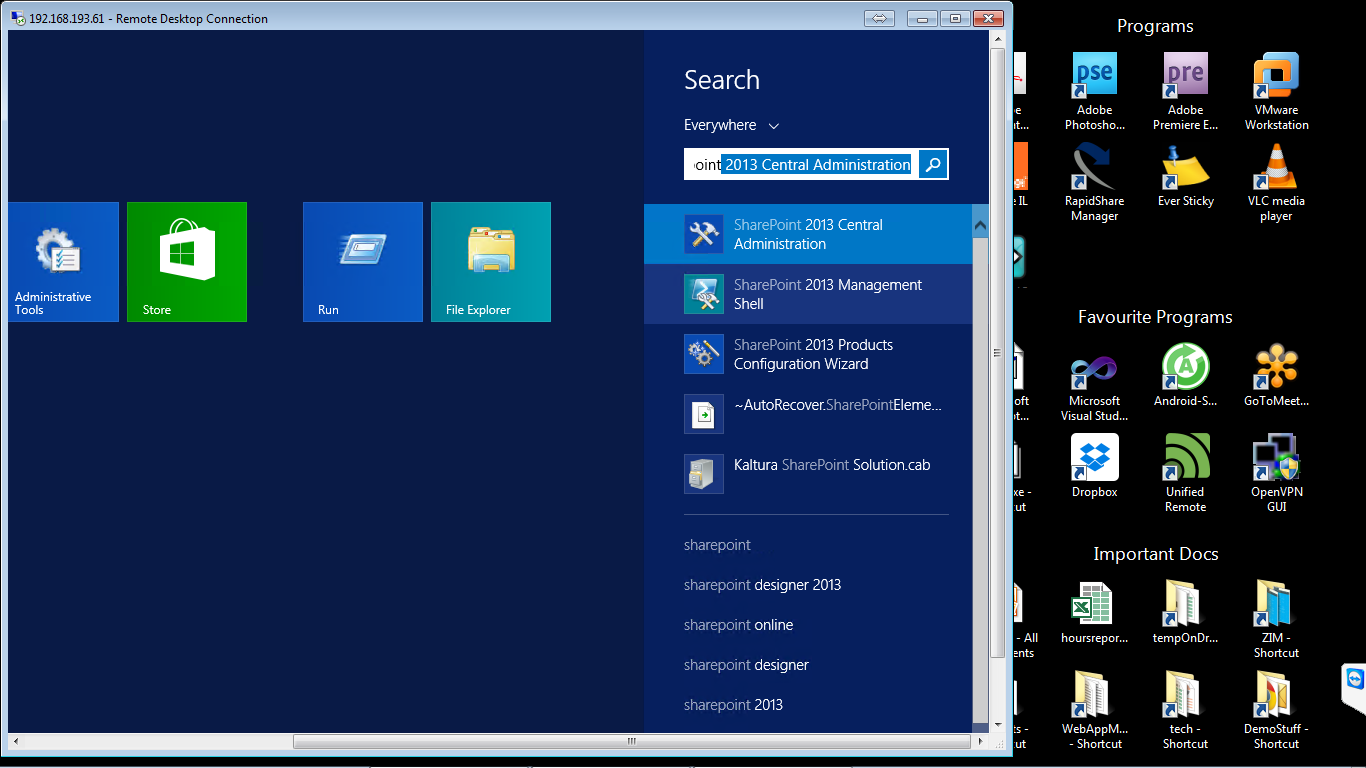
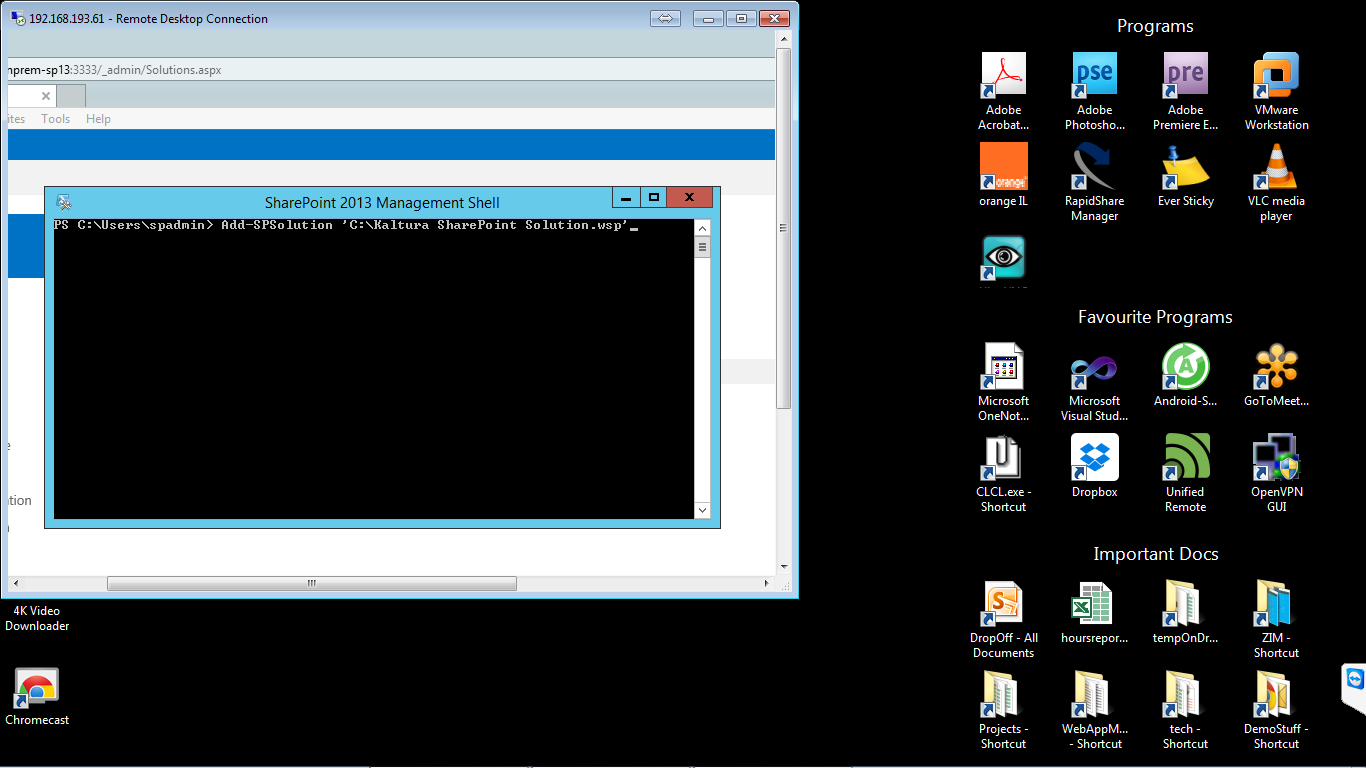
- Within the PowerShell console, type the following command:
Add-SPSolution '{Path To the WSP file}KalturaSolution.wsp' - Replace {Path To the WSP file} with the location where you saved the WSP file. The following screen displays an example of Adding the solution via PowerShell window.


Step 3 - Deploy the Solution (WSP)
Targeted for: SharePoint Administrators
Description: Deploy the solution (WSP) within SharePoint so that it becomes available for site owners. This is a common SharePoint action that deploys the solution to one or all SharePoint web applications.
To deploy the Solution (WSP)
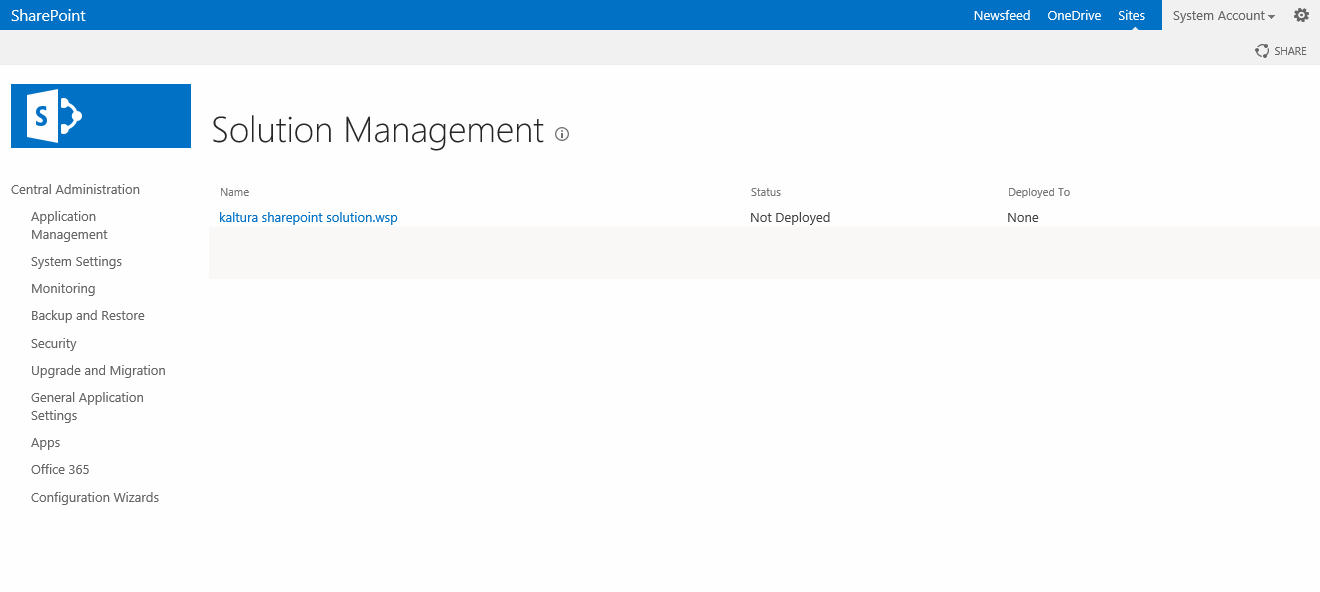
- Browse to SharePoint Solution Store.
- Navigate to “SharePoint Central Administration” -> select “System Settings” (on the left pane) and then select “Manage farm solutions”. You should now see the solution that was added in Step 2: “Kaltura SharePoint Solution.wsp”
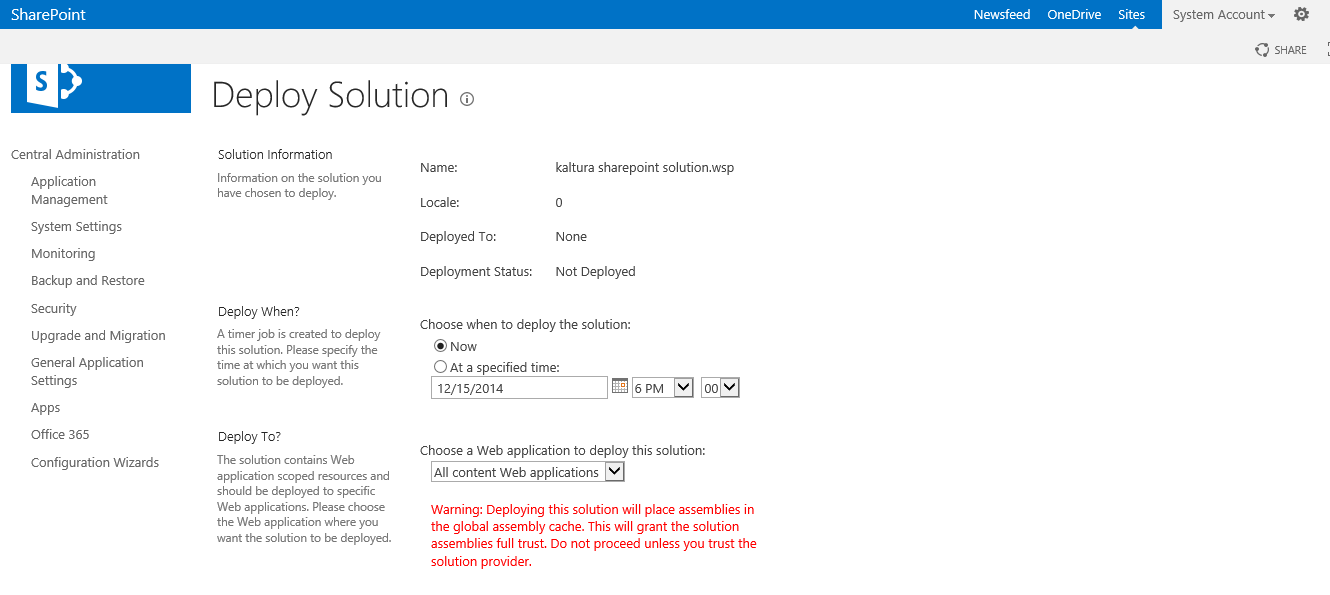
- Deploy the solution. Click on the solution, The “Deploy Solution” screen is displayed.
- Select “All content web applications” from the “Deploy to?” dropdown menu or pick a specific web application you want to deploy the solution to.
- Click “OK”. The solution is now deployed.


Step 4 - Activate the Kaltura Farm Feature
Targeted for: SharePoint Administrators
Description: Activate the farm feature “Kaltura Backbone” in the Farm Features screen. This feature sets the application backbone that includes the search connector and configuration items that are needed for various components in the solution.
To activate the Kaltura Farm Feature
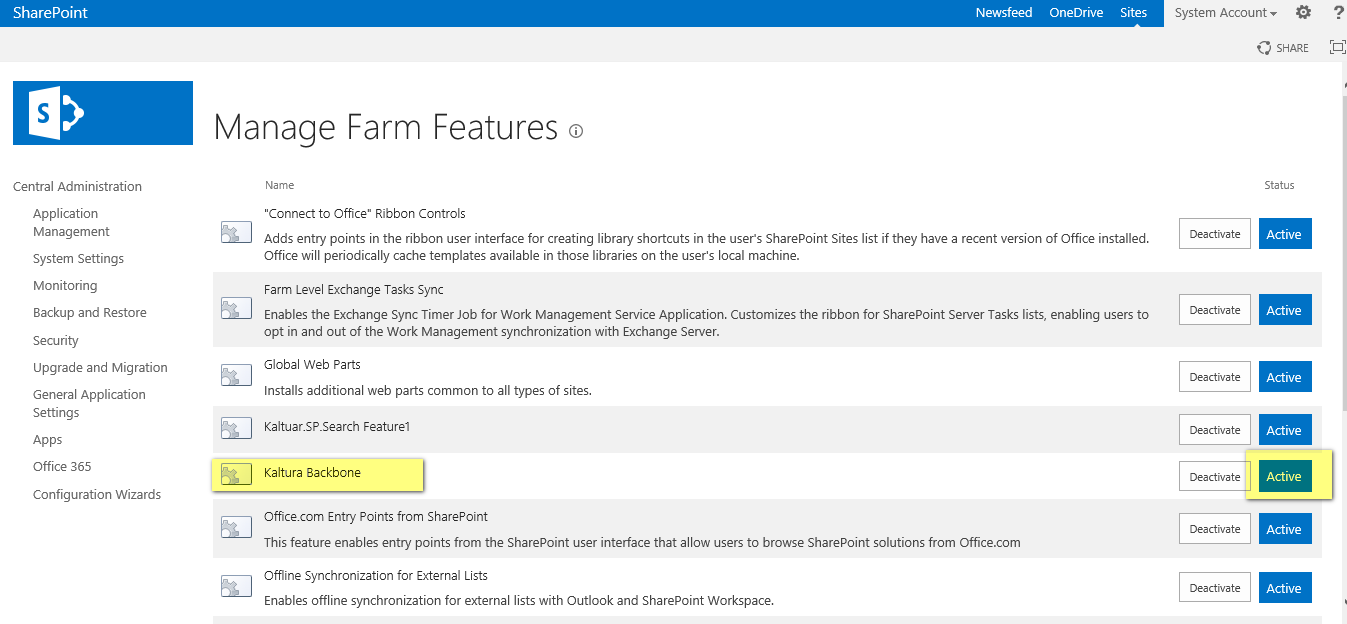
- Browse to SharePoint’s Farm Features window. Navigate to “SharePoint Central Administration”, select “System Settings”, then select “Manage Farm Features”.
- Activate the Kaltura Backbone feature. Locate the feature called “Kaltura Backbone” and click “Active”.

Step 5 - (Optional) Configure the Application Settings in Sharepoint's Secure Store Service
Targeted for: SharePoint Administrators
Optional: This step should be performed only if the installation package was not downloaded from the KAF admin. If you downloaded the solution file from the KAF admin, this step is automatically implemented by the package.
Description: Configure the credentials and other settings that create the connection between SharePoint and KAF. These settings are kept securely in the SharePoint Secure Store Service.
To configure the app settings in SharePoint’s Secure Store Service
- Browse to SharePoint Secure Store Service.
- Navigate to “SharePoint Central Administration” and select “Manage Service Applications” and then select “Secure Store Service” (or the name the Secure Store Service was assigned during installation).
- Set the application credentials. You should see the Secure Store application named “KalturaStore”. Click on KalturaStore and choose “Set Credentials” from the drop down menu.
NOTE: Even if the credentials (Secure Store configuration info) were previously filled, they appear as empty because SharePoint hides this information due to security reasons. Consequently, when the need arises to edit a single field – you are required to fill-in all of the fields.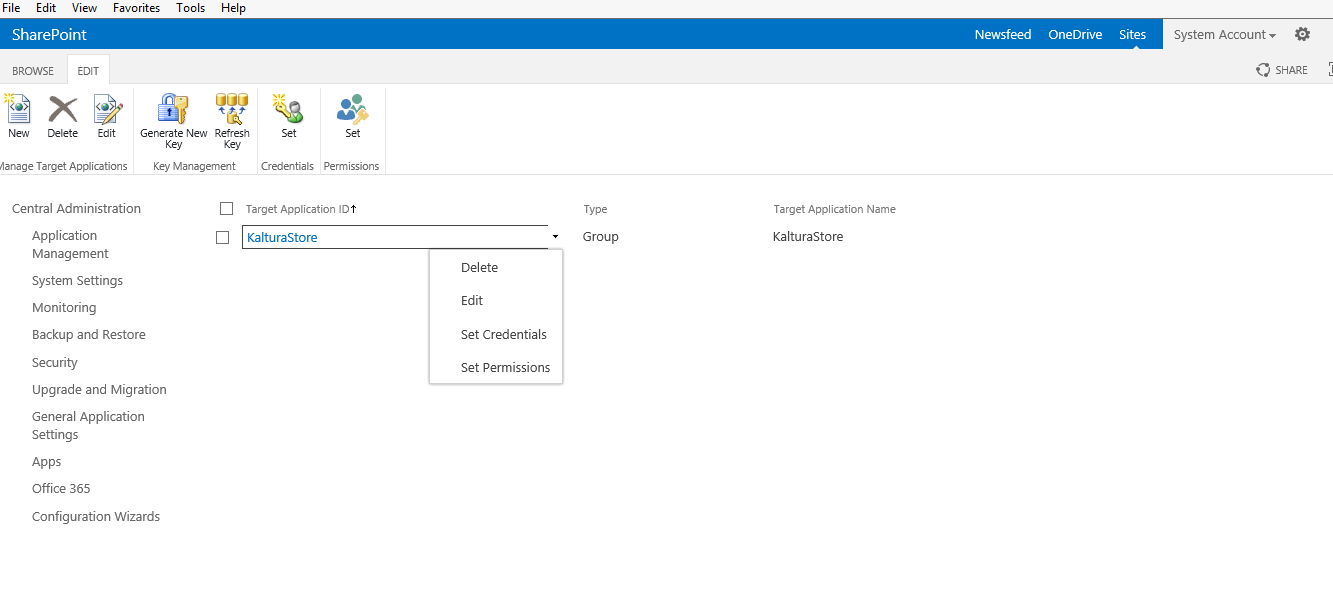
- Fill in the following Kaltura app credentials and settings within the Secure Store:
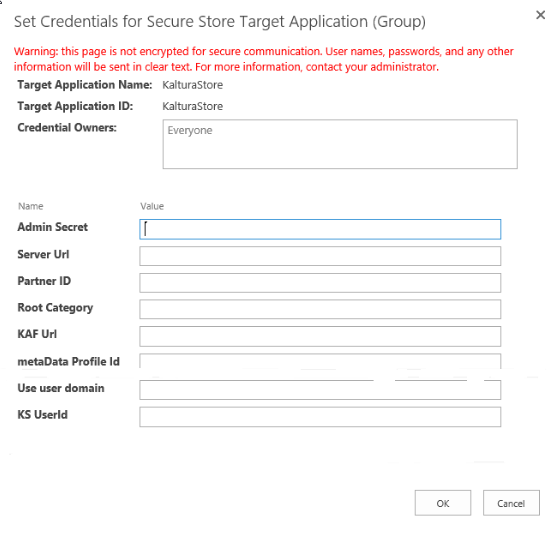


- Admin Secret – The admin secret of your Kaltura account. The secret can be obtained from your Rich Media CMS, under Settings > Integration Settings.
- Server URL – If a value is not specified it will default to https://www.kaltura.com
- Partner ID – Your Kaltura Partner ID. The partner ID can be obtained from your Rich Media CMS, under Settings > Integration Settings.
- Root category – The name of the media category within KAF. By default the root category is “sharepoint”.
- KAF URL – The Kaltura Application Framework launch point. You can obtain this value from your Kaltura representative. If a value is not specified it will default to https://{kaltura.partner.id}.kaf.kaltura.com.
- metadata Profile Id – The ID of an automatically created profile by the KAF instance. This information is found in the Rich Media CMS under settings/custom data/system name = CategoryAdditionalInfo.
- KS UserId field sets the value of SPUser object that the Kaltura solution will use.
Enter either loginname or email (input one of these words in the field). If you want users logging-in to your SharePoint solution to have the same “My Media” when they log-in to another Kaltura Application (MediaSpace for example), the user name login method should be the same in both solutions.
For example:
loginname –JohnDoe
email – Email address : JohnDoe@company.com
or for users using KMS, you could choose "email" in SP, and email in the value from ADFS SAML response. - Use user Domain – Use to determine whether the domain will be removed from the userLoginName or not (Foe example: either domainjohndoe or just johndoe). Valid parameters in this field are yes, no, true, or false.
Step 6 - Configure the Search Crawler (Connector)
Targeted for: SharePoint Administrators, Search Administrators
Description: Within the SharePoint search service, define a new result source and new result type to enable Kaltura media to result within the SharePoint search results.
To configure the search crawler
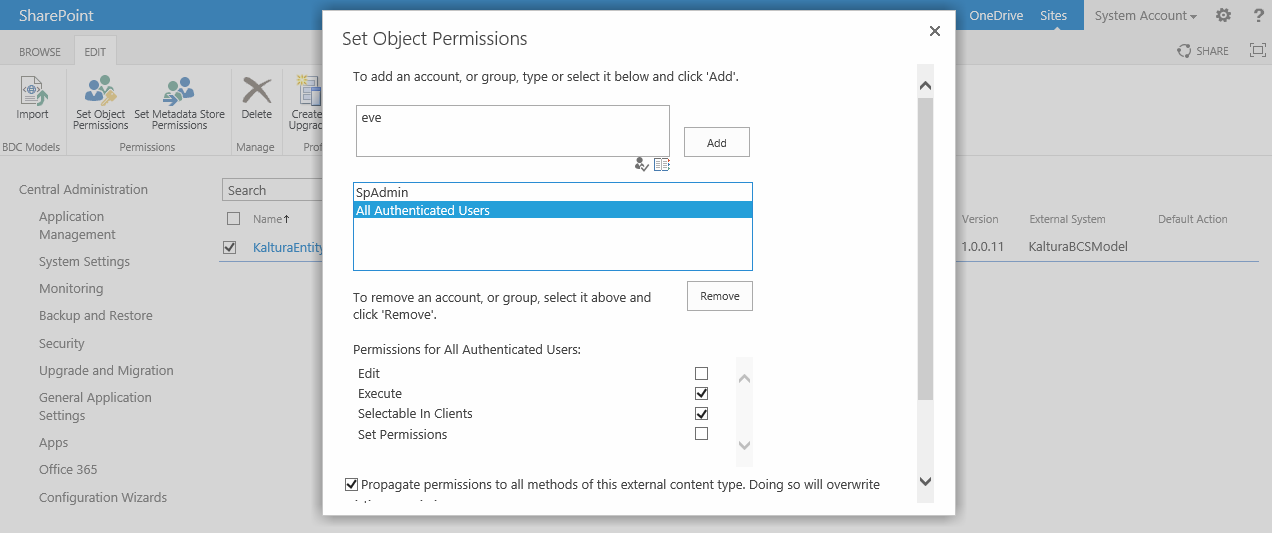
- Authorize the search service to approach Kaltura media items: Navigate to Business Connectivity Services (BCS) - Browse to “SharePoint Central Administration” and select “Manage Service Applications” then select “Business Data Connectivity” (or any other name the business connectivity services was assigned during installation).
- Ensure that the item “KalturaEntity” exists on the list.
- Assign the search service permissions to query using this Business Data Connectivity item.
- Select the item “KalturaEntity”, on the top ribbon and click “Set Object Permissions”.
- Add the Farm Account which is used for crawling external data (The Farm Account was chosen during the farm installation. If you are not sure how to identify the Farm Account, please refer to the Microsoft article Plan for administrative and service accounts in SharePoint 2013 ), then check the following Permissions’ check-boxes: “Edit”, “Execute”, and “Set Permissions”.
- Install the search schema (also known as ‘Managed Properties’).
- Locate the file “Kaltura SharePoint Solution”.
- Search Schema Installer.ps1” which you downloaded in step 1.
- Right click on the file and choose “Run with PowerShell”. A console window is displayed.
- Create the search schema and display the success message. If an error message appears on the screen, dismiss it, it should not affect the process.
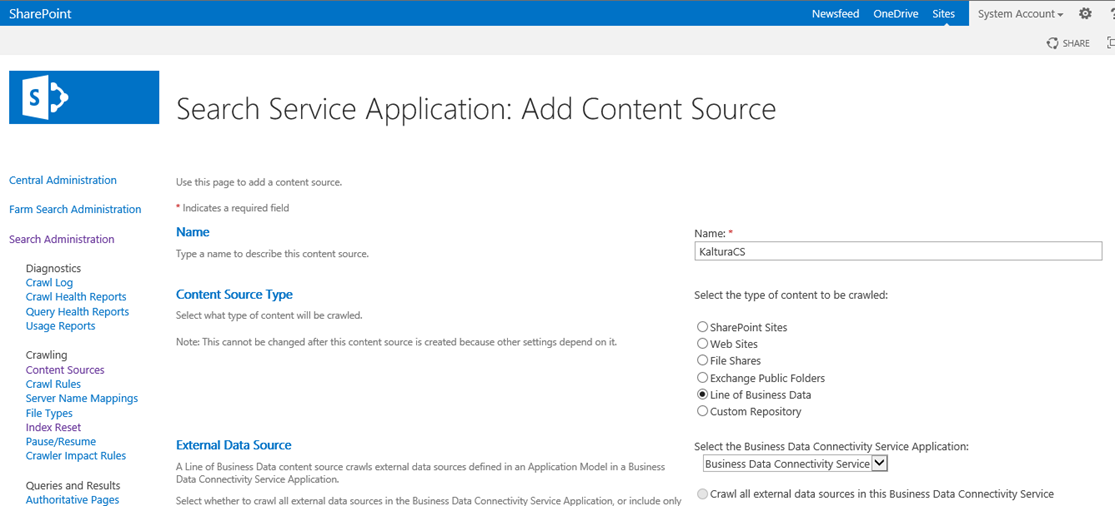
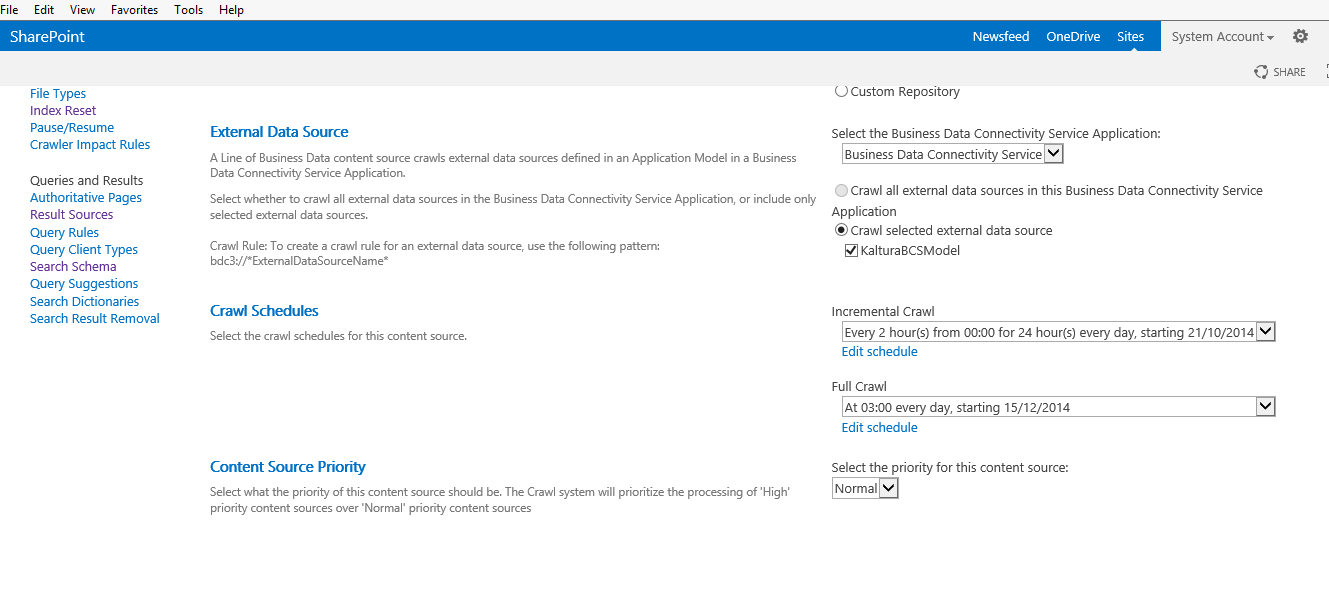
- Add a new content source. Navigate to Search Service Application- Browse to “SharePoint Central Administration” and select “Manage Service Applications” and then select “Search Service Application” (or any other name the search service was assigned during installation).
- Fill in the following information in the Add Content Source window as displayed in the following screens.
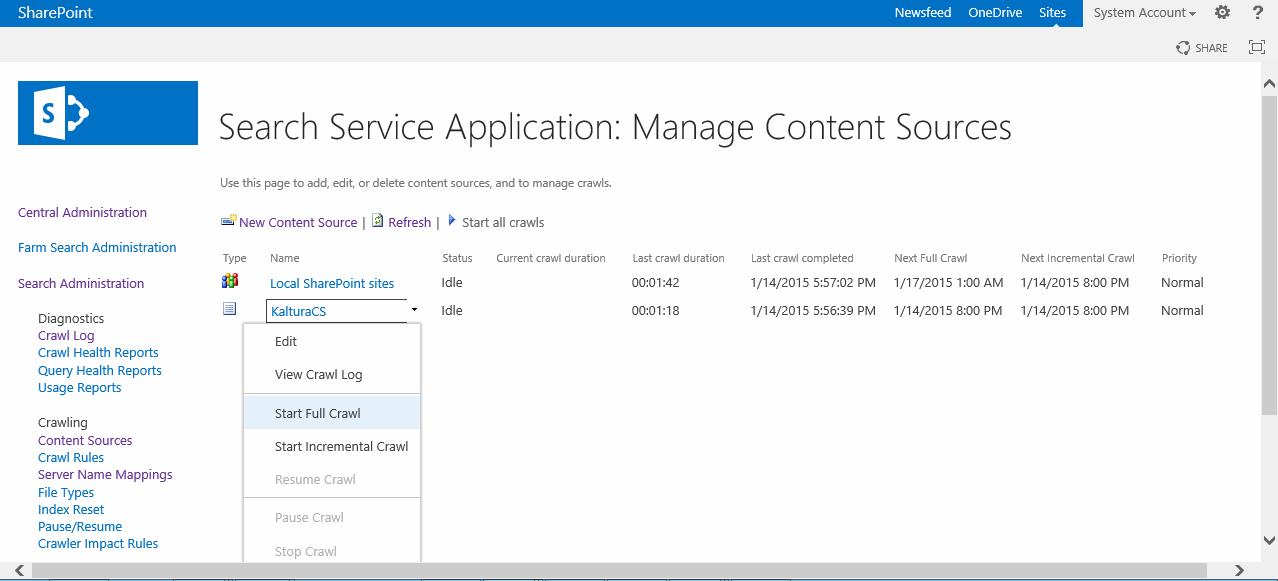
- Verify that the new content source can crawl Kaltura media successfully.
- Click on the content source that was added in step 6.
- Select “Start full crawl”. Wait for the crawling to complete and then click on the content source again.
- Select “View crawl log” and then ensure that no error appears on the last crawl report.


Step 7 - Activate the UI Feature in One or More Site Collections
Targeted for: SharePoint Administrators, Site Owners, Site Designers
Description: Activate Kaltura features within site collections where you plan to use Kaltura widgets or perform a Kaltura search. This is a common SharePoint action which is regularly done in SharePoint sites to add new functionality.
To activate UI features in site collections
- Navigate to a site collection settings screen. Browse to a site collection where you want to apply Kaltura functionality. Enter the Site collection settings screen, then choose “Site Collection Features”.
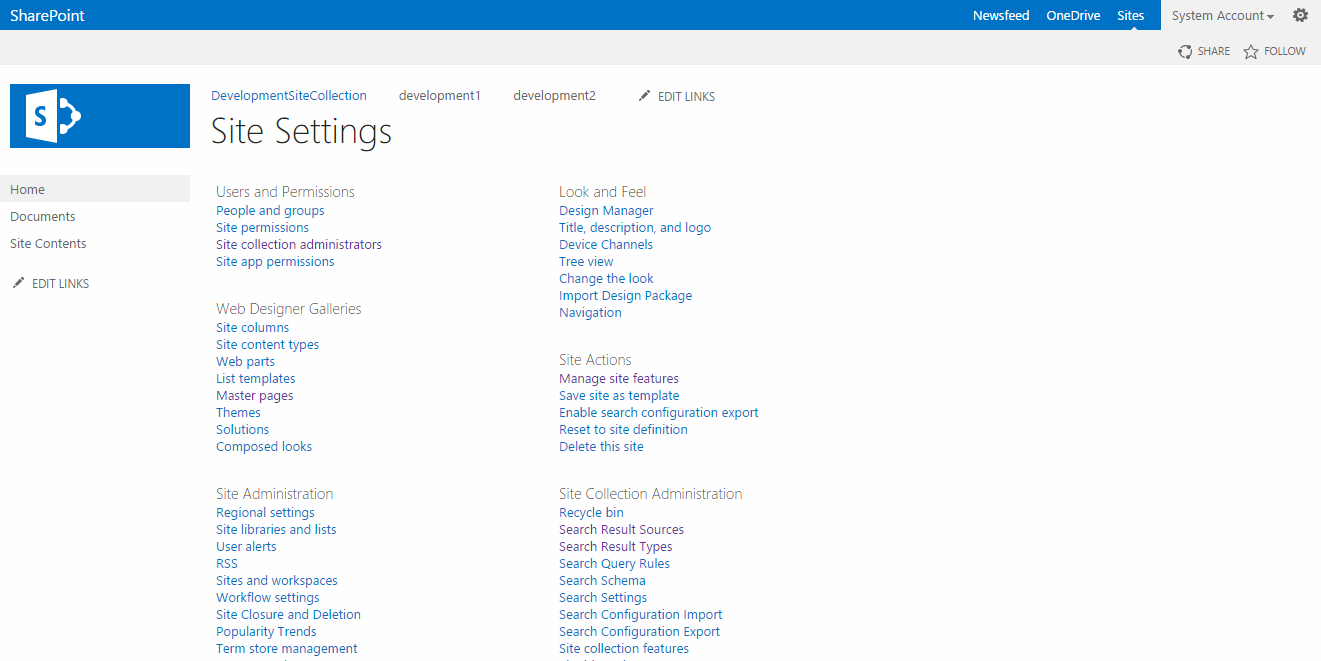
- Activate the widgets feature. To use Kaltura Widgets web parts (Media Gallery, My Media and Browse Search and Embed) in the site collection, activate the feature “Kaltura Widgets” by selecting the feature and clicking “Active”.


Step 8 - (Optional) Configure the Media Search
Targeted for – Site Collection Administrators
Applicable for - SharePoint On-Premise only. Not applicable for the SharePoint for MS Office 365 environment.
Description – Use to customize the media items look and feel within the search result, after applying the search customization media items will have unique logo and hover panel for preview.
To configure the media search within SharePoint
- Login to the site collection where you want to customize the search result as a site collection administrator.
NOTE: SharePoint will fail to import the search configuration if you are logged-in with the farm admin or application pool user account. Please ensure that the user who is logged-in is a site collection administrator and does not have higher privileges. - Enter the site settings screen by clicking on the gear icon (appears on the top corner of the site) and then choose “Site Settings.
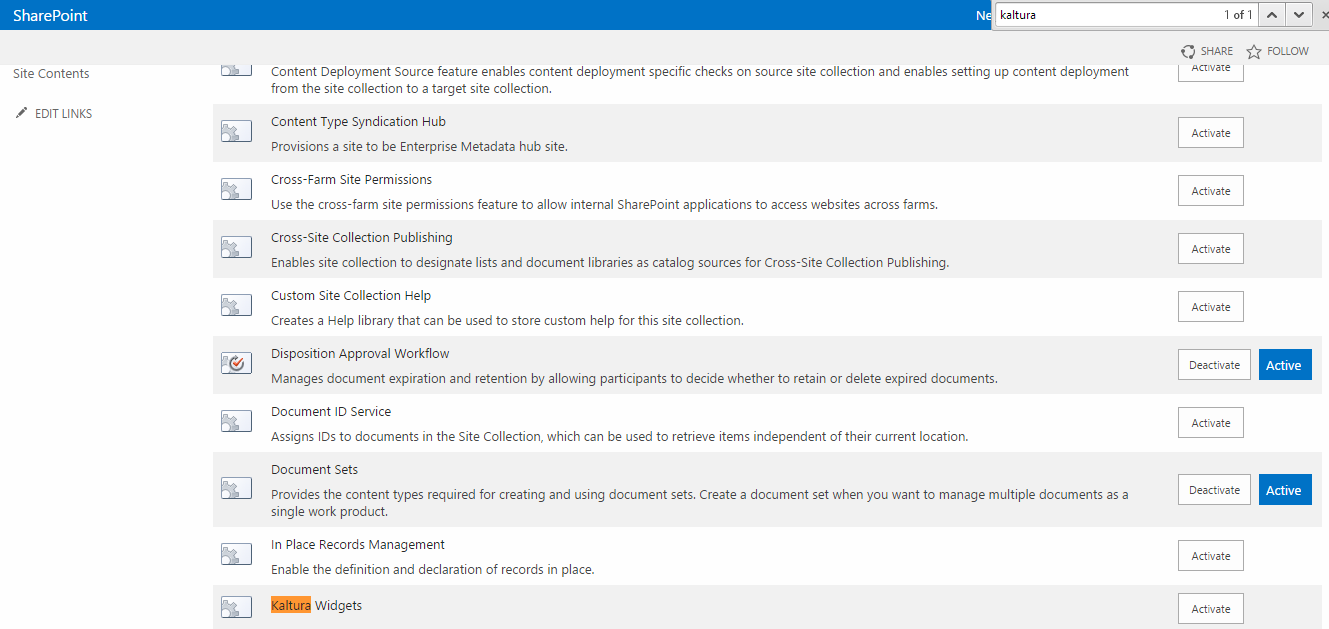
- Activate the related SharePoint features.
- Within the site settings page, navigate to “Site Collection Features” and activate the feature “SharePoint Server Publishing Infrastructure”.
- Within the site settings page, navigate to “Manage Site Features” and activate the following features: “Search Config Data Content Types” and “Search Config List Instance Feature”.
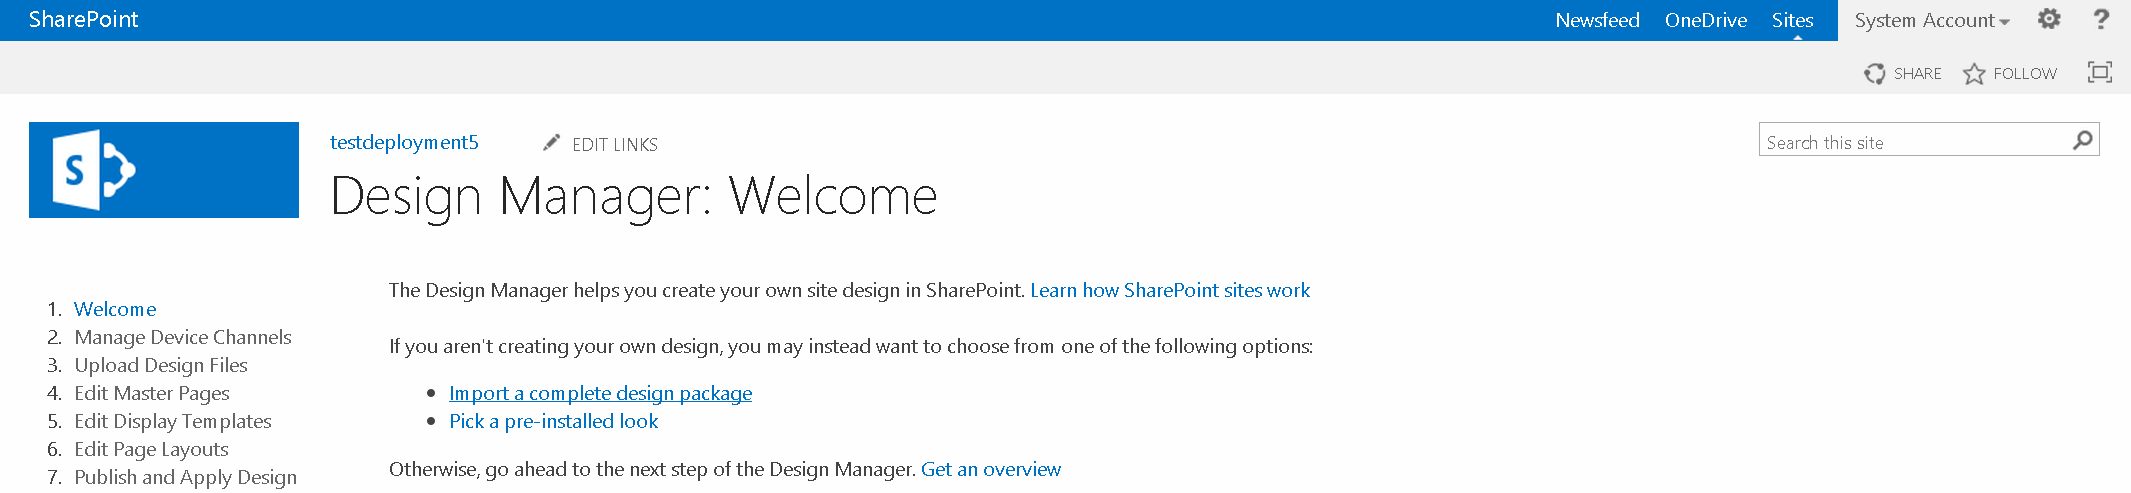
- Upload the search UI design files to SharePoint “Design Manager”: Within the site settings page, navigate to “Design Manager”.
- Within the Design Manager home screen, choose “Import a complete design package”.
- Browse and locate the file “Kaltura SharePoint Solution - Design Artifacts.wsp” that you downloaded with all the other installation files.
- Confirm to upload the file.
- Verify that a successful confirmation message appears on the screen: “Import of package "Kaltura SharePoint Solution - Design Artifacts.wsp" succeeded.”
- Import the search configuration file.
- Navigate to “Import Configuration”. The link appears under the menu “Site Collection Settings”.
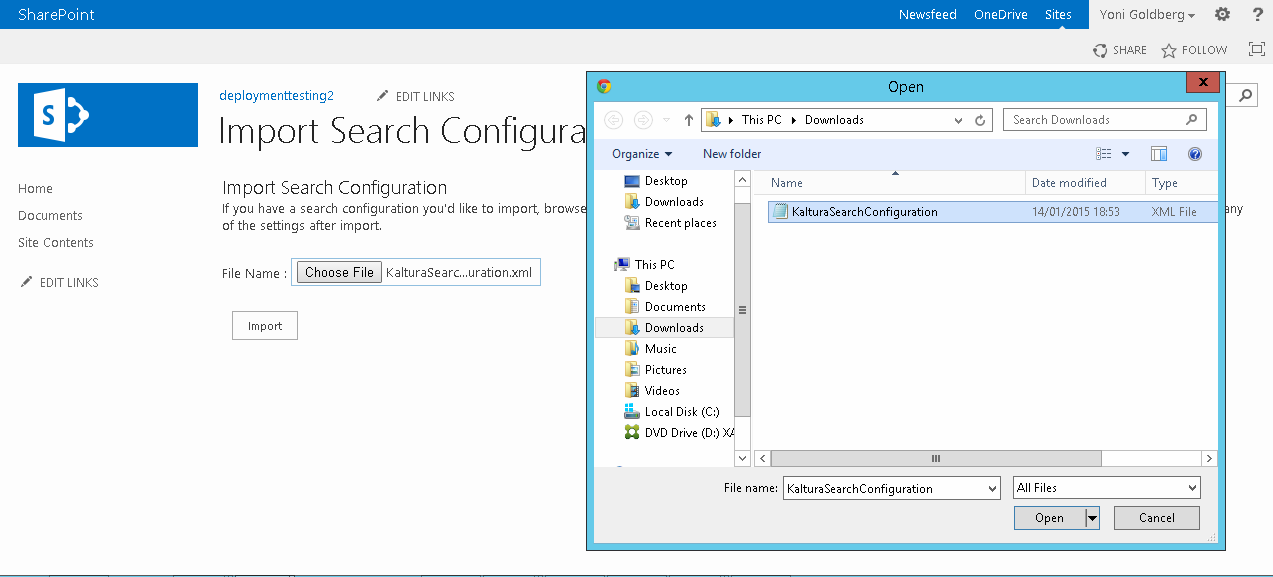
- Upload the file “Kaltura SharePoint Solution - Search UI Configuration.xml” using the file Upload button that appears in the screen and then confirm by clicking “Import”.
- Verify that the new configuration file was imported successfully. You should see a list of the configuration import files. The column “Status’ should display the value “Imported successfully”.
- To test the new search configuration, perform a search in the same site collection to which you uploaded the configuration file. Type a phrase that matches some media items that were uploaded to the Media Gallery. You may also put your mouse cursor over some media item, and hover panel with media thumbnail should popup.
NOTE: The user who performs a search must have read permissions in the site collection root site. This requirement holds true for every SharePoint solution that makes use of master pages and design files.


By now you have configured the SharePoint search server to index Kaltura media items. This section describes how to expose the search content to the user. The SharePoint search is a rich platform that includes many components and potential applications. You may design your own search solutions using SharePoint tools. The following examples do not teach you how to craft search applications but provides a few popular examples of how you may expose media items using the SharePoint search UI with links to Microsoft’s documentation.
Embed Kaltura Content within any Site Search
Every SharePoint site template comes with a search box that allows you to search within the local site content. By default, only content of the current site is displayed. Consequently, Kaltura media items will not appear in the search result. However, using the SharePoint search configuration, you may display Kaltura content along the local site content. This can be technically achieved by creating a new search result page (or search result center), configuring it to display items from the local SharePoint content and Kaltura media items and then changing the site settings to refer all searches to the new page. For more information, please refer to the Microsoft article Specify search settings for a site collection or a site.
Leverage Kaltura Content in an Enterprise Search Center
Search centers are SharePoint sites that are designed for rich search experience. They are pre-configured to perform organization-wide searches and contain various search UI elements to boost the search experience like verticals (tabs), refiners (filters) and others. If you already have a search center, Kaltura media items will be displayed within the search results. You may improve the user experience by providing a “Kaltura Vertical”. This is a tab within the search result that will narrow the search content to display Kaltura media items only. Using this tool you can focus on media items only in your search. For more information see Microsoft’s documentation on How to add a custom search vertical to your search results page in SharePoint 2013.
Creating a Custom Search Driven Application
Microsoft has coined the term ‘Search Driven Application’ to describe the richness and flexibility of the search platform. Using the various search tools, you my craft a custom search solution, for example:
- Show all the organizational media on a topic.
Based on some user interaction (for example, selecting a topic from a list), display all the related organization media, Kaltura items and local media mixed together, using the search result web part. You may apply similar formatting to all the media items regardless of their type, group important items and more.
- Show recommended content within your team sites.
You may add a widget within your team site that displays new, updated and recommended content for the team so they can explore and reveal content of interest regarding a specific topic or in general. To achieve this functionality, you may use the built-in web parts: Recommended Items and Popular Items Web Part.
- Display related media within your catalog product page.
SharePoint 2013 contains special treatment for catalog items (cross-organizational entities like products). The product page usually displays various information about the product, using the search result web part in a product page. It is possible to display all the content which is related to this product, local content and Kaltura media mixed together in a list.
Step 9 - Assign Permissions to Users
Targeted for: SharePoint Administrators, Site Owner, Site Designers
Description: Kaltura widgets inherit their permission from SharePoint and display the content according to the user’s permission. This step enables you to use SharePoint built-in security groups and permissions to set what the user is allowed to see and do.
Similar to any other content solution in SharePoint, users must be added to site groups that have some associated permission level. If your site users are already added to the built-in SharePoint groups – no other actions are required. Kaltura widgets take into account the SharePoint user permissions and authorize users accordingly.
By default, without changing the SharePoint out-of-the-box permission’s settings and Kaltura Application Framework settings, the following security principles are applied:
- Users that are part of the “Site Name Members” group are assigned the Kaltura “Contributor” contextual role.
- Users that are part of the “Site Name Visitors” group are assigned the Kaltura “Member” contextual role.
- Users that are part of the “Site Name Owners” group are assigned the Kaltura “Manager” contextual role.
To assign permissions to users
- Add users to groups in SharePoint.
- Change the default SharePoint-KAF permission mapping.
Typically, you do not need to change the default permission settings to satisfy your security requirements. However, for some complex scenarios, you may want to granularly set, for example, which permission (for example, role) in SharePoint is mapped to which KAF (Kaltura Application Framework) role. Should you want to achieve that level of control, it is possible to do so via the KAF admin console, under the ‘SharePoint’ tab. We recommend that you contact your Kaltura representative to get further technical assistance.
Default Mapping from SharePoint Groups to Kaltura Roles
The following table lists the default mapping from SharePoint groups and their permission levels to the Kaltura Application and Contextual roles.
SharePoint Group | SharePoint Permission Level | SharePoint Permission | Kaltura Role | Kaltura Contextual Role |
Visitors | Read | ViewListItems | viewerRole | Member |
Members | Edit | AddListItems | privateOnlyRole | Contributor |
Owners | Full Control | ApproveItems | privateOnlyRole | Manager |
Designers | Design | CancelCheckout | unmoderatedAdminRole | Manager |
Kaltura differentiates between application roles and contextual roles.
Application Roles
KAF application roles apply globally and include:
- anonymousRole – Can browse your site anonymously until trying to access pages/actions that require login: My Media, My Playlists, and Add New.
- viewerRole
- Not authorized to upload new content
- Does not have a My Media page
- privateOnlyRole
- Can upload content to My Media
- Can add media
- adminRole
- Can publish content
- Can upload content
- unmoderatedAdminRole – Can upload content and bypass moderation (when moderation is enabled for an account)
Contextual Roles
Contextual roles apply to actions that are in relevant to a media gallery widget.
- Member: Can access a media gallery but cannot add a new content
- Contributor: Can add content to a media gallery
- Moderator: In addition to the Contributor permission, can moderate content.
- Manager: In addition to the Contributor permission, can moderate content and access settings, including change metadata, edit members, change appearance, and delete channel.
For more information see Kaltura MediaSpace/Kaltura Application Framework (KAF) Roles and Permissions.
