Looking for more information about this feature? Feel free to contact your Kaltura representative.
About
Metadata Enrichment helps improve your media's metadata to boost content discoverability and engagement. With AI, you can:
- Automatically generate relevant titles, descriptions, and contextual tags
- Customize the output with tone, quotes, target audience, and video title prefix
- Improve how your videos appear in search results and recommendation engines
Note that generated metadata will override existing data, resulting in the loss of previous metadata.
Before you start
Videos repurposed with AI must meet the following criteria:
- Video must be in "Ready" status (transcoded)
- Video must have English captions
- Video must be 60 seconds or more in length
- Account must have Content Lab enabled
- Account must have an active REACH profile enabled with relevant catalog item(s)
Access the Content Lab
Steps for accessing the Content Lab vary depending on the Kaltura application.
Rich Media CMS -
Access the Content Lab through the Create with content lab button on the Entries list or on the Entry Details page.
 Rich Media CMS Entries list
Legacy Video Portal -
Access the Content Lab through the Create with content lab button on the Media page.

Kaltura Events - Access the Content Lab through the Create with content lab button on the Edit session page or the Edit media page.
 Events Edit session page
LMS Video - Access the Content Lab through the Create with content lab button on the Media page.

Appearance of the Content Lab
The appearance of the Content Lab varies depending on the Kaltura application.
Rich Media CMS -
After clicking the Create with Content Lab button on the Entries list or on the Entry Details page in Rich Media CMS, the 'Get more from your video' screen displays.
 Content Lab in Rich Media CMS
Legacy Video Portal, Kaltura Events, and LMS Video -
After clicking the Create with Content Lab button on -
- the Media page in legacy Video Portal
- the Edit session page or the Edit media page on Kaltura Events
- the Media page in LMS Video
the 'Create with AI screen' displays. Here's one example from the list above - accessing the Content Lab through the Create with Content Lab button on the Media page in legacy Video Portal:
 Content Lab in legacy Video Portal
The Enrich metadata with AI feature is not currently available for Kaltura Virtual Events.
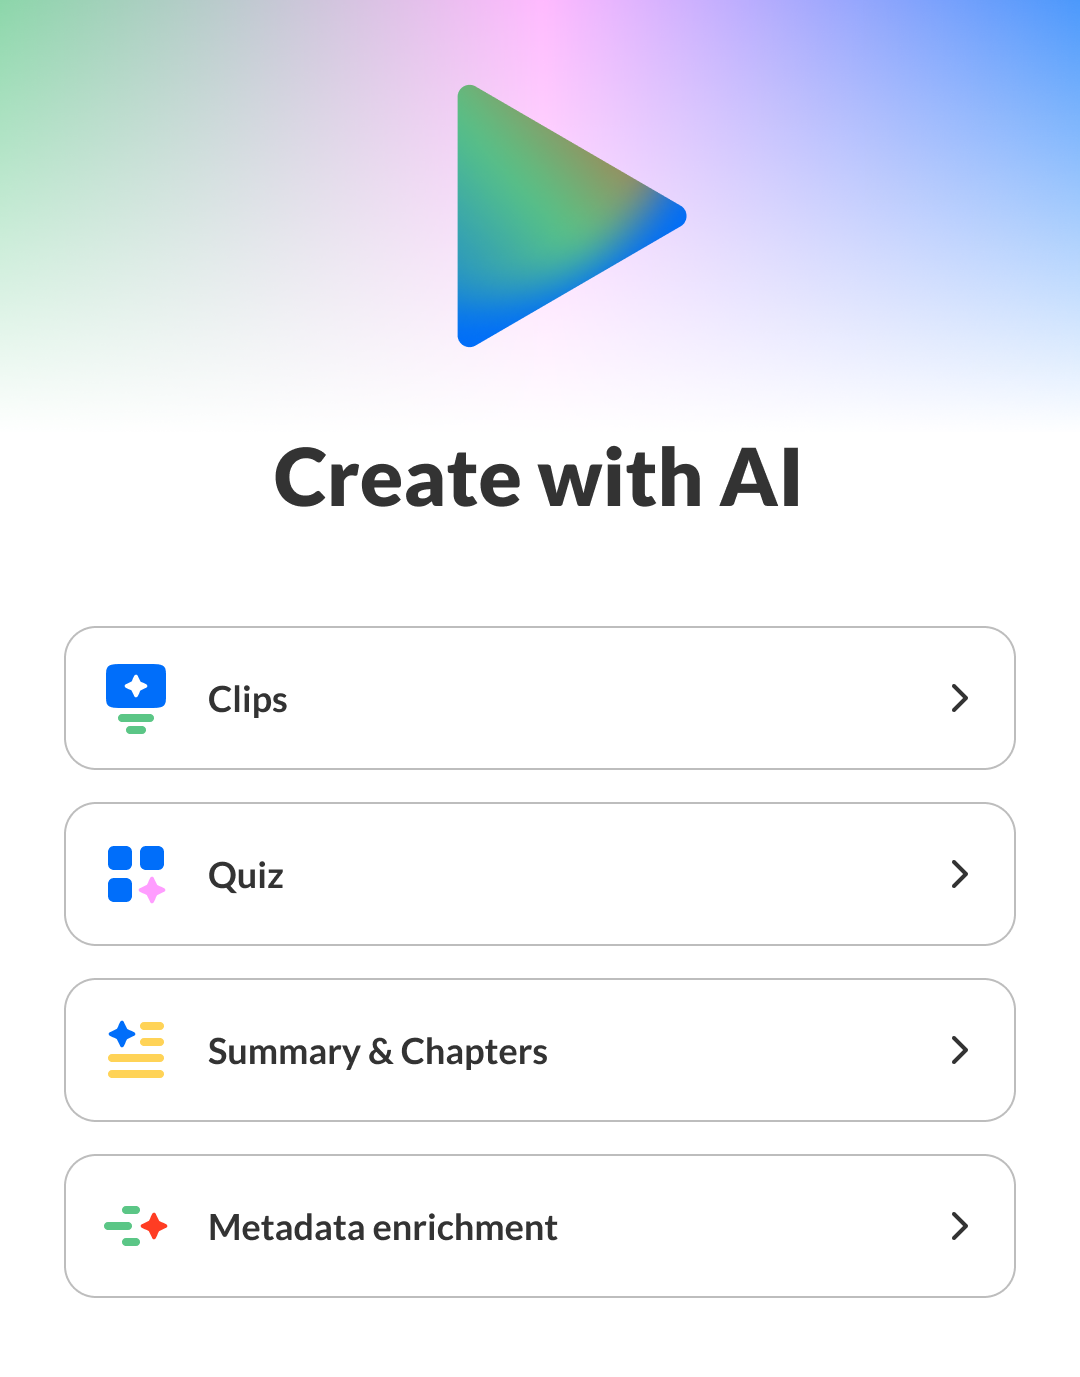
Enrich metadata with AI
- Click Create with Content Lab.
In Rich Media CMS, the 'Get more from your video' screen displays.
 Content Lab in Rich Media CMS
In legacy Video Portal and LMS Video, the 'Create with AI screen' displays.
 Content Lab in legacy Video Portal and LMS Video
This is the Content Lab's main menu. Options shown vary depending on the services configured for your account.
- Click Metadata enrichment.
-
Type instructions to match your desired outcome. You can also click on any of the available tags to populate the box with examples of popular instructions that could be given. Please note that some of the available tags require you to complete the instructions. Once you click on a tag, a drop-down box displays with suggestions for additional text instructions. You may also type the text in manually if none of the suggestions fit your needs.
- Tone of Voice - Describe the tone of voice with which you would like the metadata to be created.
- Add Quotes - Include key quotes from the session in the entry description.
- Target audience - Tailor the metadata to a target audience.
- Add Title Prefix - Add a descriptor at the beginning of the title.
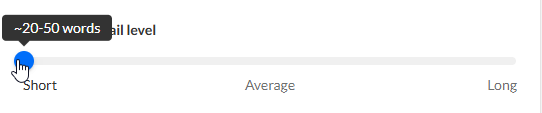
- Adjust the sliding scale with your cursor to define how long you want your metadata to be - Short, Average, or Long. The longer your metadata, the more detailed it will be. Short = approximately 20-50 words, Average = approximately 50-100 words, and Long = approximately 100-250 words.
- Select the output language for the generated title, description, and tags. The dropdown includes both Last used languages and All languages.
- Click Generate. The Content Lab begins generating your metadata.
- Select a title, then click Continue.
You are prompted to choose a description.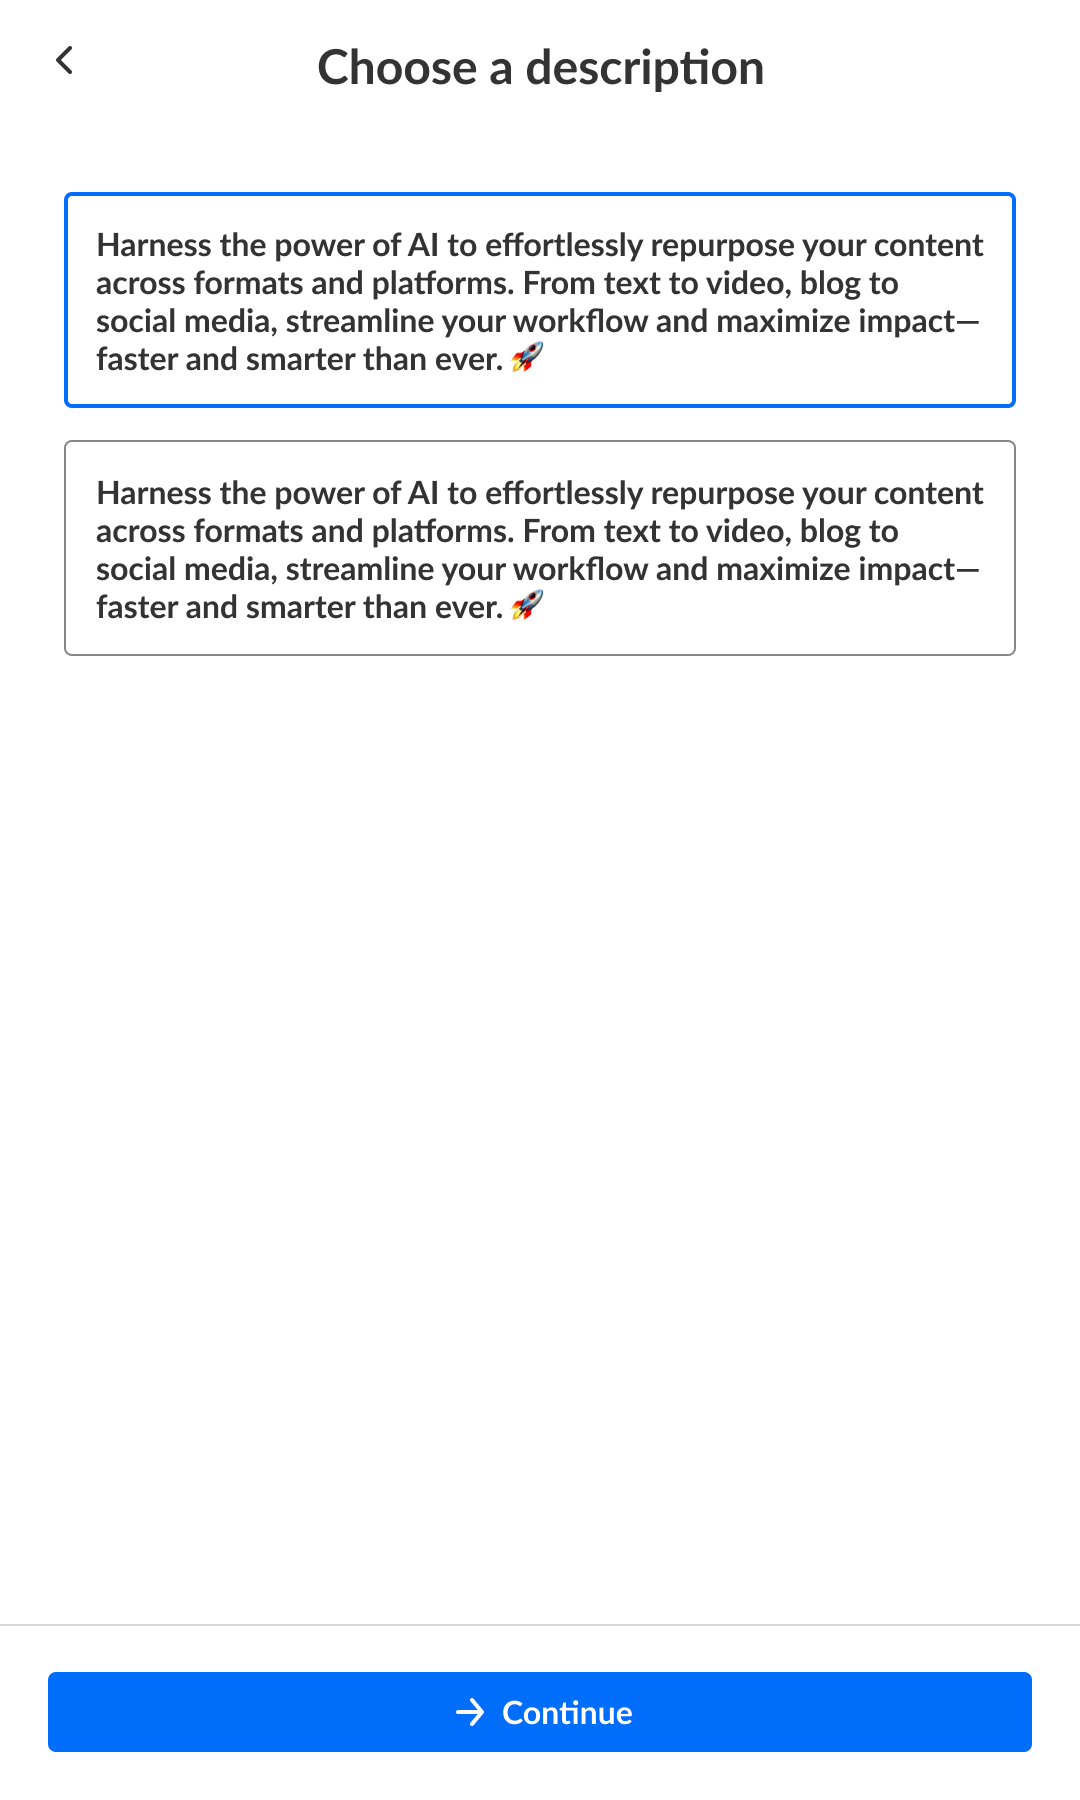
- Select a description, then click Continue.
The Enrich metadata preview page displays with the title, description, and tags chosen.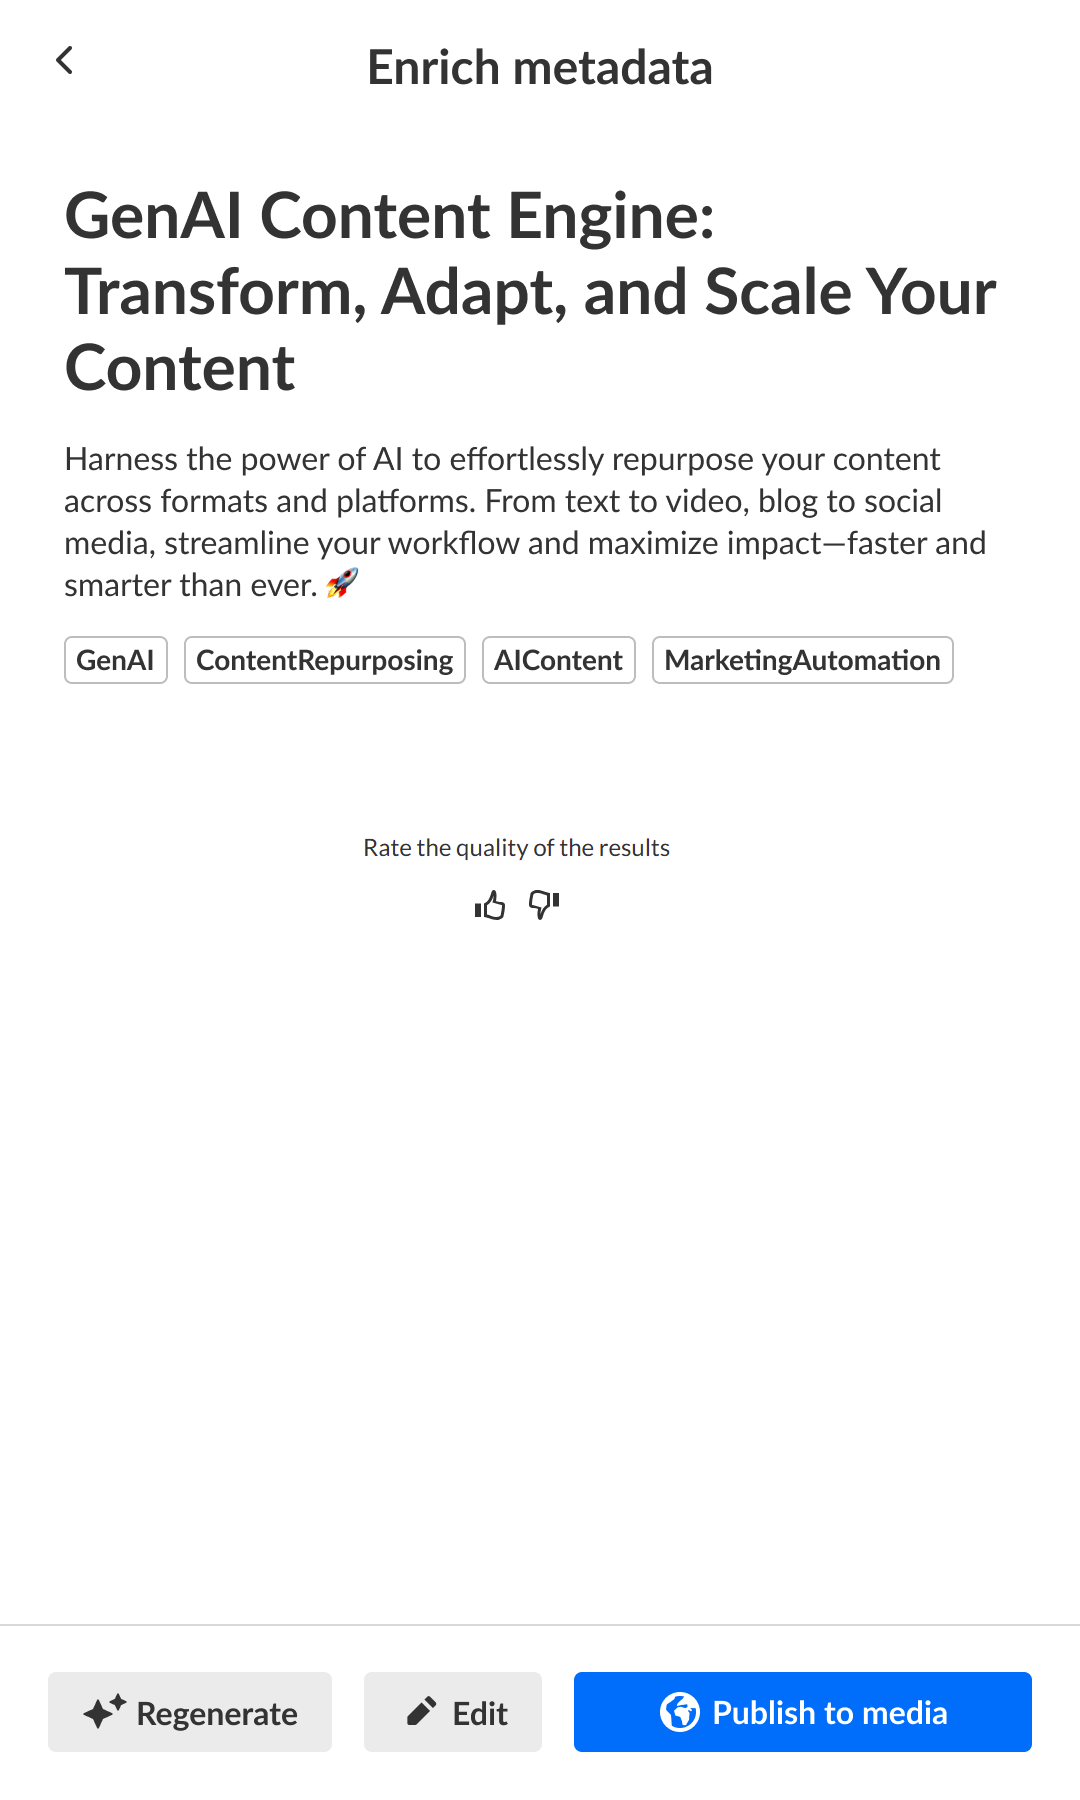

If this is your first time enriching media, the Enrich metadata screen displays.
If you've already done some media enrichment in the past, the list of generated metadata drafts displays. Simply click Generate new to navigate to the Enrich metadata screen.


Once finished, you are prompted to choose a title.


If you leave the metadata enrichment process before completing all the steps, Content Lab will pick up where you left off the next time you open the draft.
Provide feedback on the metadata
- Click the "thumbs up" or "thumbs down" to provide your feedback on the metadata. If you click "thumbs down", an additional screen displays.
- Click to choose a reason and, optionally, add specific details about why you gave it a "thumbs down". Your feedback is important to us!
- Click Send.

Edit metadata draft
- Click Edit on the Enrich metadata preview page.
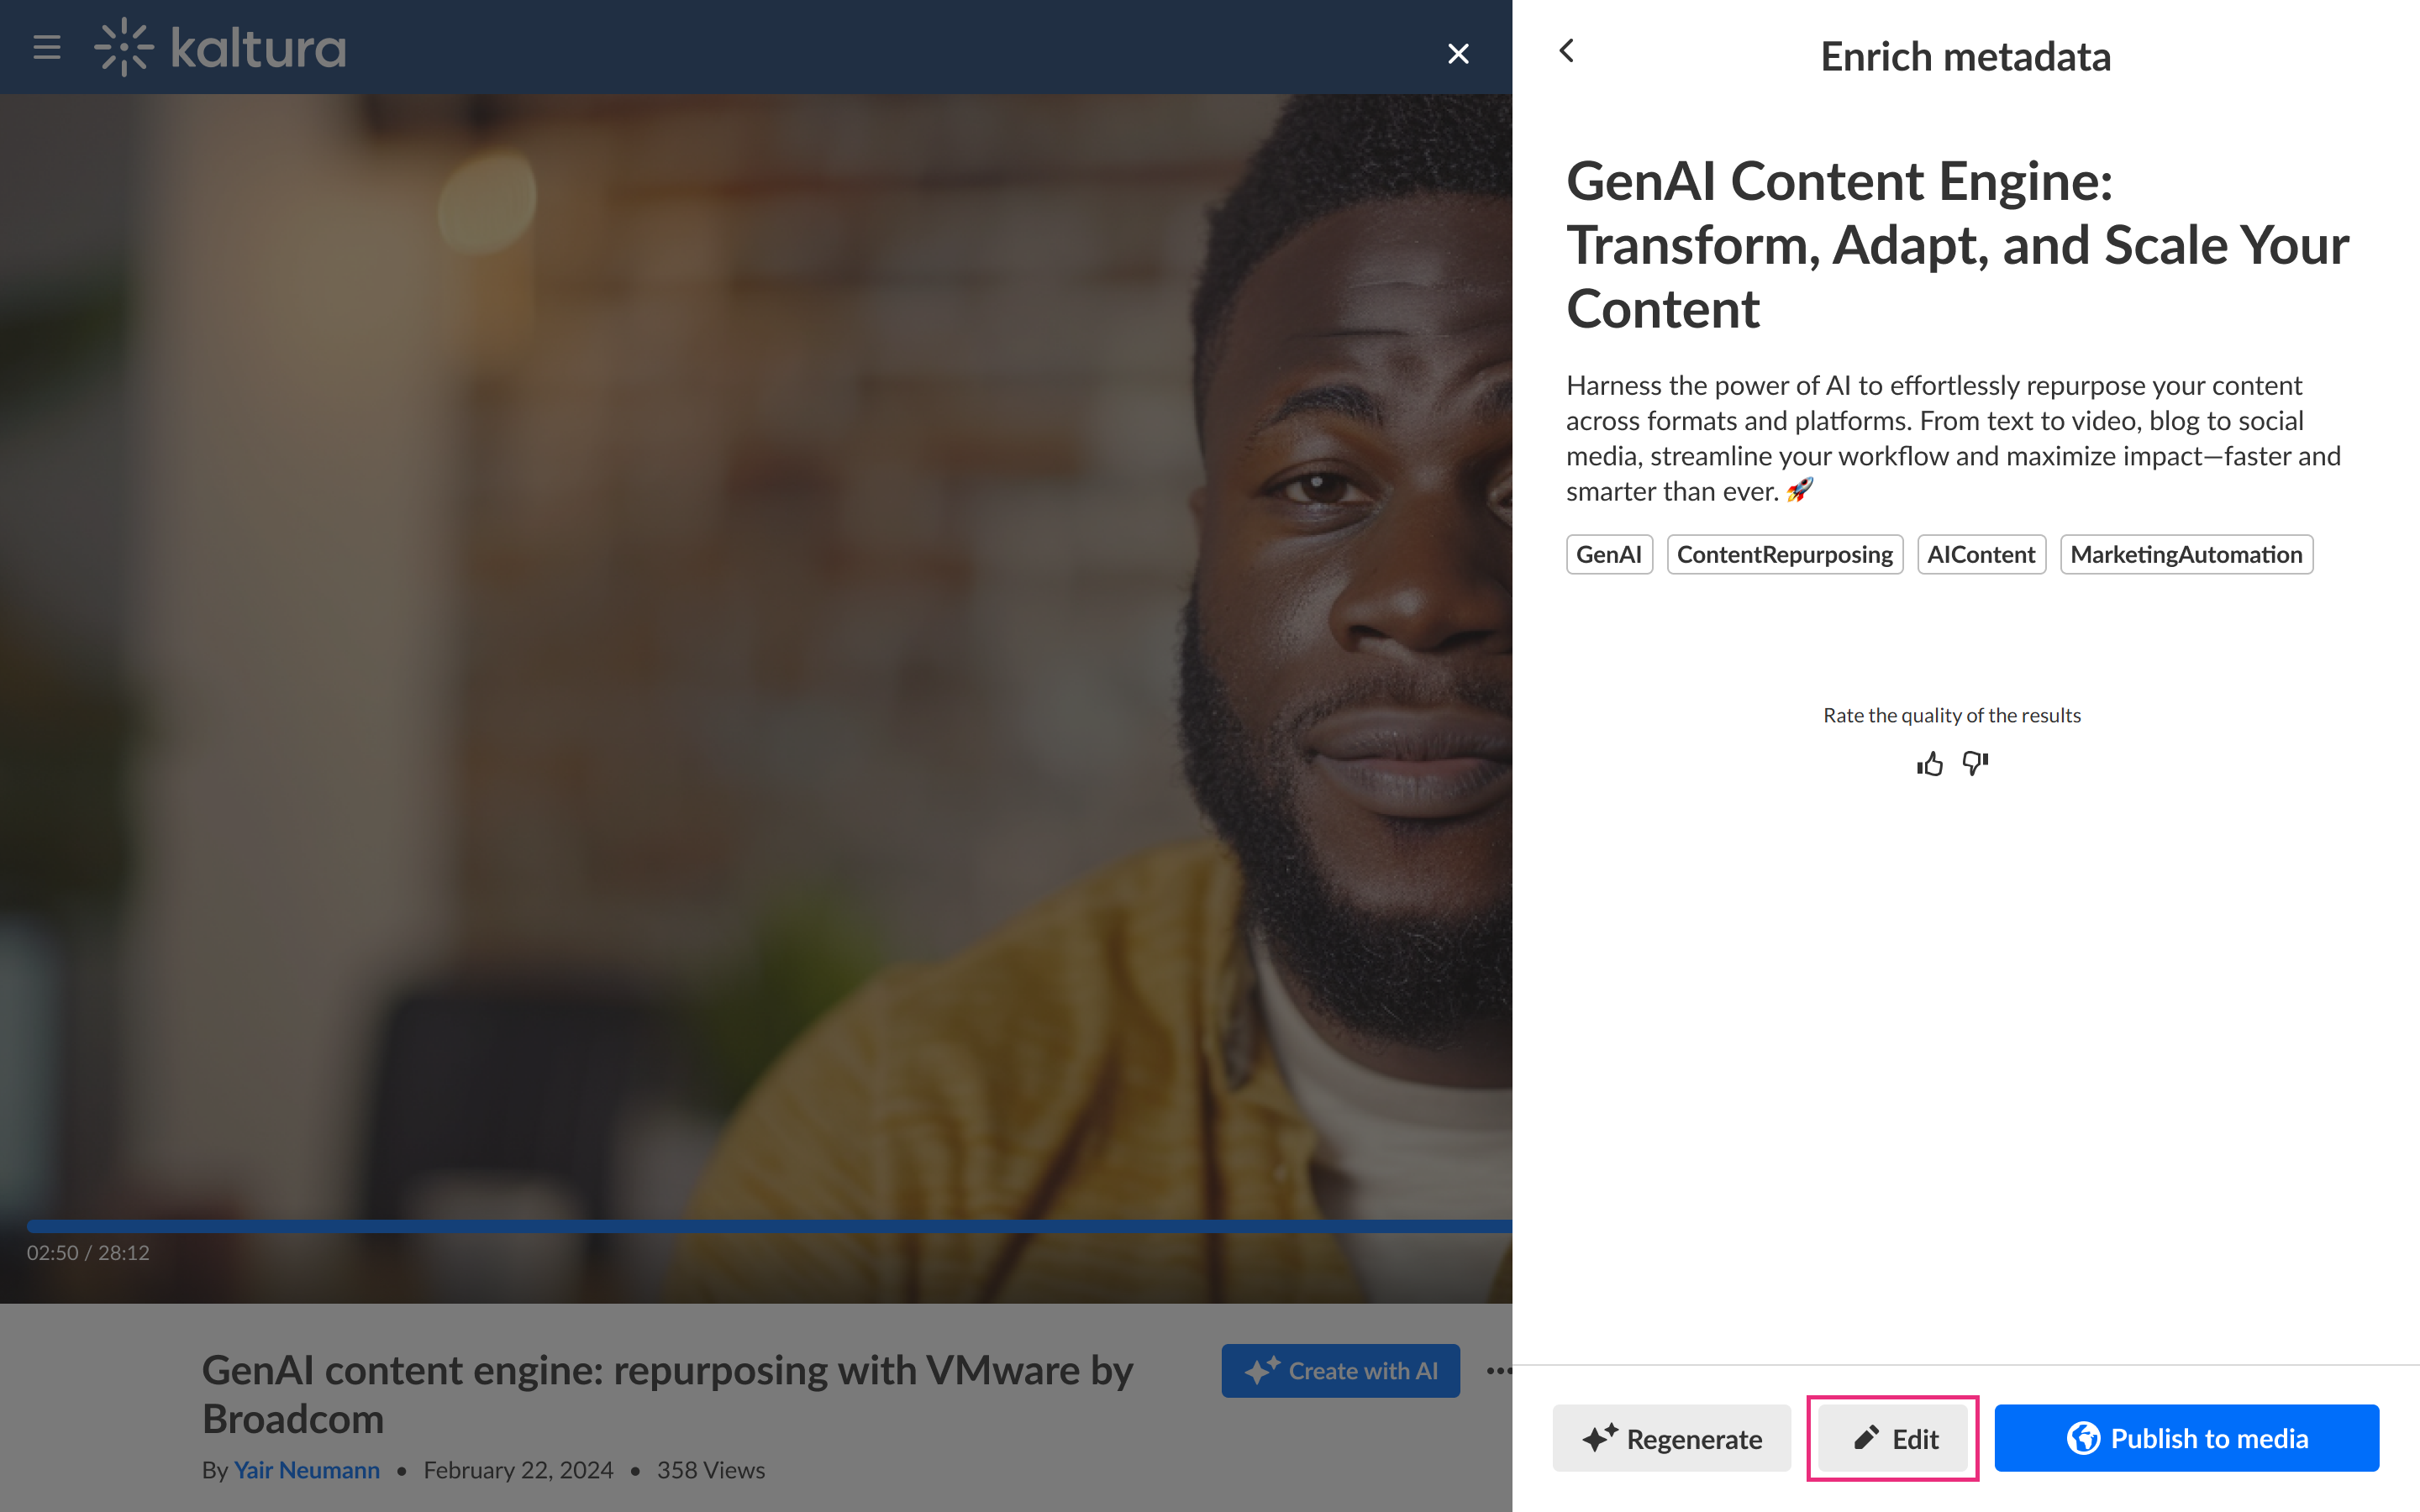
The Edit metadata screen displays.
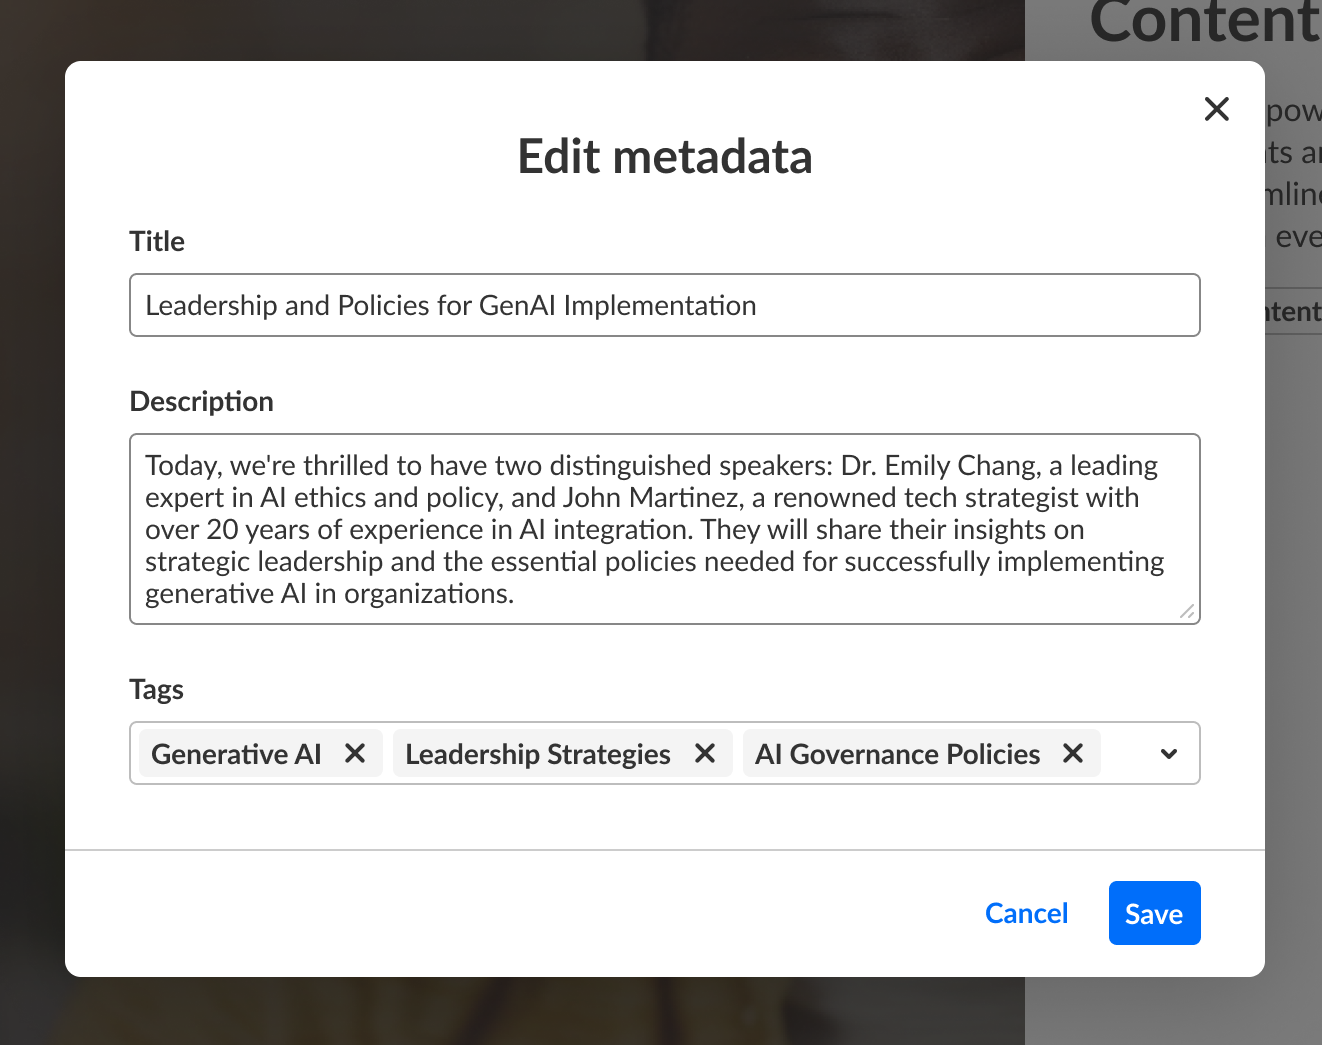
- Edit the title, description, and tags as desired. These will be saved to the metadata of the entry that is created.
- When finished, click Save.


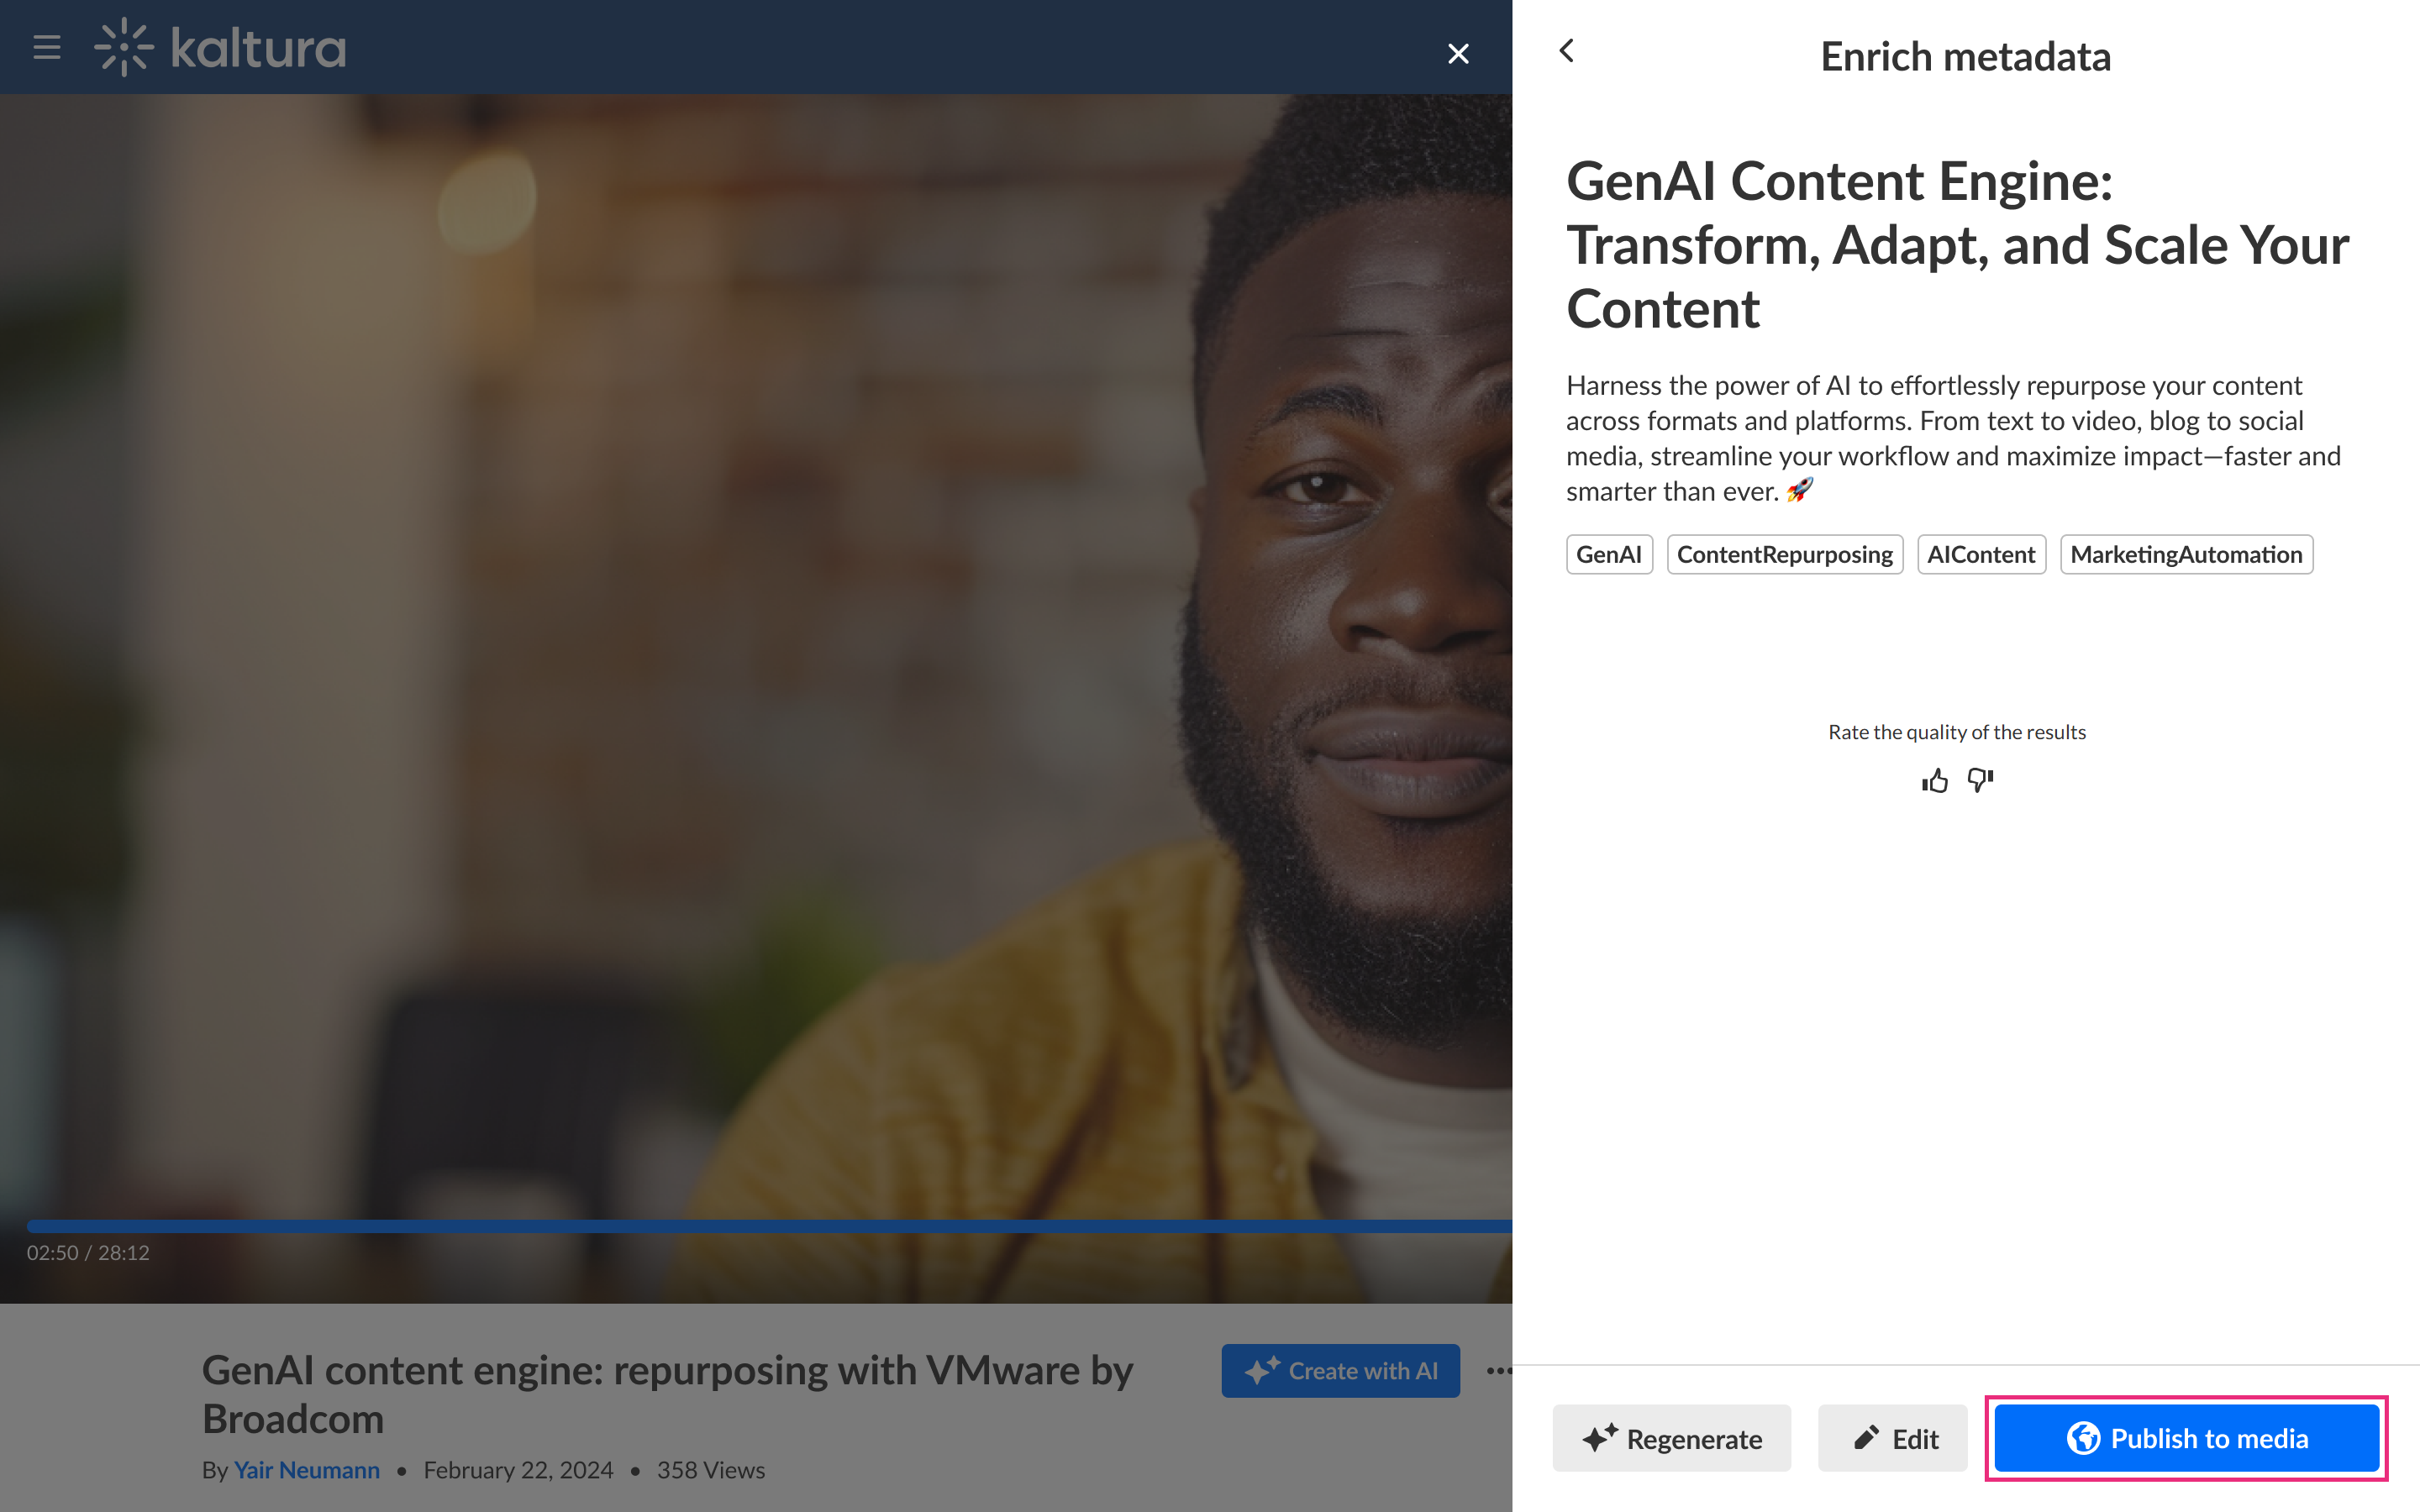
Publish to media
- Click Publish to media on the Enrich metadata preview page.
 The Publish metadata screen displays.
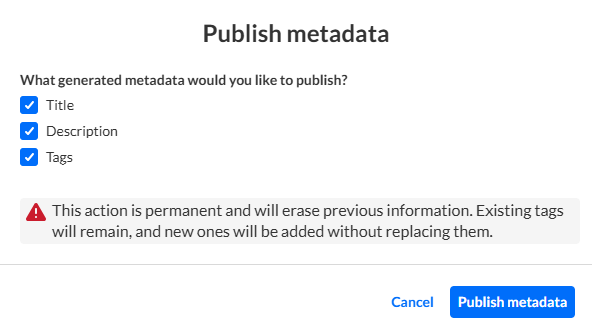
- Click to choose which metadata assets you would like to publish. Title, Description, and Tags are all available for publishing.
Notice the warning that generated metadata will override existing data, resulting in the loss of previous metadata. This action cannot be undone. - Click Publish metadata to move forward with publishing the newly generated metadata or click Cancel to cancel the action. If you clicked Publish metadata, you receive confirmation that your metadata was successfully published.
 The Publish metadata screen displays.
Regenerate metadata
- Click Regenerate on the Enrich metadata preview page.
 You receive a warning that you have unsaved changes. Click Keep editing to cancel regeneration or click Leave to continue regeneration.
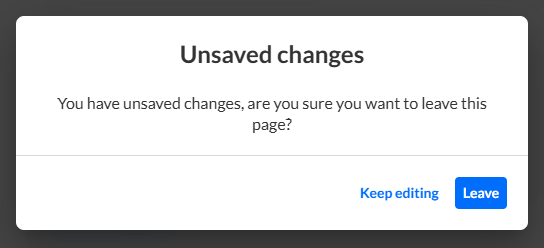 If you clicked Leave, the Enrich metadata screen displays.
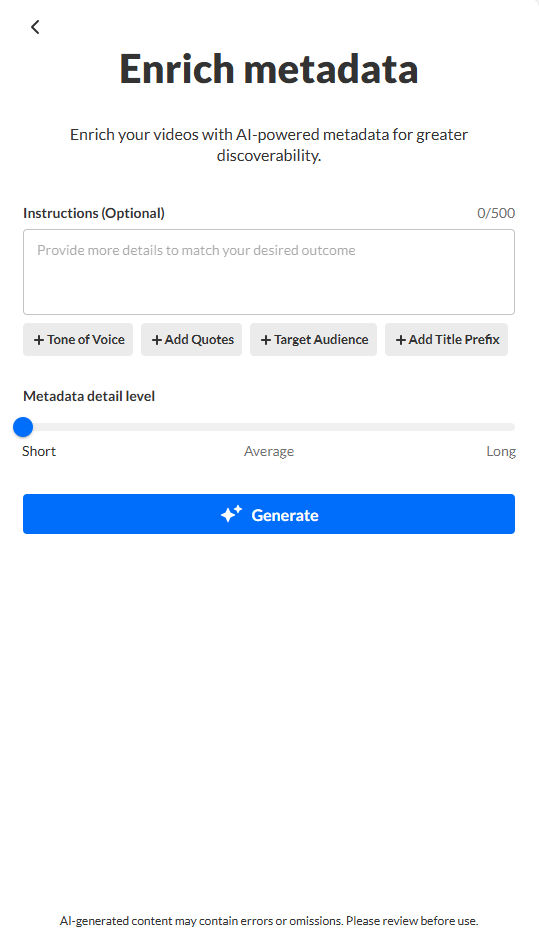
- Follow these instructions to enrich your metadata.
 You receive a warning that you have unsaved changes. Click Keep editing to cancel regeneration or click Leave to continue regeneration.
 If you clicked Leave, the Enrich metadata screen displays.
Kaltura does not use customer data to train its AI models. To learn more, see Kaltura's Artificial Intelligence Principles.
