About
The Auth module controls sign-in settings for Content Hubs and the legacy Video Portal. By default, it uses Kaltura Authentication.
- To configure SAML authentication, see the SAML module.
- To offer multiple sign-in methods, use enableMultiAuth.
- To let users change their sign-in method after selecting Remember My Selection, direct them to
https://<partnerId>.mediaspace.kaltura.com/user/clear-login-selection. They can also clear their browser cookies.
About AuthBroker
AuthBroker manages sign-in through external identity providers at the account level. It supports SAML and OAuth 2.0. AuthBroker users are shared across applications and instances in the account.
You can configure an authentication profile once and use it with multiple applications or instances.
Configure the Auth module
1. Go to your Configuration Management console and select Auth in the left panel. You can also go directly to https://{your_site_URL}/admin/config/tab/auth.
The Auth page displays.

2. Configure the following:
- demoMode – Select Yes to enable demo login mode. In this mode, any username and password combination signs the user in with an admin role.
- showLogin – Select Yes to show the sign-in and sign-out menu in the site header.
- autoRedirectAdminToSSOLogin – Select Yes to send administrators to your organization’s SSO sign-in page when they visit
/admin. The username and password form won’t appear. Confirm that administrators can sign in through SSO before enabling this setting. - phUser – Enter placeholder text for the user ID field.
- phPwd – Enter placeholder text for the password field.
- phLoginInstruction – Enter instructions for the sign-in page.
- failedLoginEmailTemplate – Select an email template to send when someone enters an email address that does not match an existing user. Leave the field empty to disable this email. Email tokens are not supported in this template. To configure templates, see the EmailTemplates module.
Configure authentication methods
Use a single authentication method
Leave enableMultiAuth set to No to configure one authentication method using authNAdapter and authZAdapter.
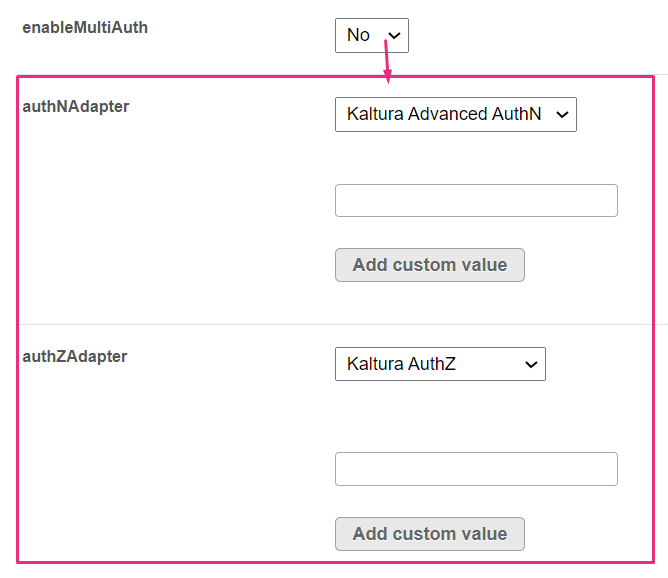
Configure the following:
- authNAdapter – Select the authentication method. KalturaAuth uses the built-in user management system at
/admin/users. LdapAuth uses your organization’s LDAP or Active Directory server to authenticate users. - authZAdapter – Select the authorization method that determines each user’s role. KalturaAuth uses the built-in user management system. LdapAuth uses your organization’s LDAP or Active Directory server.
When Theming is enabled, set authNAdapter to Kaltura Advanced AuthN.
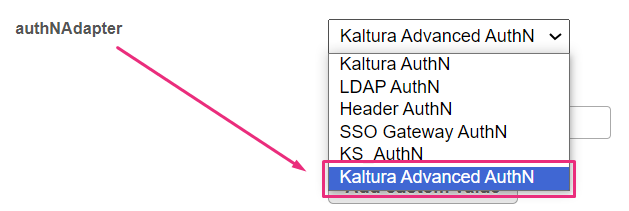
To use a custom authentication or authorization class, enter its name in the corresponding field and click Add custom value.
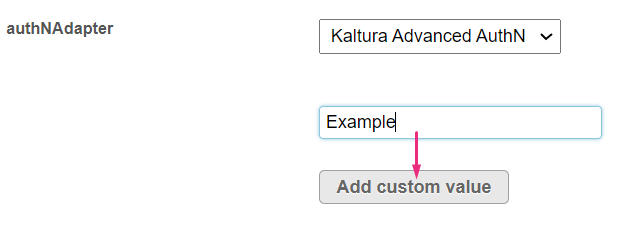
The value is added to the corresponding menu.
Use multiple authentication methods
Set enableMultiAuth to Yes to add a section for each authentication method you want to offer.
Additional fields display.
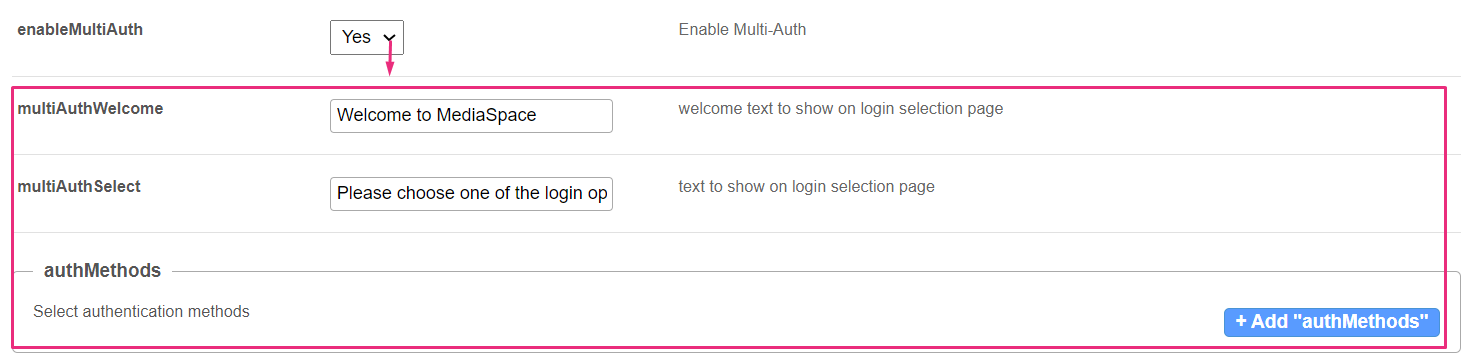
Configure the following:
- multiAuthWelcome – Enter welcome text for the sign-in selection page.
- multiAuthSelect – Enter text prompting users to choose a sign-in method.
Click +Add "authMethods".
A new section displays.
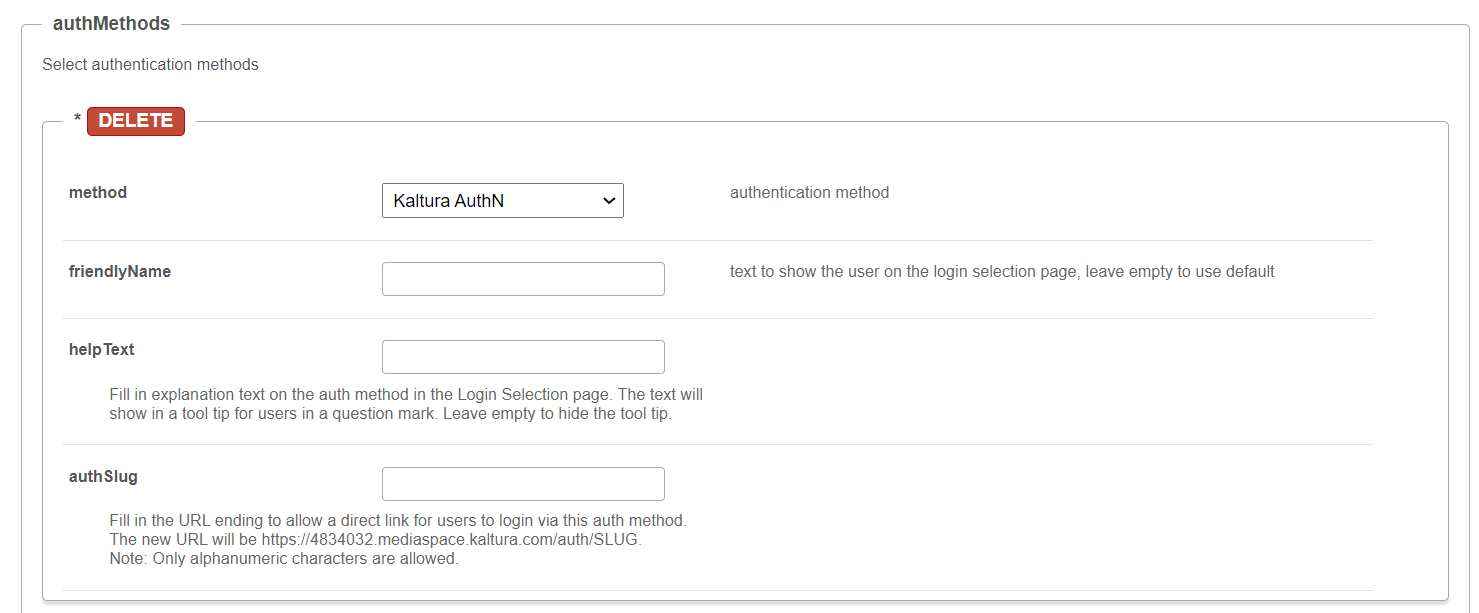
Configure the following for each method:
- method – Select an authentication method from the drop-down menu.
- friendlyName – Enter the name shown on the sign-in selection page. Leave it empty to use the default name.
- helpText – Enter the text shown when a user points to the question mark on the sign-in selection page. Leave it empty to use the default text.
- authSlug – Enter an alphanumeric URL ending for a direct link to this sign-in method. The resulting URL follows the format
https://<your_site_URL>/auth/SLUG.
Configure access and session settings
Configure the following:
- allowAnonymous – Select Yes to let users browse the site without signing in. Anonymous users have the anonymousRole. When they select an action that requires a higher role, a sign-in page displays.
- anonymousGreeting – Enter the text shown in the header instead of a signed-in user’s name.
- sessionLifetime – Enter the maximum user session length in seconds. The minimum applied length is 3,600 seconds, even if you enter a lower value.
- refreshDetailsOnLogin – Select Yes to update user details in Kaltura at each sign-in.
- refreshRoleOnLogin – Select Yes to update the user’s Kaltura role at each sign-in. Select No if an administrator manages the role directly in Kaltura.
Configure LDAP settings
LdapServer
Click Expand to view the LDAP server settings.

Make sure the required ports and IP ranges in your organization’s firewall are accessible from Kaltura servers. The Kaltura LDAP wizard can help test the connection and suggest a working configuration.
Configure the following:
- host – Enter the LDAP server address.
- port – Enter the LDAP server port.
- protocol – Enter ldap or ldaps.
- Protocolversion – Select the LDAP protocol version, V2 or V3.
- baseDn – Enter the server’s base DN.
- bindMethod – Select how users are authenticated against the LDAP server:
- Search before bind – Search the server to find the user’s DN.
- Direct bind – Construct the user’s DN using the format in userDnFormat, without searching.
searchUser
Under LdapServer, click Expand to display the searchUser settings.

Configure the following:
- username – If anonymous search is not allowed, enter the DN of the account used to search for users, such as
CN=xyz. Leave the field empty for anonymous search. - password – If anonymous search is not allowed, enter the password for the search account. Leave the field empty for anonymous search.
- userSearchQueryPattern – Enter the pattern used to find a user. The
@@USERNAME@@token is replaced with the username entered at sign-in. - emailAttribute – Enter the user-record attribute containing the email address. Leave it empty if you do not want to synchronize email addresses with Kaltura.
- firstNameAttribute – Enter the user-record attribute containing the first name. Leave it empty if you do not want to synchronize first names.
- lastNameAttribute – Enter the user-record attribute containing the last name. Leave it empty if you do not want to synchronize last names.
- tlsCipherSuite – Advanced setting for the
LDAPTLS_CIPHER_SUITEenvironment variable.
ldapOptions
Click Expand to configure LDAP group searches.

- Get user from groups – Search group records to find groups that list the user as a member.
- Get groups from user – Check the user’s record to find the groups it lists.
If you select Get user from groups, configure the byGroup settings:
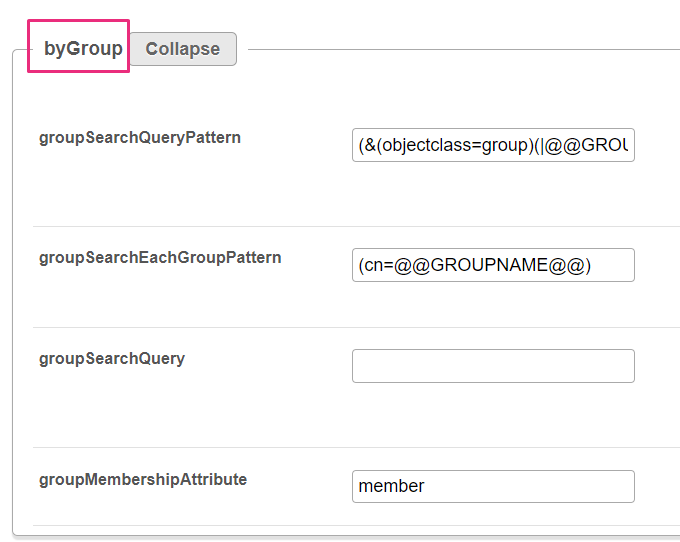
- groupSearchQueryPattern – Enter a pattern for finding all groups in one query. The
@@GROUPS_REPLACEMENTS@@token is replaced with the pattern in groupSearchEachGroupPattern. - groupSearchEachGroupPattern – Enter the pattern for an individual group. The pattern is repeated for each group in the mapping settings, with an OR relationship between groups.
- groupSearchQuery – Enter a query that finds all mapped groups in one request. If you enter a value here, groupSearchQueryPattern and groupSearchEachGroupPattern are not used.
- groupMembershipAttribute – Enter the attribute on a group record that lists its members.
If you select Get groups from user, configure byUser settings:
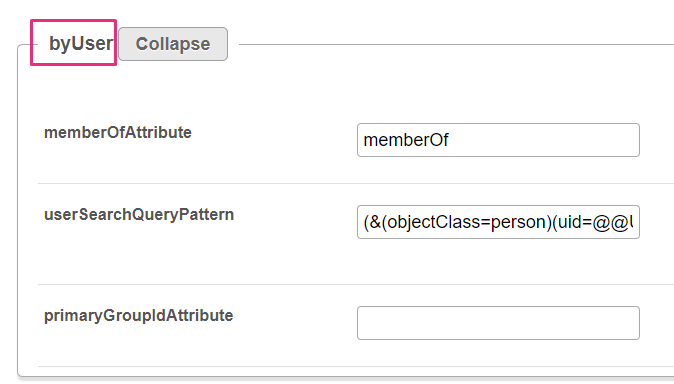
- memberOfAttribute – Enter the attribute used with the
memberOfsearch filter to map groups to users. This filter is not enabled by default on every LDAP server. - userSearchQueryPattern – Enter the pattern used to find a user. The
@@USERNAME@@token is replaced with the username entered at sign-in. - primaryGroupIdAttribute – If you authorize users by primary group ID in Active Directory, enter the attribute name, usually
primaryGroupId. - groupsMatchingOrder – Enter the order in which to match site roles to LDAP groups. For example, enter
adminRole,viewerRoleto check for the admin role first.
ldapGroups
Use ldapGroups to map LDAP groups to site roles. Click Expand, then enter each group’s common name, such as faculty, rather than its full value, such as CN=faculty.

Configure the following:
- adminRole – Enter LDAP group names that map to the admin role. Click +Add "adminRole" to add another group.
- viewerRole – Enter LDAP group names that map to the viewer role. Click +Add "viewerRole" to add another group.
- privateOnlyRole – Enter LDAP group names that map to the private-only role. Click +Add "privateOnlyRole" to add another group.
- unmoderatedAdminRole – Enter LDAP group names that map to the unmoderated admin role. Click +Add "unmoderatedAdminRole" to add another group.
To map a primary group ID, click +Add "matchByPrimaryGroupId".
A new section displays.
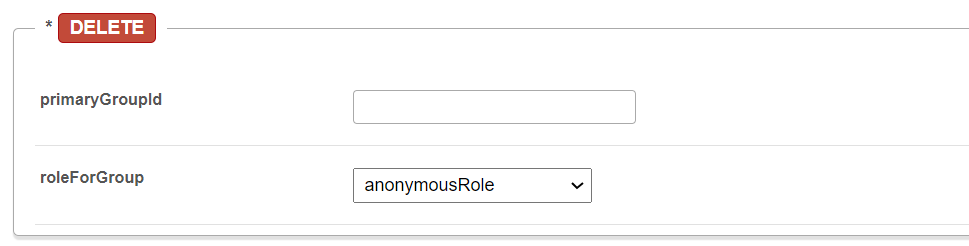
- primaryGroupId – Enter the group ID.
- roleForGroup – Select the role for that group from the drop-down menu. The options are:
- anonymousRole
- viewerRole
- privateOnlyRole
- adminRole
- unmoderatedAdminRole
Configure other authentication settings
SSO
Click Expand to open the SSO Gateway settings for site sign-in. To require SSO for administrators signing in at /admin, use autoRedirectAdminToSSOLogin.

Configure the following:
- secret – Enter a custom shared secret, or enter
defaultto use the Kaltura Admin Secret for your account. - loginUrl – Enter the SSO Gateway sign-in URL. The
refparameter is added automatically. - logoutUrl – Enter the URL users are sent to after signing out. This is usually your organization’s sign-in page.
- hashAlgorithm – Select SHA1 or SHA256 to generate the session key.
headerAuth
Click Expand to open the header authentication settings for site sign-in.

Configure the following:
- headerName – Enter the HTTP header containing the authenticated user’s ID.
- logoutURL – If allowAnonymous is set to No, enter a URL to send users to after sign-out instead of showing an unauthorized page.
forgotPassword
Click Expand to open the settings for the Forgot Password link and email text.

For link, choose how the Forgot Password link works:
- Leave the value empty to hide the link.
- Enter an email address beginning with
mailto:to open the user’s email application. The message uses the text in emailSubject and emailBody. - Enter the URL of a page that helps users recover their credentials. Do not enter
true.
Configure the email text:
- emailSubject – If link contains an email address, enter the subject for the generated email. Enter an empty string if you do not want a subject.
- emailBody – If link contains an email address, enter the body of the generated email. Enter an empty string if you do not want a body. With Kaltura Authentication’s user management system, administrators can select a user’s email address to open an email with a new password.
- reminderSubject – Enter the subject for the new-password email, or enter an empty string.
- reminderBody – Enter the body for the new-password email. The password is inserted automatically at the end of the message.
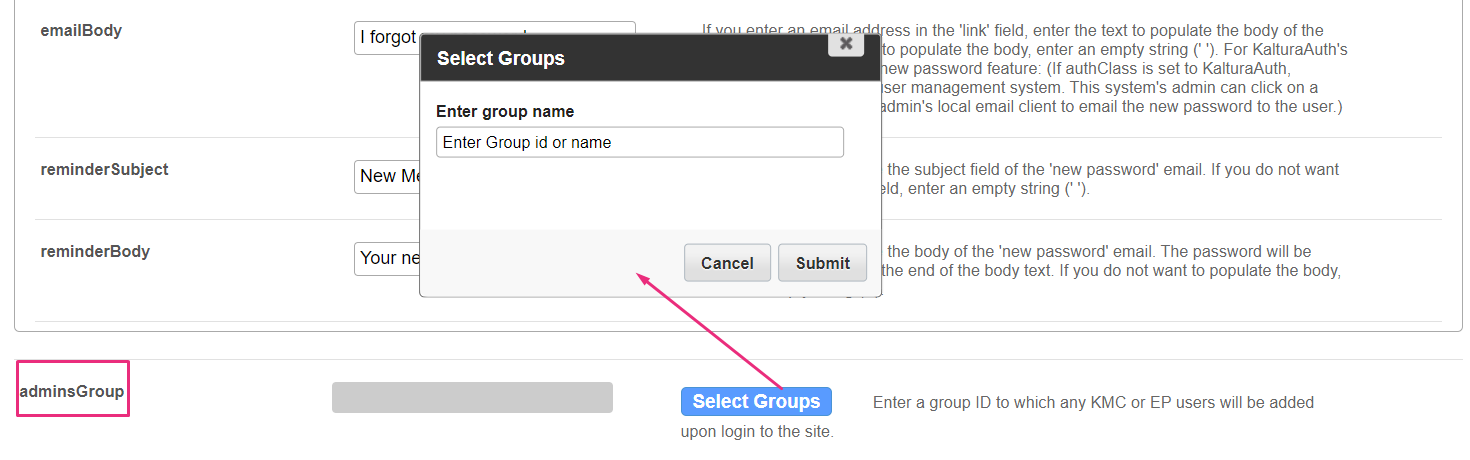
adminsGroup
Enter the group ID to which Rich Media CMS or Events users are added when they sign in to the site.
3. When you have finished configuring the module, click Save.
