About
This guide will help you customize the design of your media page in your video portal. Follow these steps to personalize the appearance and functionality of your media pages.
This feature must be enabled by your administrator in the entrydesign module.
Access the display settings
- From the user menu, select My Media.
- Click on the pencil icon.
- Click on the Display tab.

The My Media page displays.


The Edit page displays.

The Display settings display.
Customize
1. Choose from the following options to customize the design of the entry page.
The availability of the possible settings depends on your Kaltura administrator's configuration:
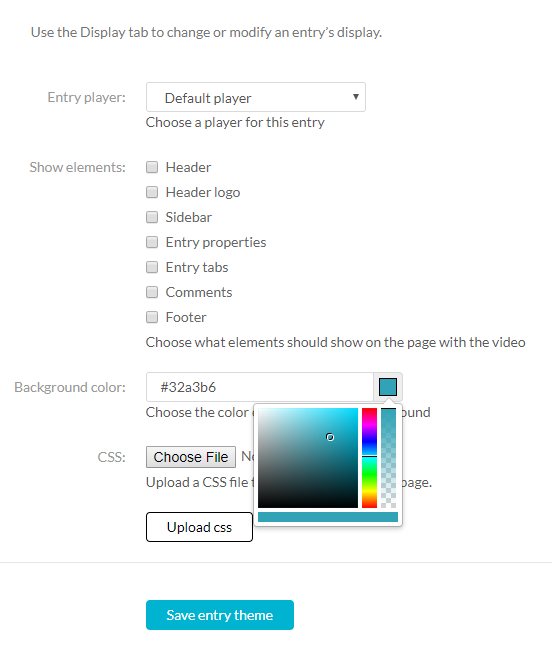
- Entry player - Choose a custom player for the page. The choices available are from a predefined set of players supplied by your administrator.
- Show elements - Uncheck the UI elements that you want to hide on the entry page.
- Sidebar – The sidebar refers to the bar to the right of the player. Depending on your application's settings, you may or may not have a sidebar, related media, or a playlist chosen by the administrator.
- Entry properties – The properties are right below the player, containing the entry’s name, owner, and 3 counter icons for views, comments and likes.
- Entry tabs – Below the properties tab, the entry tab includes the Details, Share, Attachments and the Actions drop down menu.
- Comments – The comment section, if enabled in your video portal.
- Header – The header includes the entire bar on the top of the video portal screen. If you decide to remove it, it will also remove the logo, and all other links.
- Header logo – The main logo at the top left of video portal screen.
- Footer – The video portal footer.
- Background color - Choose a background color for the entry page.
- CSS - Choose a CSS file to alter only this single page.
Click on the "Upload CSS" button to apply the change. Note that clicking on this button without uploading a file first will have no effect. - Different logo - Choose a new logo that will replace the existing one when viewing this page. Click on the Upload logo button to apply the change (clicking on this button without uploading a file first will have no effect).
2. Click Save entry theme.
Example
The following shows a sample configuration where all boxes have been unchecked and the background color was changed.

The resulting media is displayed as follows:

