About
This guide explains how to upgrade the Kaltura LMS Extensions integration in Brightspace from LTI 1.1 to LTI 1.3.
As of August 8, 2022, with the release of KAF version 5.108.10x, KAF instances configured for LTI 1.3 can continue to launch existing embed codes added through the LTI 1.1 Kaltura Browse, Search, and Embed tool when the same KAF instance is used.
Prerequisites
- Administrator access to the Brightspace account integrated with Kaltura
- A Kaltura Application Framework (KAF) instance of type D2L, version 5.108.10x or later
Step 1 - Back up your KAF configuration
- Sign in to your KAF Configuration Management console at
https://{your_KAF_base_URL}/admin. - Under Server Tools, click Backup Configuration.
- Click Save Backup.
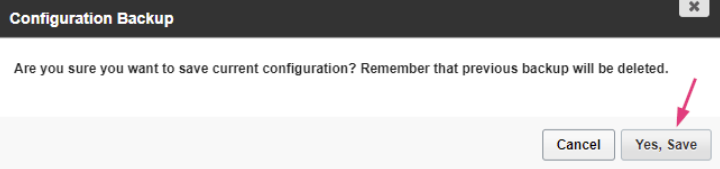
- Click Yes, and then click Save.


A confirmation message displays: Are you sure you want to save current configuration? Remember that previous backups will be deleted.
Once the backup is complete, the following confirmation message displays: Configuration file was saved successfully.
The backup page displays the last configuration save date. This is the date on which the configuration settings were last modified, not the date on which the backup was performed.
Step 2 - Register the Kaltura tool in Brightspace
- Sign in to your Brightspace instance with an administrator account.
- Click the Admin Tools gear icon in the upper-right corner, and then select Manage Extensibility.
- On the Manage Extensibility page, select the LTI Advantage tab, and then click Register Tool.
- Select Standard to display the tool registration fields.
- Complete the following fields:
- Name - Enter a general name for the tool, for example, Kaltura KAF LTI 1.3 integration.
- Description - Optional.
- Domain - Enter your KAF base URL:
https://{your_KAF_base_URL}. For example,https://12345.kaf.kaltura.com. - Redirect URIs - Enter
https://{your_KAF_base_URL}/hosted/index/oauth2-launch. For example,https://12345.kaf.kaltura.com/hosted/index/oauth2-launch. - OpenID Connect Login URL - Enter
https://{your_KAF_base_URL}/hosted/index/oidc-init. For example,https://12345.kaf.kaltura.com/hosted/index/oidc-init. - Target Link URI - Leave this field blank.
- Keyset URL - Enter
https://{your_KAF_base_URL}/hosted/index/lti-advantage-key-set. For example,https://12345.kaf.kaltura.com/hosted/index/lti-advantage-key-set. - Extensions - Select the following:
- Assignment and Grade Services
- Deep Linking
- Names and Role Provisioning Services
- Roles - Select Send Institution Role.
- Click Register.
- Click Done.


The Register a Tool page displays.

Make sure Enabled is selected. If it isn't, enable the tool.
The following confirmation message displays.

Step 3 - Update your instance to LTI 1.3
- In Brightspace, navigate to Admin Tools > Manage Extensibility > LTI Advantage. Refer to steps 1–3 in Register the Kaltura tool in Brightspace.
- Click the name of the tool you created.
- On the tool editing page, scroll down to Brightspace Registration Details.
- In a separate browser tab or window, sign in to your D2L KAF Configuration Management console at
https://{your_KAF_base_URL}/admin. - Navigate to the Hosted module at
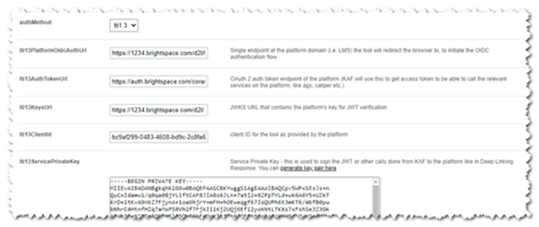
https://{your_KAF_base_URL}/admin/config/tab/hosted. - Use the information under Brightspace Registration Details to configure the following settings:
- Set
authMethodto lti1.3. This exposes the LTI 1.3 configuration fields. - Set
lti13PlatformOidcAuthUrlto the value listed for OpenID Connect Authentication Endpoint. For example,https://{your_D2L_Domain}/d2l/lti/authenticate. - Set
lti13AuthTokenUrlto the value listed for Brightspace OAuth2 Access Token URL. For example,https://auth.brightspace.com/core/connect/token. - Set
lti13KeysUrlto the value listed for Brightspace Keyset URL. For example,https://{your_D2L_domain}/d2l/.well-known/jwks. - Set
lti13ClientIdto the value listed for Client Id. - Under
lti13ServicePrivateKey, click Generate key pair here. This generates the private and public keys. - In the Certificate Generator window, click Use to save the key pair to the
lti13ServicePrivateKeyandlti13ServicePublicKeyfields.
- Set
- Scroll to the bottom of the Hosted module and click Save.
D2L Brightspace LTI migration: Upgrade legacy links to LTI Advantage (1.3)
Once your instance is updated to LTI 1.3, consider migrating any existing LTI 1.1 links to ensure compatibility. The recommended migration methods are:
- Migrate button - Use the Manage Tool Links (Legacy) tab in Brightspace to migrate links manually to LTI 1.3.
- LTI Migration API - Automate the migration process with the LTI Migration API for large-scale changes.
- Course Import - Reimport courses to apply the updated LTI 1.3 links across multiple courses.
- Course Copy - Copy course content with updated LTI 1.3 links into new course offerings.
For detailed instructions about each method, see the Brightspace integration documentation.
Step 4 - Add the LTI 1.3 tools
- In Brightspace, navigate to Admin Tools > Manage Extensibility > LTI Advantage. Refer to steps 1–3 in Register the Kaltura tool in Brightspace.
- Click the name of the tool you created, and then scroll to the bottom of the page.
- Click View Deployments.
- Click New Deployment.
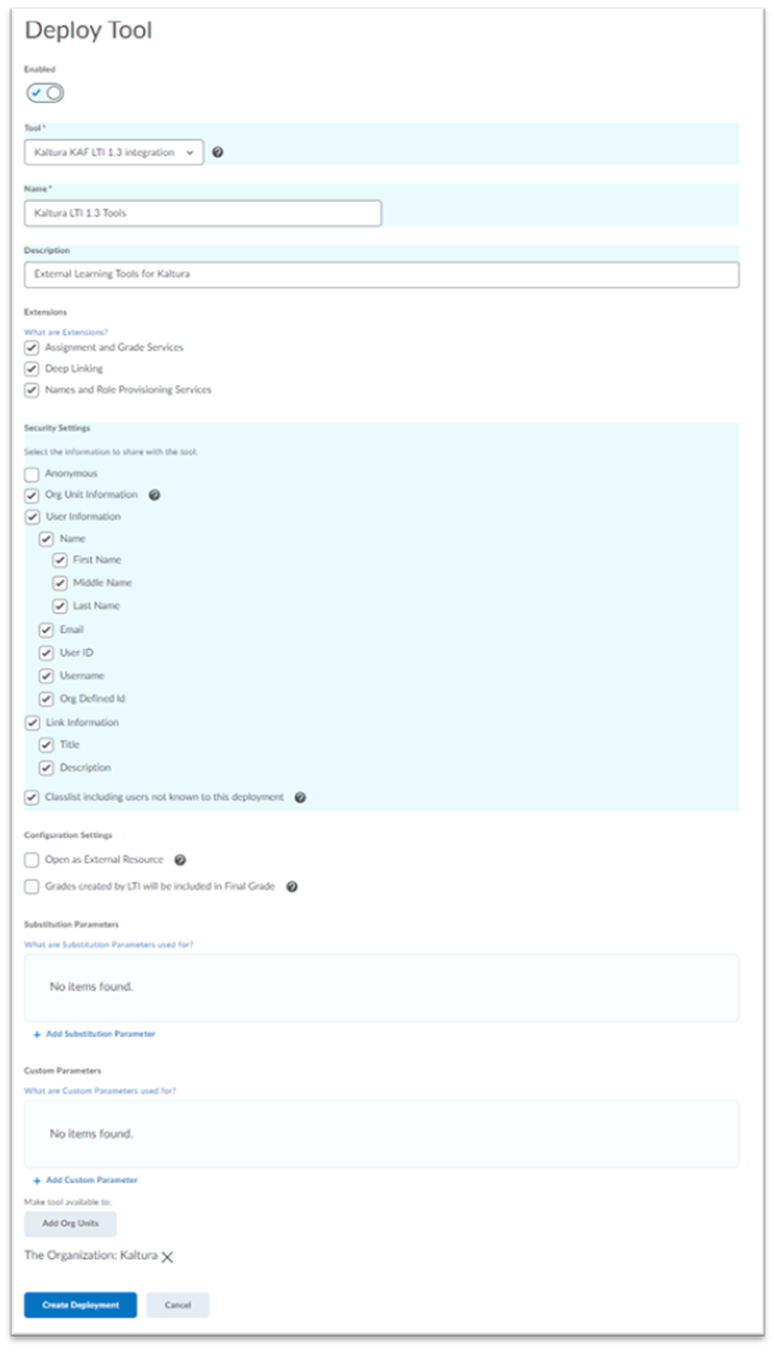
- Make sure Enabled is selected. If it isn't, enable the tool.
- Complete the following configuration settings:
- Tool - Select the tool registered in the Register the Kaltura tool in Brightspace section.
- Name - Enter a name for the tool set, for example, Kaltura LTI 1.3 Tools.
- Description - Optional.
- Extensions - Select the following:
- Assignment and Grade Services
- Deep Linking
- Names and Role Provisioning Services
- Security Settings - Select the following options and their child options:
- Org Unit Information
- User Information
- Link Information
- Classlist including users not known to the tool
- Configuration Settings - Select Auto Create Grade Items.
- Make the tool available to - Select your org unit and All descendants.
- Click Create Deployment.
- Click View Links to continue.
The following confirmation message displays.
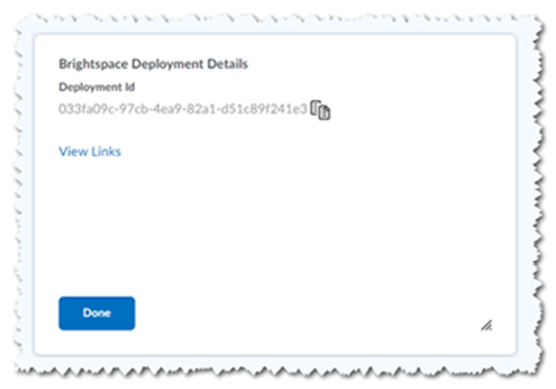
If you click Done by mistake, you can access the links page in the next section.
Step 5 - Configure the Kaltura user ID value
By default, the Kaltura user ID is your Brightspace user ID.
With the Kaltura LMS integration, user ID records are passed from the LMS to Kaltura during the LTI launch. A Kaltura administrator can configure the KAF settings that determine which claim and property pair is used as the Kaltura user ID.
Kaltura added the following fields to the Hosted module to support user ID assignment with LTI 1.3:
lti13UserIdClaim- The LTI claim from which the user ID is taken.lti13UserIdClaimProperty- The property within the claim from which the user ID is taken.
When using LTI 1.1 as the authentication method (KAF > Hosted > authMethod = lti), administrators use the ltiUserIdAttribute field in the KAF Hosted module to determine which LTI attribute is used as the user ID.
The default LTI 1.1 value is:
ltiUserIdAttribute=ext_d2l_username
If ltiUserIdAttribute in your KAF instance is not set to ext_d2l_username, review Configure the Kaltura user ID value for your LMS integration before proceeding.
When using LTI 1.3 as the authentication method (KAF > Hosted > authMethod = lti1.3), administrators use the lti13UserIdClaim and lti13UserIdClaimProperty fields in the KAF Hosted module to determine which LTI attribute is used as the user ID.
The default LTI 1.3 values are:
ltiUserIdAttribute= blanklti13UserIdClaim=http://www.brightspace.comlti13UserIdClaimProperty=username
To view and configure these settings using the default values:
- Sign in to your KAF Configuration Management console at
https://{your_KAF_base_URL}/admin. - Navigate to the Hosted module at
https://{your_KAF_base_URL}/admin/config/tab/hosted. - Scroll down to the
ltiUserIdAttributesetting. - If
ltiUserIdAttributeis set toext_d2l_username, proceed to step 6. Otherwise, review Configure the Kaltura user ID value for your LMS integration before proceeding. - Clear the value of
ltiUserIdAttribute. - Set
lti13UserIdClaimtohttp://www.brightspace.com. - Set
lti13UserIdClaimPropertytousername. - Scroll to the bottom of the Hosted module and click Save.
Step 6 - Add the Kaltura tools and links
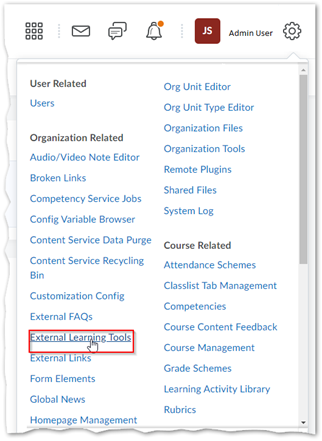
- In Brightspace, click the Admin Tools gear icon in the upper-right corner, and then select External Learning Tools.
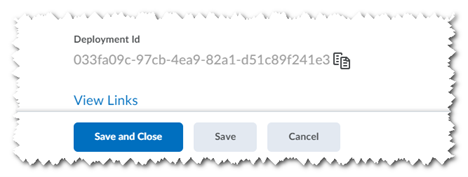
- On the LTI Advantage page, click the tool you created. Scroll to the bottom of the page, and then click View Deployments. The deployment ID and a View Links link display.
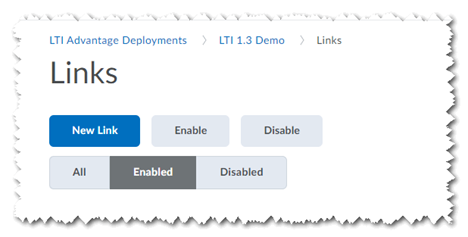
- Click View Links. A new browser tab opens.
- Click New Link, and then configure each Kaltura tool you want to create.
Browse, Search, and Embed (BSE) - Quicklink
Use these steps to add the Kaltura BSE tool as a Brightspace Quicklink.
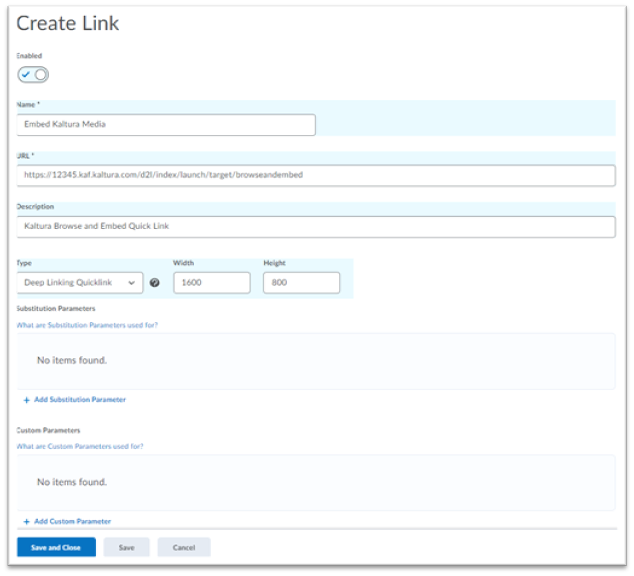
- Click New Link. The Create Link page displays.
- Make sure Enabled is selected. If it isn't, enable the tool.
- Complete the following fields:
- Name - Enter the name displayed to users: Embed Kaltura Media.
- URL - Enter
https://{your_KAF_Base_URL}/d2l/index/launch/target/browseandembed. For example,https://12345.kaf.kaltura.com/d2l/index/launch/target/browseandembed. - Description - Optional.
- Type - Select Deep Linking Quicklink, set Width to
1125, and set Height to600. - Substitution Parameters - Optional.
- Custom Parameters - Optional.
- Click Save.
Browse, Search, and Embed (BSE) - Insert Stuff
Use these steps to add the Kaltura BSE tool to Brightspace Insert Stuff.
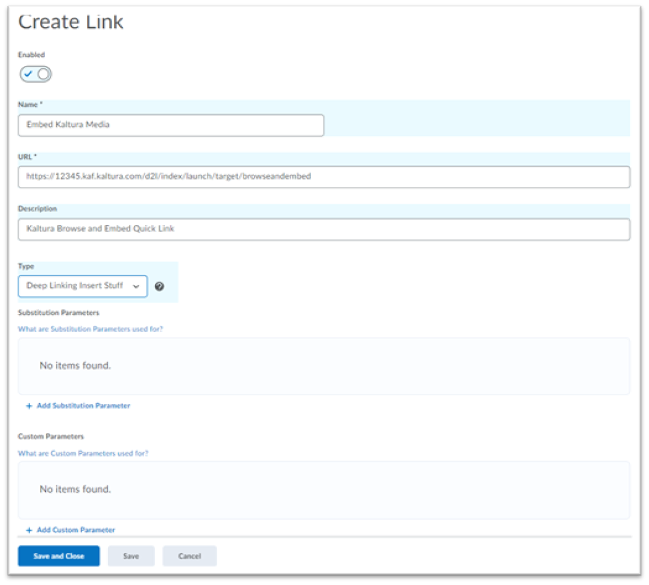
- Click New Link. The Create Link page displays.
- Make sure Enabled is selected. If it isn't, enable the tool.
- Complete the following fields:
- Name - Enter the name displayed to users: Embed Kaltura Media.
- URL - Enter
https://{your_KAF_Base_URL}/d2l/index/launch/target/browseandembed. For example,https://12345.kaf.kaltura.com/d2l/index/launch/target/browseandembed. - Description - Optional.
- Type - Select Deep Linking Insert Stuff.
- Substitution Parameters - Optional.
- Custom Parameters - Optional.
- Click Save.
My Media
Use these steps to add My Media to Brightspace.
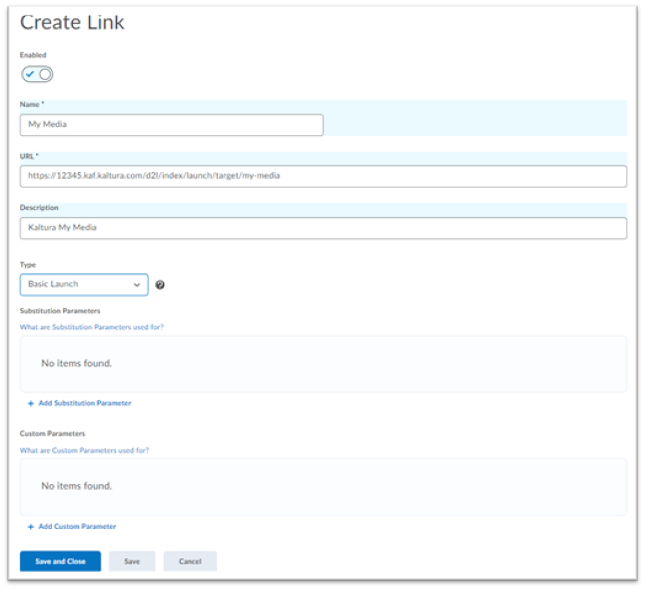
- Click New Link. The Create Link page displays.
- Make sure Enabled is selected. If it isn't, enable the tool.
- Complete the following fields:
- Name - Enter the name displayed to users: My Media.
- URL - Enter
https://{your_KAF_Base_URL}/d2l/index/launch/target/my-media. For example,https://12345.kaf.kaltura.com/d2l/index/launch/target/my-media. - Description - Optional.
- Type - Select Basic Launch.
- Substitution Parameters - Optional.
- Custom Parameters - Optional.
- Click Save.
Media Gallery
Use these steps to add the Kaltura Media Gallery tool to Brightspace.
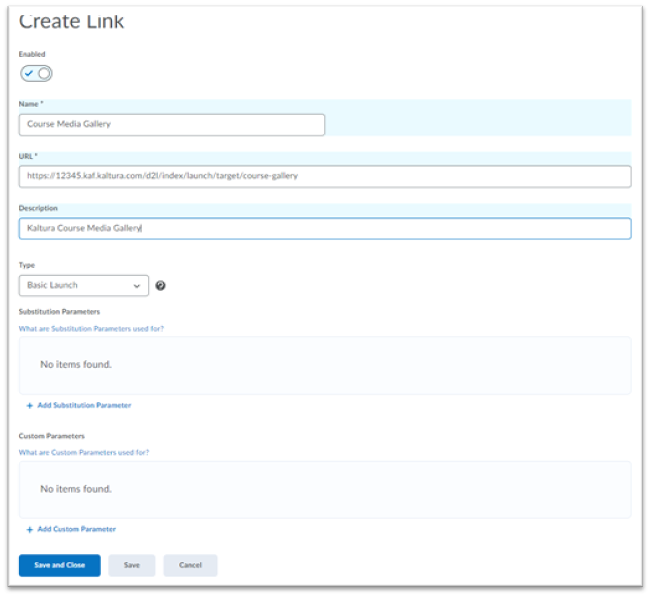
- Click New Link. The Create Link page displays.
- Make sure Enabled is selected. If it isn't, enable the tool.
- Complete the following fields:
- Name - Enter the name displayed to users: Course Media Gallery.
- URL - Enter
https://{your_KAF_Base_URL}/d2l/index/launch/target/course-gallery. For example,https://12345.kaf.kaltura.com/d2l/index/launch/target/course-gallery. - Description - Optional.
- Type - Select Basic Launch.
- Substitution Parameters - Optional.
- Custom Parameters - Optional.
- Click Save.
Step 7 - Set up My Media as a navigation bar link
- Sign in to Brightspace as the administrator of the org unit where you want to add the My Media link, and then open the org unit home page.
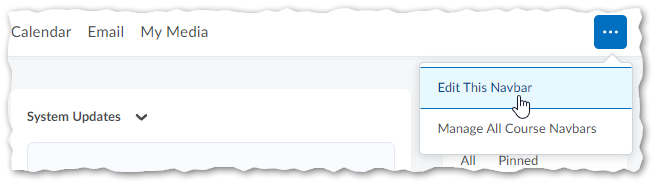
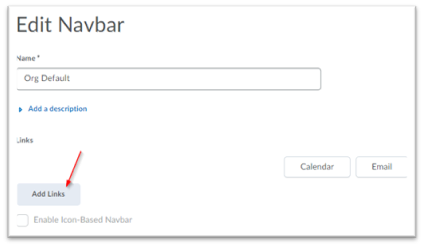
- Hover over the navigation bar to display Actions for Navbar, and then click Edit This Navbar.
- On the Edit Navbar page, click Add Links.
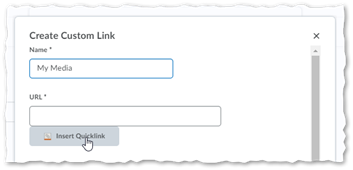
- In the Add Links window, click Create Custom Link.
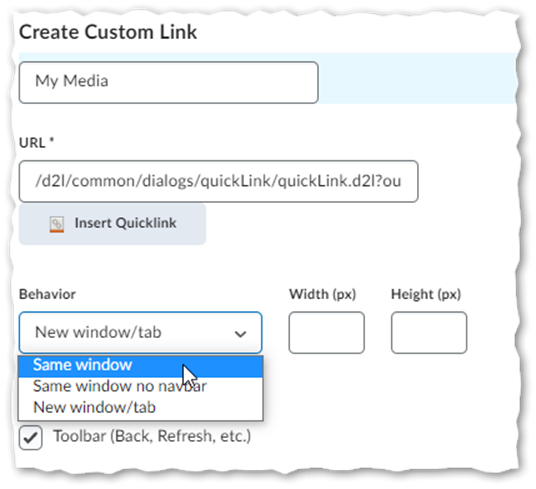
- In the Create Custom Link window, enter My Media in the Name field.
- Click Insert Quicklink.
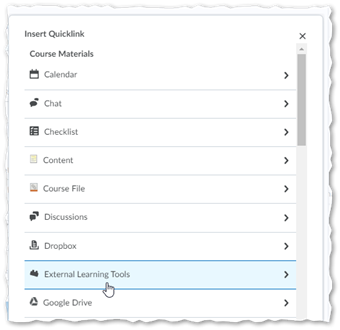
- In the Insert Quicklink window, click External Learning Tools.
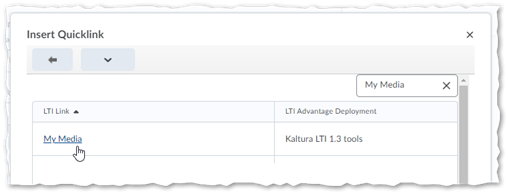
- Search for and select My Media. The URL for the My Media tool in your LTI Advantage deployment is added to the URL setting in the Create Custom Link window.
- On the Create Custom Link page, under Behavior, select the iframe behavior for My Media. Kaltura recommends selecting Same window.
- Click Create.
- Click Add.
- In the Edit Navbar window, click Save and Close. The My Media link is added to the org unit navigation bar.
Step 8 - Add Course Media Gallery to the course navigation bar
The administrator can add the Course Media Gallery tool to a course template, or an individual course administrator can add it to a course.
- Sign in to Brightspace as the administrator of the org unit where you want to add the link, and then open the org unit home page.
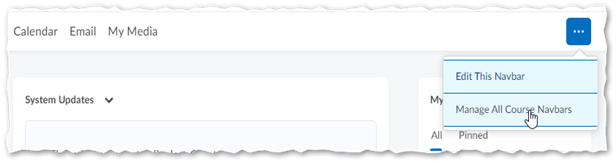
- Hover over the navigation bar to display Actions for Navbar, and then click Manage All Course Navbars.
- Select the Course Navbar to which you want to add the Course Media Gallery link. The Edit Navbar window opens.
- In the Edit Navbar window, click Add Links.
- In the Add Links window, click Create Custom Link.
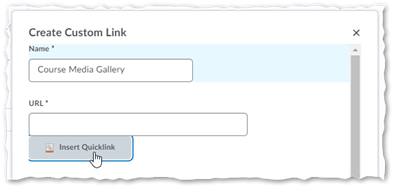
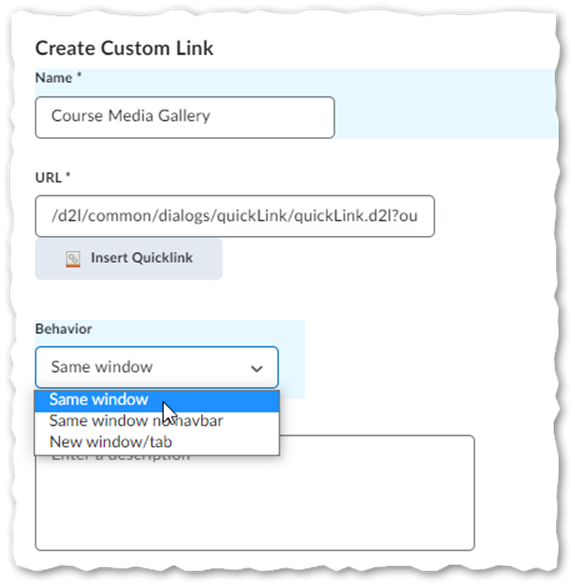
- In the Create Custom Link window, enter Course Media Gallery in the Name field.
- Click Insert Quicklink.
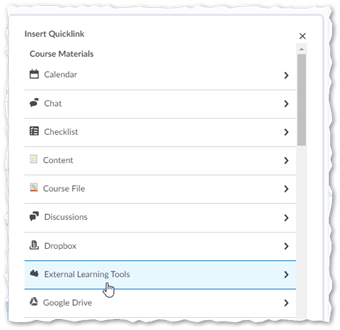
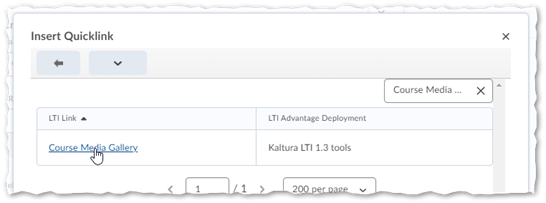
- In the Insert Quicklink window, click External Learning Tools.
- Search for and select Course Media Gallery. The URL for the Course Media Gallery tool in your LTI Advantage deployment is added to the URL setting in the Create Custom Link window.
- On the Create Custom Link page, under Behavior, select the iframe behavior for Course Media Gallery. Kaltura recommends selecting Same window.
- Click Create.
- Click Add.
- In the Edit Navbar window, click Save and Close. The Course Media Gallery link is added to the course navigation bar.
Step 9 - Remove the LTI 1.1 tools
- Test that all the LTI 1.3 tools and links you added are working properly.
- Remove any navigation bar links for the LTI 1.1 My Media and Media Gallery Quicklinks.
- Set the visibility of the Kaltura LTI 1.1 external tool links to Off:
- Go to Admin Tools.
- Click External Learning Tools.
- Click Manage Tool Links (Legacy).
- Click the title of each Kaltura LTI 1.1 tool, such as Embed Kaltura Media, Insert Stuff, or Quicklinks.
- Clear Allow users to view this link.
