Legacy notice
This article documents the legacy KME room. For our next-generation virtual classroom and collaborative meeting solution, please visit the Kaltura Room documentation.
Moderators use Notes to highlight key live discussion points that all participants can see being written in real time. Notes can then be downloaded as branded PDF's.
Kaltura Live Room Notes are not your basic note taking tool.
- With Kaltura Live Room Notes, moderators can compose notes as session participants view updates in real time. This enables participants to follow along as key discussion points are written down.
- Moderators can even provide note writing permissions to specific participants to enable simultaneous editing options from multiple editors.
- Moderators can create multiple notes that remain accessible within the virtual classroom.
- Kaltura Live Room Notes can be added to Files with a click of a button or downloaded as well-designed, branded PDF reflecting your organization's branding.
Access Notes
Kaltura Meetings Live Room Notes is a right module tool that can be opened similarly to Chat, Participant List, and Playlist.
To access Kaltura Live Room Notes:
- Enter your virtual classroom
- Click Notes in the upper bar.
Notes will open on the right side of your screen. Want to get more space to see your note? Dismiss the Chat, Participant List and/or Playlist to expand the view able area of Notes.
Create Notes
When opening Kaltura Live Room Notes for the first time, a new note is automatically created for you. As a moderator, you can immediately start typing. If notes have already been created in the virtual classroom, then you can add additional notes by clicking the + (plus) button in the bottom right corner of the Notes list.
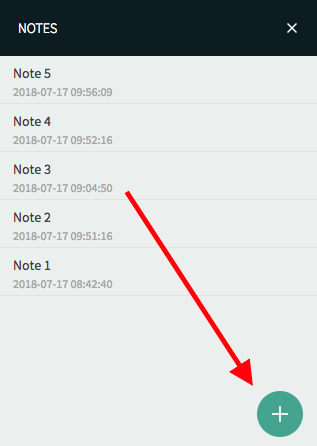
If you are viewing a note and wish to create a new note, then you can do the following:
- Click the Back arrow that displays next to the note name.
- Click the + button.
Compose Notes
As an instructor, room manager, moderator or participant with note writing permissions, you can add your text to any note while your participants view what you write in real time - like broadcasting a stream of text!
- Open a note: Select a note name in your list of notes or select the + button to create a new note.
- Start typing.
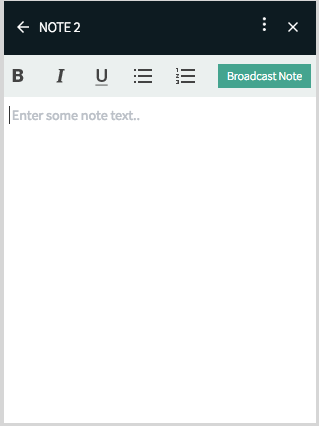
Note Formatting Options
- Bold
- Italics
- Underline
- Bulleted List
- Numerical List
Broadcast Your Note
As you type your note, anyone viewing the note sees what you are typing in real time. But, how do you get your participants to look at your note? You can actually automatically open the note you are working on with the Broadcast Note button.
- Open a note.
- Click the Broadcast Note button. All participants (except other note writers that are writing in a note) will now see your note opened automatically.
Edit An Existing Note
To edit an existing note, simply select a note from your list of notes.
Rename Your Note
From The Notes List
- Hover your cursor over the note you want to rename.
- Click the v that displays.
- Select Rename.
- Enter in the note name.
- Click the Save button.
From The Note Editor
- Click the 3 dots menu in the note upper bar.
- Select Rename.
- Enter in the note name.
- Click the Save button.
Download A Branded Note PDF
You and your participants can download a branded PDF version of your notes that is automatically created for you based on your organization's branding as set in Branding. The download note option is available to all live session participants.
From The Notes List
- Hover your cursor over the note you want to download.
- Click the v that displays.
- Select Download.
From The Note Editor
- Click the 3 dots menu in the note upper bar.
- Select Download.
Add PDF Versions of Your Notes to Files
As an instructor or moderator you can easily add PDF versions of your notes directly to your course files.
From The Notes List
- Hover your cursor over the note you want to Add To Files.
- Click the v that displays.
- Select Add to Files. A Notes folder is automatically generated in your course files if you haven't already used the Add To Files function. Enter the folder to find the branded PDF version of your recently added note.
From The Notes Editor
- Click the 3 dots menu in the note upper bar.
- Select Add to Files. A Notes folder is automatically generated in your course files if you haven't already used the Add To Files function. Enter the folder to find the branded PDF version of your recently added note.
Delete Your Notes
From The Notes List
- Hover your cursor over the note you want to delete.
- Click the v that displays.
- Select Delete.
- Click the Delete button.
From The Notes Editor
- Click the 3 dots menu in the note upper bar.
- Select Delete.
- Click the Delete button.
