About
This article describes how to connect Rich Media Content Management System (Rich Media CMS) and Event accounts to Auth Broker in the Rich Media CMS using Security Assertion Markup Language (SAML) profiles.
Auth Broker is a "gateway" that sits on the partner (account) level and manages authentication to Kaltura via external Identity providers (IdP). Auth Broker works with the Security Assertion Markup Language (SAML) and Open Authorization (OAuth 2.0) protocols. Auth Broker users are "shared users" (users who are shared between applications/instances in the partner).
Auth Broker works with a higher version of SAML and you no longer need to set up a new profile for each new account. You may set up profile(s) just once and easily use them in multiple applications/instances.
To learn more about Auth Broker, please see Auth Broker.
Currently, only SAML is supported for self-serve setup.
Prerequisite
Before connecting the Rich Media CMS and Event accounts to AuthBroker, you must have created a SAML profile using the steps in Create and Manage SAML Profiles.
Connect Rich Media CMS and Event accounts to AuthBroker
- Login to the Rich Media CMS.
- Click the Settings (gear icon) button
 in the upper right area of your screen.
 - Click the ACCOUNT tab.

- Click Edit next to the desired SSO configuration - Rich Media CMS or Event Platform. The selected SSO configuration screen displays. In our example below, we've chosen Rich Media CMS SSO configuration.
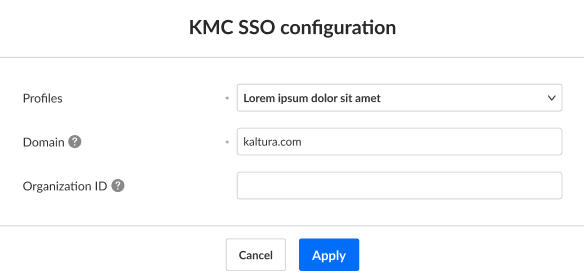
- Select the SAML profile that you created in Create and Manage SAML profiles from the Profiles pull-down menu.
- In the Domain field, type the domain of your email. The domain immediately follows the "@", for example, if the format of emails in your organization is user@kaltura.com, the domain is "kaltura.com".
You may enter multiple domains separated by commas.
- In the Organization ID field (optional), decide on and enter a unique value for this account. If more than one Rich Media CMS account is subscribed to log in with SSO, users will be required to enter the Organization ID when logging into the Rich Media CMS. The Organization ID indicates which account they wish to log into.
If your organization does not support multiple Rich Media CMS accounts per domain, this field is not required.
- Click Apply. You are redirected back to the ACCOUNT tab.
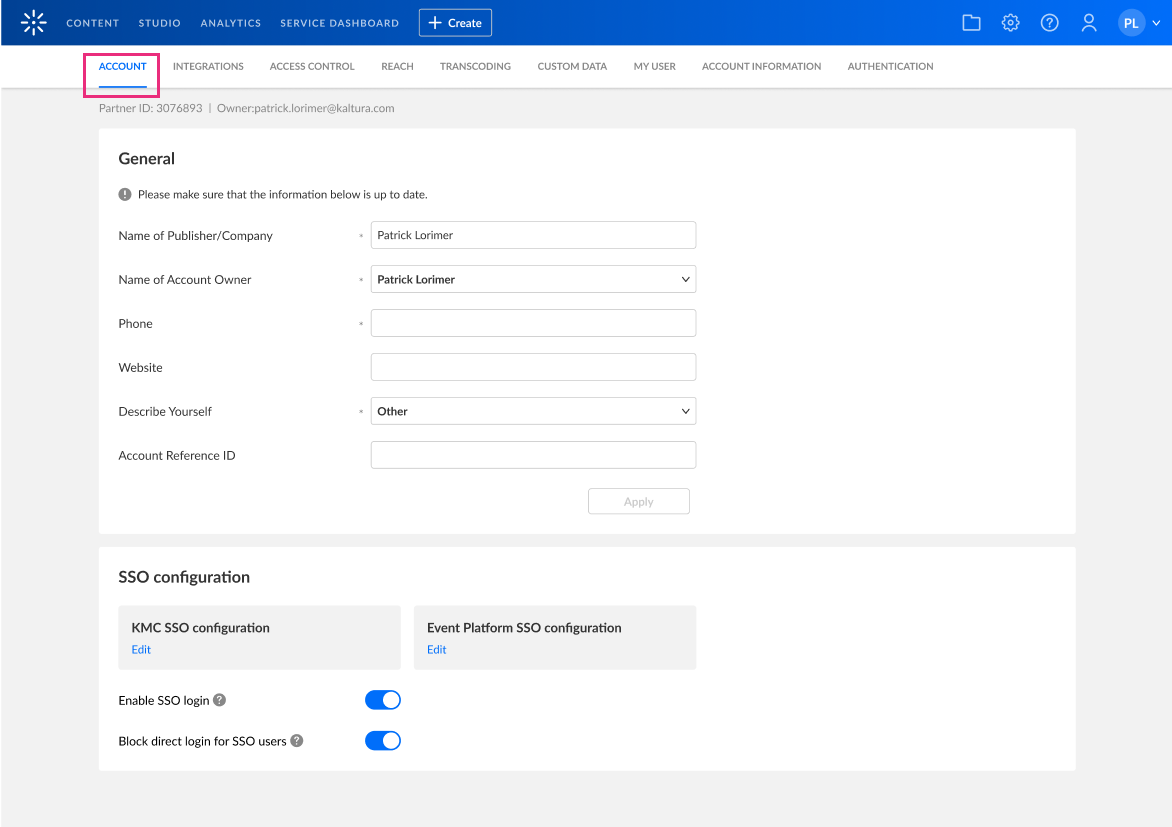
- Click the switch to enable/disable SSO login as desired. If you choose to enable SSO login, do so after SSO setup is complete and verified.
- Logout of your account (Rich Media CMS or Events, depending on which you configured) and log back in with SSO to verify that SSO login is set up correctly.
- Choose whether to enable/disable the option for SSO users to login with username and password (i.e., direct login). Enabled = SSO users are blocked from direct login. Disabled = SSO users may do direct login.
If SSO login has not been setup correctly, and you block direct login for SSO users, you could get locked out of your account. Please login with SSO at least once to verify that SSO login is set up correctly before enabling.
 in the upper right area of your screen.


