About
On the Templates tab of the Emails page, you may:
- Create (with AI if you wish!), edit, schedule, and send custom emails for attendees, speakers, and moderators. Custom emails may include event/session reminders, schedule changes, post event surveys, and more.
- Customize the automated system emails, including "Invite", "Registration complete", "Login email" (in case you are using login link and not user/password), "Notify speaker of session assignment", "Notify moderator of session assignment", "Notify speaker of schedule change", and "Notify moderator of schedule change".

Please note - If your event is based on a custom event template, all branding contained in that template is used in your automated system emails and custom templates.
The screens shown here represent a multi-session event. The same actions apply when working with single session.
Custom email templates and automated system emails - What's the difference?
On our preset event templates, Kaltura provides six custom email templates that event organizers can use to build custom emails for prospects, registrants, and attendees. You can edit and use them as basis for your email or create new ones.
- Send a reminder - Raise awareness to the site, call registrants to check the speakers and agenda, wander around and watch some VODs.
- Notify your audience - Attract registrants to join the event after it has started.
- Spread the word - Invite attendees to share content, make it clear that the recordings are available and that the site is open for registration.
- Promote content - Provide extra content regarding the event’s subject with a spotlight on the company blog posts, products, etc.
- Get feedback - Ask participants for feedback with an external form.
- Upcoming events - Showcase the organization's upcoming events.
Kaltura also provides seven automated system emails that are sent to users and stakeholders based on system triggers.
- Invite - Attendees, speakers, and moderators will receive this email upon being invited to the event.
- Registration complete - Attendees will receive this email upon completing the registration.
- Login email - Attendees will receive this email upon trying to log in to the event site.
- Notify speaker of session assignment - Speakers will receive this email upon being assigned to a session.
- Notify moderator of session assignment - Moderators will receive this email upon being assigned to a session.
- Notify speaker of schedule change - Speakers will receive this email when a change has been made to the schedule.
- Notify moderator of schedule change - Moderators will receive this email when a change has been made to the schedule.
Create a custom email template using AI
Producing content for an event is challenging. Beyond managing session content, there are numerous other details that demand attention to ensure everything runs smoothly. One of those details is managing email notifications. Kaltura's AI-generated email templates make creating or editing your emails much easier and faster!
Looking for more information about this feature? Feel free to contact your Kaltura representative.
This feature supports English language only.
- On the Templates tab, under Custom templates, click Create with AI.
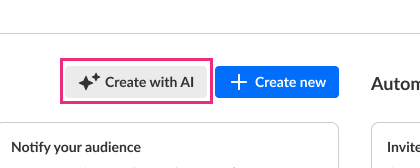 The Create with AI screen displays.
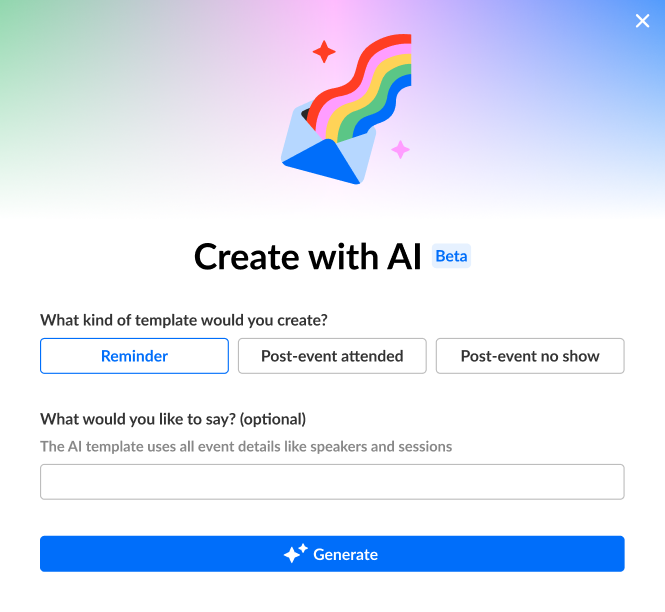
- Decide what kind of template you would like to create.
- Reminder - Remind attendees about anything that's happening before and/or during the event.
- Post-event attended - Engage with attendees right after the event is over.
- Post-event no show - Engage with registrants that didn't attend the event.
- Type anything else you would like included in the email. This is an optional step. The AI template uses all the event details (i.e., speakers, sessions, etc.), but this is your time to provide additional context. For instance, if your event is taking place in San Diego, CA, you may want to type something like "Mention that because the event is taking place in San Diego, CA and there's so many fun things to do and see in San Diego like the world-famous zoo and museums, attendees may want to arrive a day early."
- Click Generate. You are redirected to the AI template creator page.
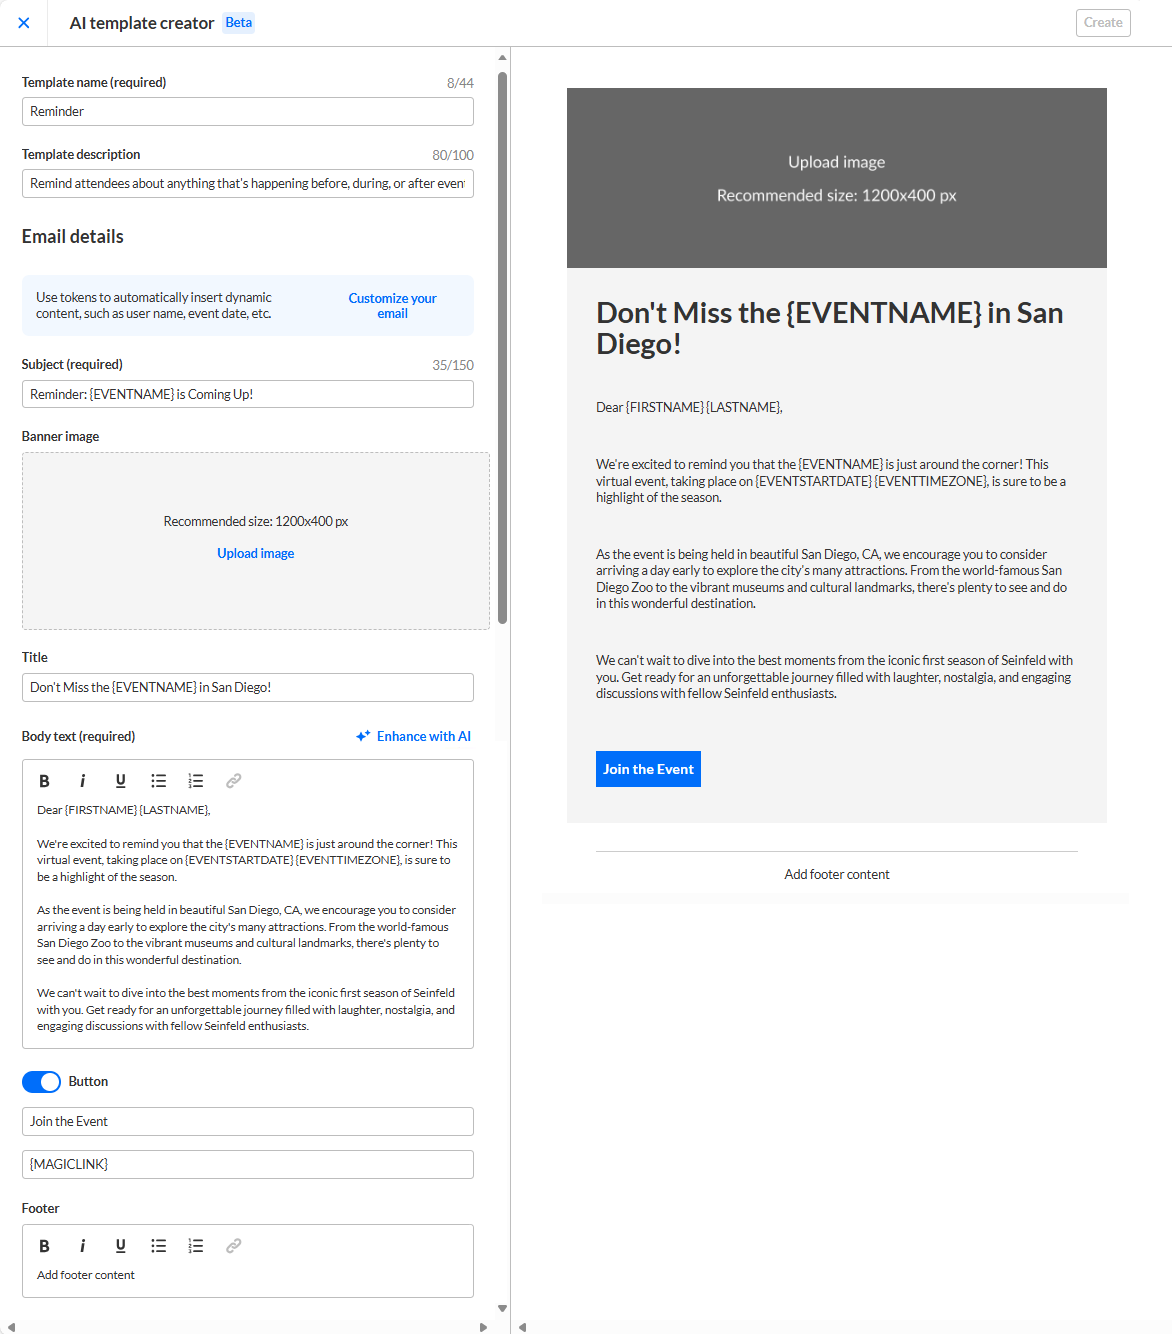
- At this point you can edit what's already filled in, as well as add more to your email template. A preview of the new template is displayed on the right of your screen and updates in real time as you make your changes.
You may click Customize your email in the Email details section to see a list of customization tokens that you may copy and paste into fields to customize your email template.- Template name (required) - Type a name for your template. The Template name is pre-filled based on the kind of template you selected.
- Template description - Type a description of your template. Notice the Template description is pre-filled based on the kind of template you selected.
- Subject (required) - Type a subject for your email.
- Banner image - If you wish to upload an image, click Upload image and choose the desired file. Recommended size is 1920x1080 px. You may click Edit image to choose a different one.
- Title - Type a title for your email.
- Body text (required) - Type the message for the body of the email. Some tips are provided for creating a powerful email.
You may also use AI to modify the body text. Simply click the Enhance with AI button and additional options display. Clicking on any of the options modify the email accordingly.- Add changes - Produces a different version with your specified changes.
- Rewrite - Produces a different version of the same content.
- Shorter - Creates a shorter version of the same content.
- Longer - Creates a longer version of the same content.
- More formal - Edits current content to a more formal writing style.
- More casual - Edits the current content to a more casual writing style.
Looking for more information about this feature? Feel free to contact your Kaltura representative.
- Button - Click to enable use of a Call to Action (CTA) button in the email. When users press this button, they are redirected to the configured location.
- Button Label - Type the text that will display on the CTA button.
- Button URL - Type the URL your user will be redirected to when they push the button.
When using a login link for entrance into the event, Kaltura recommends adding the "MAGICLINK" customization token as the button URL so that your attendees can directly login and have a seamless experience.
- Footer - Type the text that will display on the email footer.
- Once you are finished, click Create to save it. A notification that the custom email template was created successfully is displayed.
Create a custom email template on your own
- On the Templates tab, under Custom templates, click Create new.
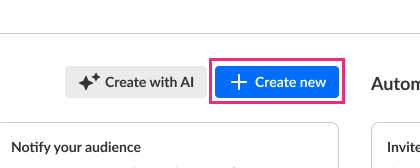 The Create new template page displays.
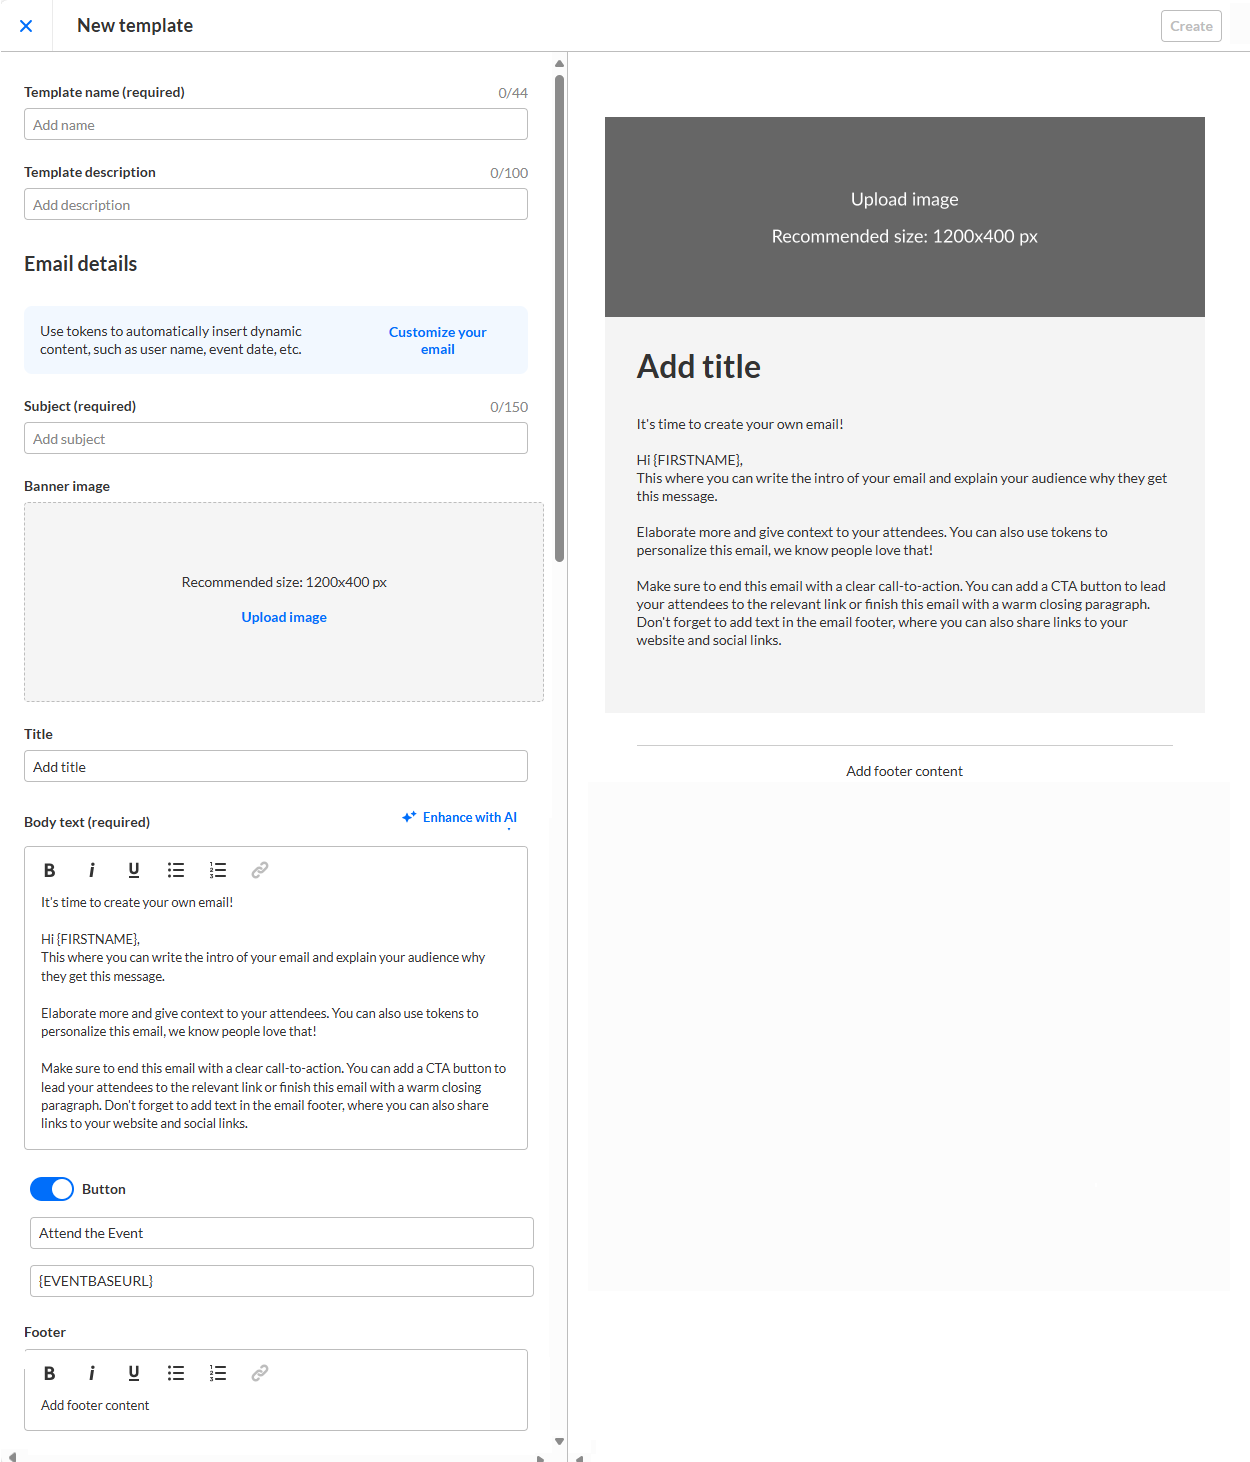
- Fill in the appropriate fields. The editable fields in the Create new template page are as follows. A preview of the new template is displayed on the right of your screen and updates in real time as you make your changes.
You may click Customize your email in the Email details section to see a list of customization tokens that you may copy and paste into fields to customize your email template.- Template name
- Template description - Type a description of your template.
- Subject (required) - Type a subject for your email.
- Banner image - If you wish to upload an image, click Upload image and choose the desired file. Recommended size is 1920x1080 px. You may click Edit image to choose a different one.
- Title - Type a title for your email.
- Body text (required) - Type the message for the body of the email. Some tips are provided for creating a powerful email.
You may also use AI to modify the body text. Click the Generate with AI button and additional options display. Clicking on any of the options modify the email accordingly.- Add changes - Produces a different version with your specified changes.
- Rewrite - Produces a different version of the same content.
- Shorter - Creates a shorter version of the same content.
- Longer - Creates a longer version of the same content.
- More formal - Edits current content to a more formal writing style.
- More casual - Edits the current content to a more casual writing style.
Looking for more information about this feature? Feel free to contact your Kaltura representative.
- Button - Click to enable use of a Call to Action (CTA) button in the email. When users press this button, they are redirected to the configured location.
- Button Label - Type text that will display on the CTA button.
- Button URL - Type the URL your user will be redirected to when they push the button.
When using a login link for entrance into the event, Kaltura recommends adding the "MAGICLINK" customization token as the button URL so that your attendees can directly login and have a seamless experience.
- Footer - Type the text that will display on the email footer.
- Once you are finished, click Create to save it. A notification that the custom email template was created successfully is displayed.
Edit a custom email template
- On the Templates tab, under Custom templates, choose Edit template from the three-button menu located in the desired custom email box to edit the custom template before sending.
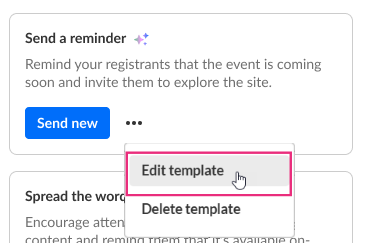 The Edit Template page displays. In the example below, we have chosen to edit the Send a reminder template.
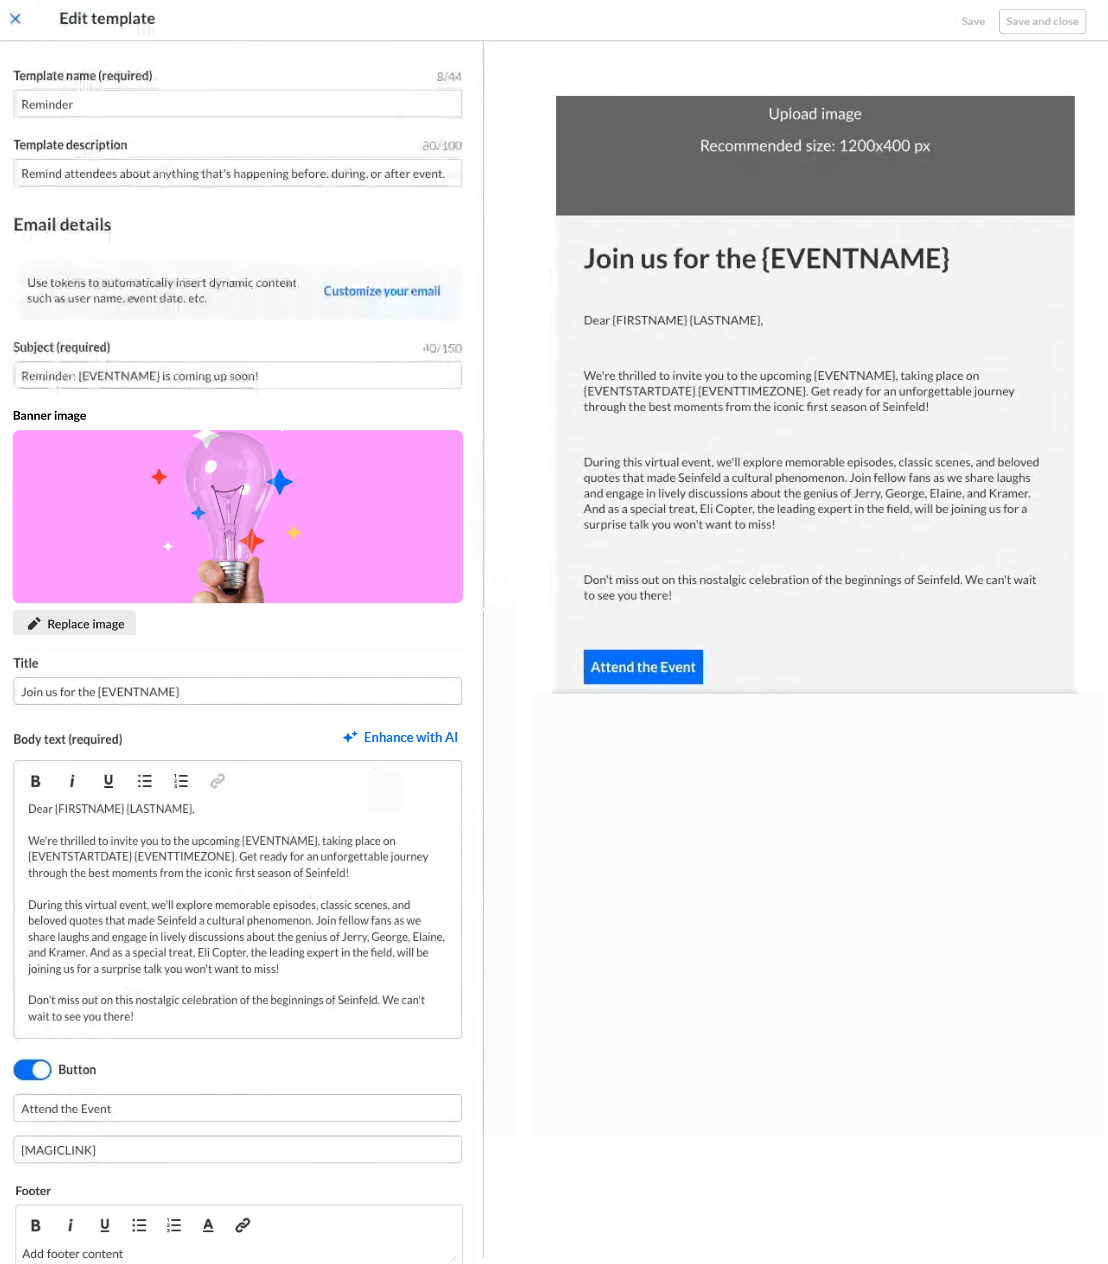
- Edit the appropriate fields. The editable fields in this Edit template page are as follows. A preview of the custom email template is displayed on the right of your screen and updates in real time as you make your changes.
You may click Customize your email in the Email details section to see a list of customization tokens that you may copy and paste into fields to customize your email template.- Template name (required) - Type a name for your template.
- Template description - Type a description of your template.
- Subject (required) - Type a subject for your email.
- Banner image - If you wish to upload an image, click Upload image and choose the desired file. Recommended size is 1920x1080 px. You may click Replace image to choose a different one.
- Title - Type a title for your email.
- Body text (required) - Type the message for the body of the email. Some tips are provided for creating a powerful email.
You may also use AI to modify the body text. Simply click the Enhance with AI button and additional options display. Clicking on any of the options modify the email accordingly.- Add changes - Produces a different version with your specified changes.
- Rewrite - Produces a different version of the same content.
- Shorter - Creates a shorter version of the same content.
- Longer - Creates a longer version of the same content.
- More formal - Edits current content to a more formal writing style.
- More casual - Edits the current content to a more casual writing style.
Looking for more information about this feature? Feel free to contact your Kaltura representative.
- Button - Click to enable use of a Call to Action (CTA) button in the email. When users press this button, they are redirected to the configured location.
- Button text - Type the text that will display on the CTA button.
- Button URL - Type the URL your user will be redirected to when they push the button.
When using a login link for entrance into the event, Kaltura recommends adding the "MAGICLINK" customization token as the button URL so that your attendees can directly login and have a seamless experience.
- Footer - Type the text that will display on the email footer.
- Once you are finished editing the custom email, click Save to save and remain on the page or Save and Close to save and exit the page. A notification that the email template was updated successfully is displayed.
Schedule or send a custom email
- On the Templates tab, under Custom templates, click Send new in the desired custom email box to prepare to send the custom email.
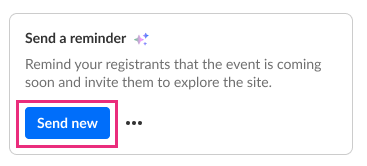 The Send new screen displays. In the example below, we have chosen to send a reminder email.
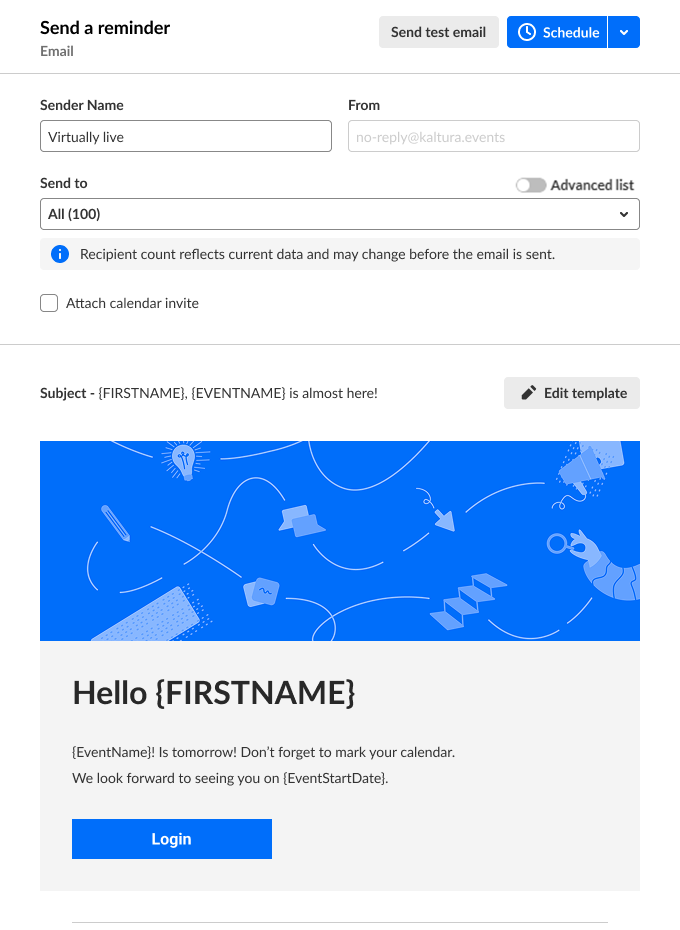
- In the Sender Name field, type the sender name. Note - It is prefilled with the event name. You can change or remove this text.
- From the Send to pull-down list, select who will receive the custom email - All, Speakers, Moderators, No show users, or RSVPs.
- If you selected All, you also have the option of choosing from a more advanced list of users, thereby streamlining communication with specific audience segments. In other words, sending relevant content to your relevant audience based on their attendance status. Slide the Advanced list button to the right and another option displays - Registration status. Click the down arrow to expand the Registration status list and click on desired status(es).
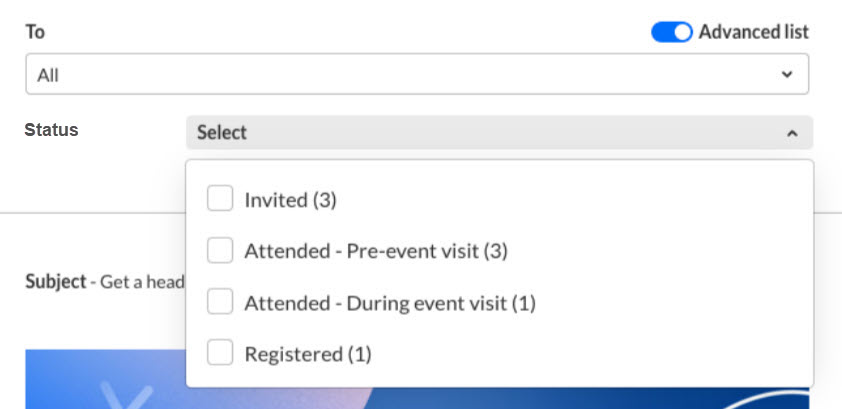 The statuses listed reflect the granularity seen upon hovering over the registration status of a user in the All users page. For detailed information on these statuses, see People tab > All users - Invite attendees to your event.
Following are a couple examples when you may choose to use the Advanced list option:
You want to send an email to all those who attended your event, thanking them for coming. Choose Attended-During event visit.
You want to send an email to those who were invited and/or registered but did not attend, telling them they were missed and directing them to the recording. Choose Invited and Registered. - If you selected RSVPs, you are required to select one session from a list of existing sessions on the agenda, thereby streamlining communication with those who have RSVPed to a specific session at the time of sending. Click on desired session.
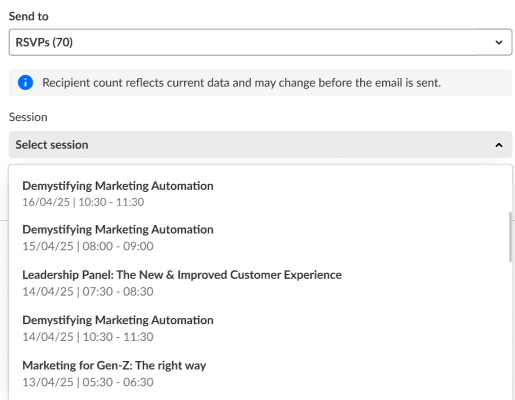
This option is available only if RSVP has been enabled and configured on your account.
- If you selected All, you also have the option of choosing from a more advanced list of users, thereby streamlining communication with specific audience segments. In other words, sending relevant content to your relevant audience based on their attendance status. Slide the Advanced list button to the right and another option displays - Registration status. Click the down arrow to expand the Registration status list and click on desired status(es).
- If you would like to send a test email to yourself to check the appearance, click Send test email, then click Send.
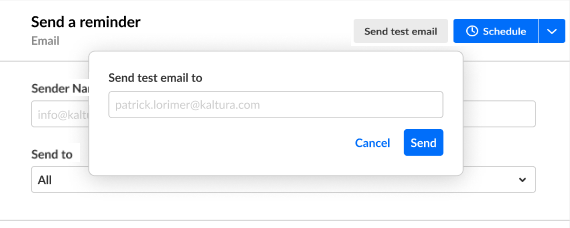
- After you've received the test email and are satisfied with the appearance, you may choose to schedule the email to be sent later or send it now.
- Schedule the email to be sent later -
- Click Schedule. The Schedule email screen displays.
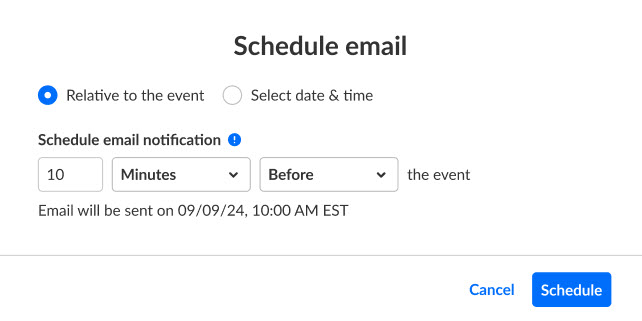
- Decide whether you would like to schedule the email relative to the event (i.e., at a chosen amount of time before, into, or after an event), or on a specific date and time.
- If you choose Relative to the event, type the number of [days, hours, or minutes, per your selection] and whether this will occur before, after, or into your event.
Let's use a few examples. If you want to schedule the reminder email to be sent 2 hours before the event starts, you type 2, then select Hours and Before. If you want to schedule the reminder email to be sent 1 day after the event ends, you type 1, then select Days and After. If you want to schedule the reminder email to be sent 20 minutes after the start time of the event - you type 20, then select Minutes and Into.
Please note that if the event time changes, the email schedule will be adjusted accordingly. In addition, if the event has already started, and you attempt to schedule an email before the event, you receive a message that the email must be scheduled in the future.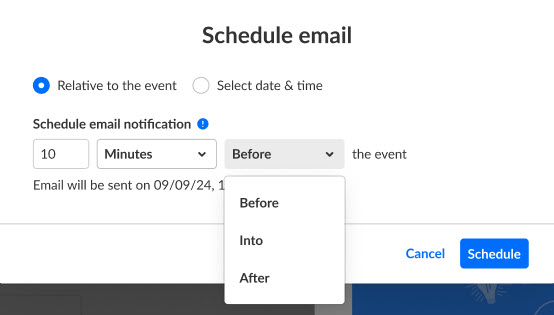 If you choose Schedule date & time, make the appropriate selections for date and time.

- Click Schedule. You are redirected to the Scheduled tab. You receive confirmation that the email has been scheduled successfully and it is displayed in the list.
- Click Schedule. The Schedule email screen displays.
- Schedule the email to be sent later -
- Send the email now -
- Click the down arrow to the right of the Schedule button.
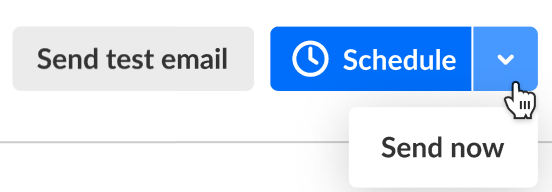
- Choose Send now. A notification that the email was sent successfully is displayed.
- Click the down arrow to the right of the Schedule button.
If you would like to edit the custom template, simply click the Edit template button and follow the steps in Edit a Custom Template.
Delete a scheduled custom email
You can always delete a scheduled email if you change your mind.
- Click on the Scheduled tab.
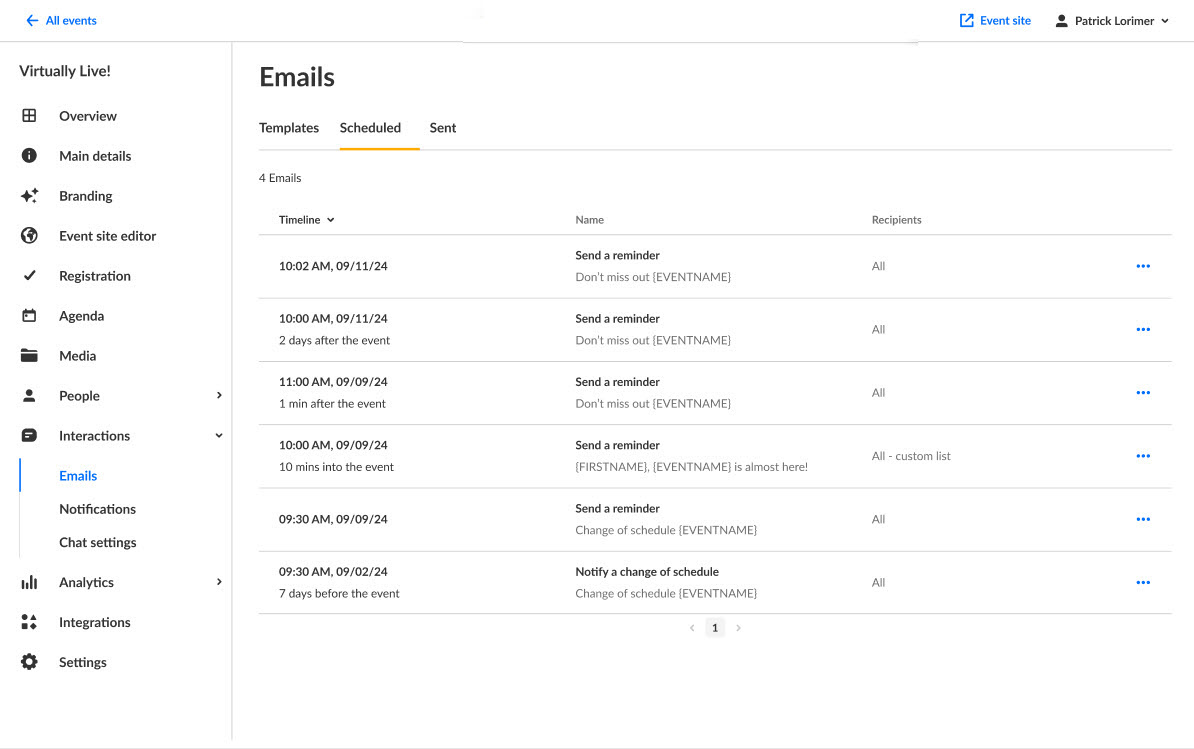
- Click the three-dot action menu to the right of the desired email and choose Delete.
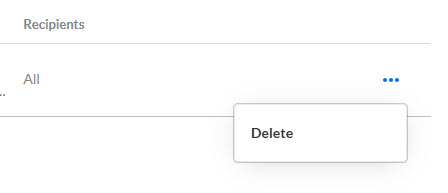 You are asked to confirm your action. This action can't be undone.
 - Click Delete email to confirm or click Cancel to exit.
Delete a custom email template
- On the Templates tab, under Custom templates, choose Delete Template from the three-button menu located in the desired custom email box to delete the custom template.
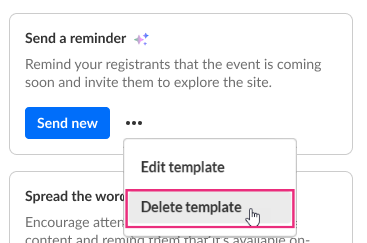
- You are asked to confirm your action. This action can't be undone. Click Delete permanently to confirm or click Cancel to exit
Customize the Invite email (an automated system email)
The "Invite" email is the email that attendees, speakers, and moderators will receive upon being invited to the event.
- On the Templates tab, under Automated system emails, click Edit (the pencil icon) in the Invite box. The Edit template page displays.
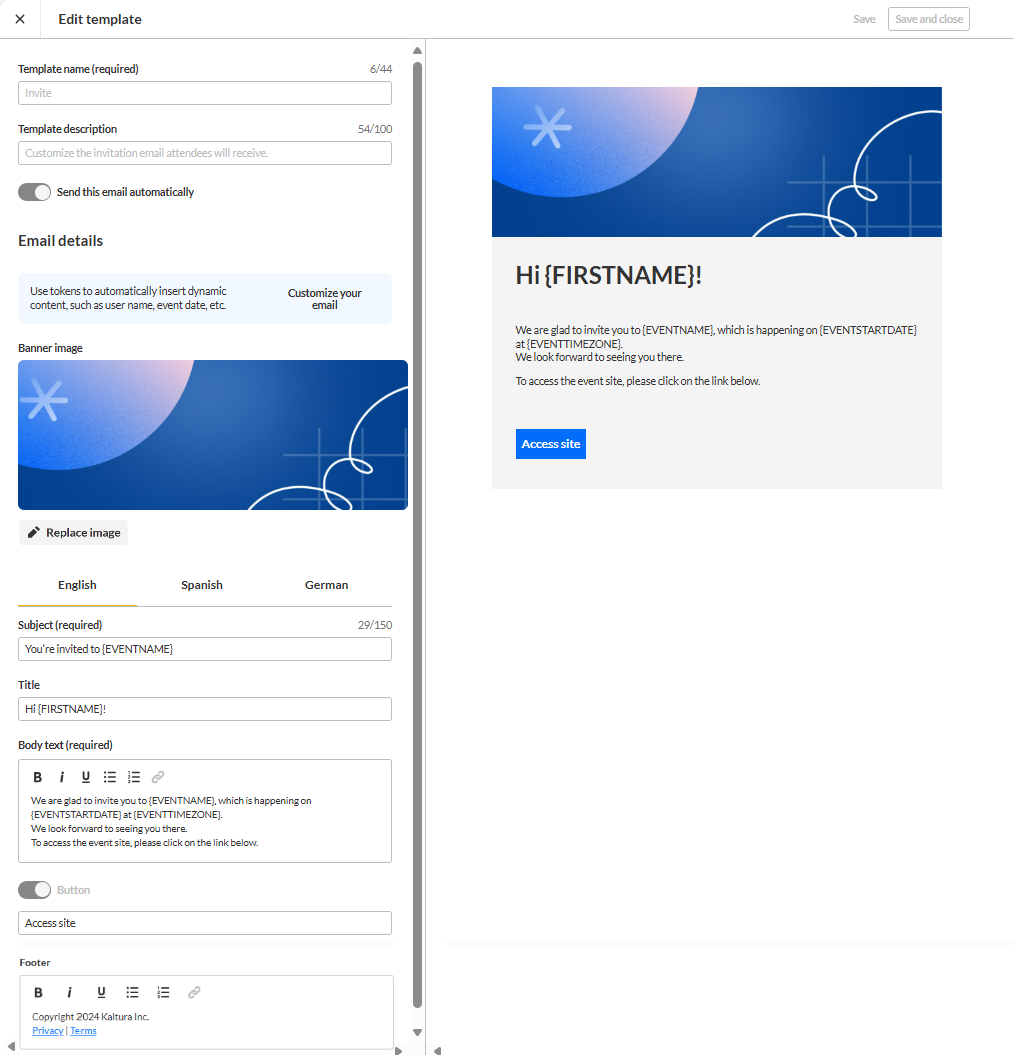
- Edit the appropriate fields.
The editable fields in this Edit template page are as follows. A preview of the Invite email is displayed on the right of your screen and updates in real time as you make your changes. You may click Customize your email in the Email details section to see a list of customization tokens that you may copy and paste into fields to customize your email template.- Banner image - If you wish to upload an image, click Upload image and choose the desired file. Recommended size is 1920x1080 px. You may click Replace image to choose a different one.
- You may wish to edit your multi-lingual invite emails. Select the desired language tab to edit the multi-lingual content for your invitations. If more than three languages are available on your account, click the ellipses to see the full list of relevant languages.
 Choose a language from the drop-down list. That language will be placed in the second position, right after the main language set on your account. In our example below, the main language is English. When the user chooses a language from the drop-down list, the language chosen will be placed between English and German.
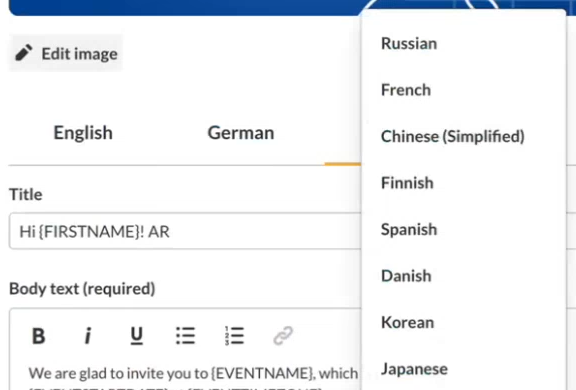
Looking for more information about this feature? Feel free to contact your Kaltura representative.
- Subject (required) - Type a subject for your email.
- Title - Type a title for your email.
- Body text (required) - Type the message for the body of the email. Some tips are provided for creating a powerful email.
You may also use AI to modify the body text. Simply click the Enhance withAI button and additional options display. Clicking on any of the options modifies the email accordingly.- Add changes - Produces a different version with your specified changes.
- Rewrite - Produces a different version of the same content.
- Shorter - Creates a shorter version of the same content.
- Longer - Creates a longer version of the same content.
- More formal - Edits current content to a more formal writing style.
- More casual - Edits the current content to a more casual writing style.
Looking for more information about this feature? Feel free to contact your Kaltura representative.
- Call to Action Button text - Type the text that will display on the Call to Action (CTA) button in the email.
- Footer - Type the text that will display on the email footer.
- Once you are finished editing the Invite email, click Save to save and remain on the page or Save and Close to save and exit the page. A notification that the email template was updated successfully is displayed.
Note that you cannot edit the Template name or the Template description. These fields have been set in advance by Kaltura. You also may not disable this email from being sent automatically, nor may you disable the CTA button.
Following is an example of an "Invite" email for an event configured with email and password.

Following is an example of an "Invite" email for an event configured with a login link.
Customize the Registration complete email (an automated system email)
The "Registration complete" email is the email that attendees will receive upon completing the registration.
- On the Templates tab, under Automated system emails, click Edit (the pencil icon) in the Registration complete box. The Edit template page displays.
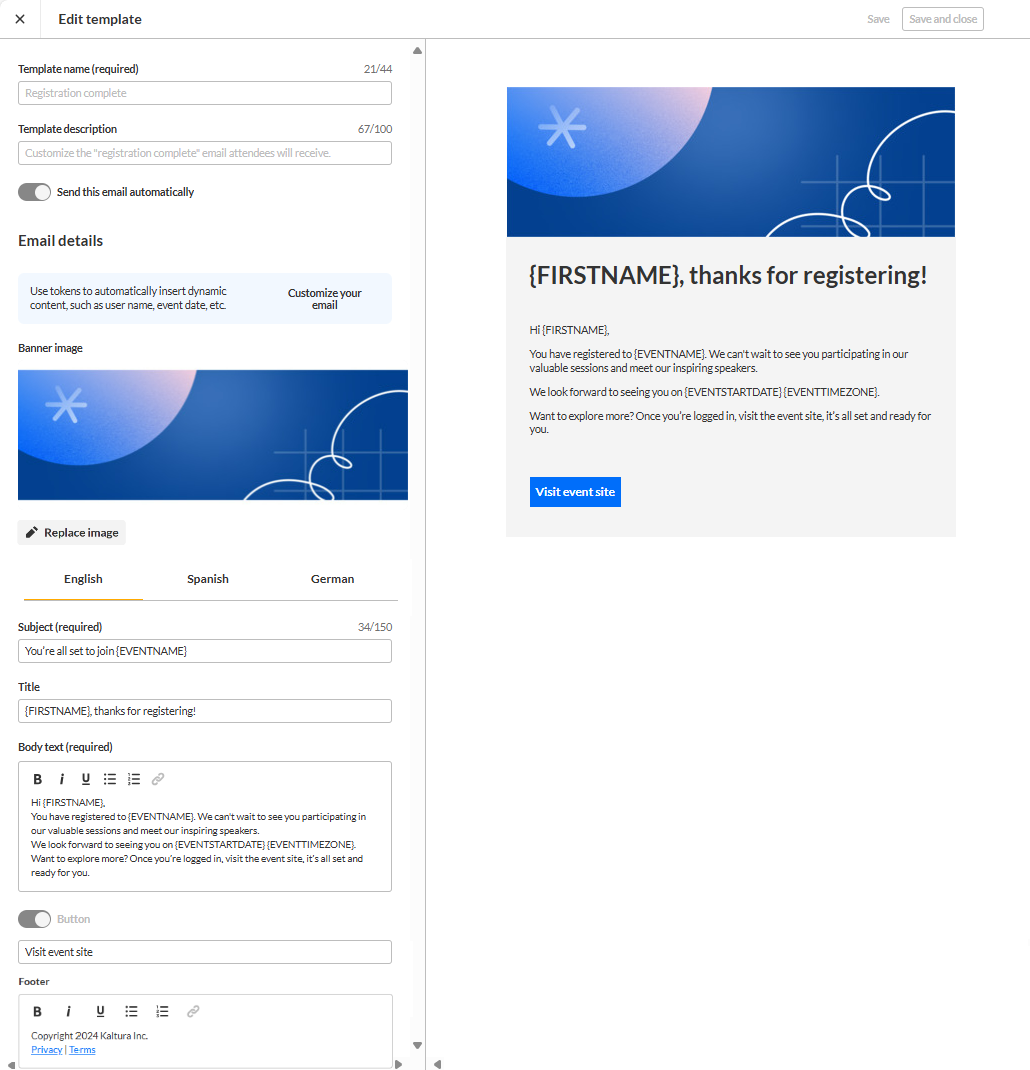
- Edit the appropriate fields.
The editable fields this Edit template page are as follows. A preview of the Registration complete email is displayed on the right of your screen and updates in real time as you make your changes. You may click Customize your email in the Email details section to see a list of customization tokens that you may copy and paste into fields to customize your email template.- Banner image - If you wish to upload an image, click Upload image and choose the desired file. Recommended size is 1920x1080 px. You may click Replace image to choose a different one.
- You may wish to edit your multi-lingual invite emails. Select the desired language tab to edit the multi-lingual content for your invitations. If more than three languages are available on your account, click the ellipses to see the full list of relevant languages.
 Choose a language from the drop-down list. That language will be placed in the second position, right after the main language set on your account. In our example below, the main language is English. When the user chooses a language from the drop-down list, the language chosen will be placed between English and German.

- Subject (required) - Type a subject for your email.
- Title - Type a title for your email.
- Body text (required) - Type the message for the body of the email. Some tips are provided for creating a powerful email.
You may also use AI to modify the body text. Simply click the Enhance with AI button and additional options display. Clicking on any of the options modify the email accordingly.- Add changes - Produces a different version with your specified changes.
- Rewrite - Produces a different version of the same content.
- Shorter - Creates a shorter version of the same content.
- Longer - Creates a longer version of the same content.
- More formal - Edits current content to a more formal writing style.
- More casual - Edits the current content to a more casual writing style.
Looking for more information about this feature? Feel free to contact your Kaltura representative.
- CTA Button text - Type the text that will display on the Call to Action (CTA) button in the email.
- Footer - Type the text that will display on the email footer.
- Once you are finished editing the Registration complete email, click Save to save and remain on the page or Save and Close to save and exit the page. A notification that the email template was updated successfully is displayed.
Note that you cannot edit the Template name or the Template description. These fields have been set in advance by Kaltura. You also may not disable this email from being sent automatically, nor may you disable the CTA button.
Following is an example of a "Registration complete" email.
Customize the Login email (an automated system email)
The "Login" email is the email that attendees will receive when trying to log in to the event site. To learn more about your event site, see Getting to know your event site, session page, and lobby page.
- On the Templates tab, under Automated system emails, click Edit (the pencil icon) in the Login email box. The Edit template page displays.
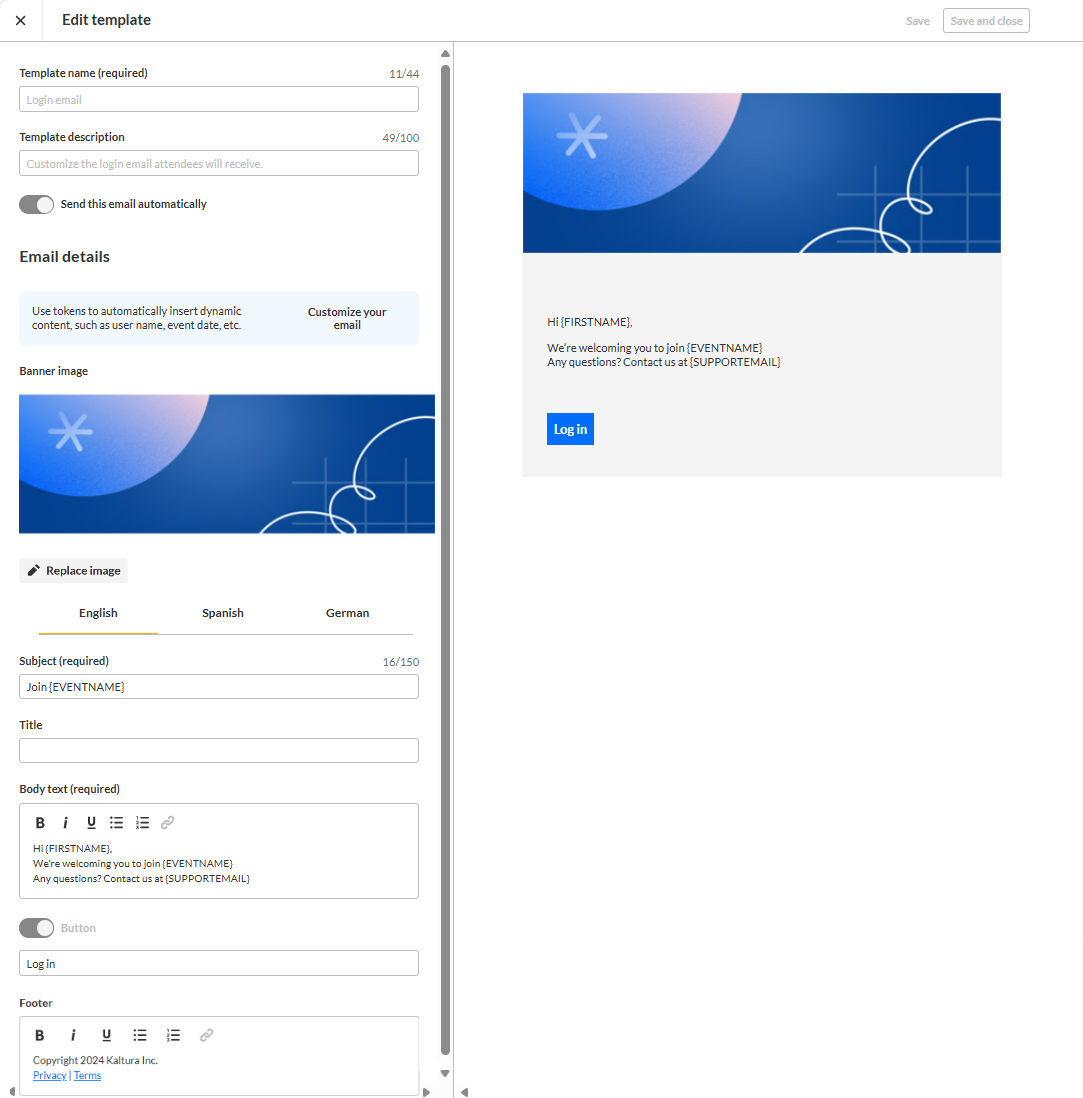
- Edit the appropriate fields.
The editable fields in this Edit template page are as follows. A preview of the Login email is displayed on the right of your screen and updates in real time as you make your changes. You may click Customize your email in the Email details section to see a list of customization tokens that you may copy and paste into fields to customize your email template.- Banner image - If you wish to upload an image, click Upload image and choose the desired file. Recommended size is 1920x1080 px. You may click Replace image to choose a different one.
- You may wish to edit your multi-lingual invite emails. Select the desired language tab to edit the multi-lingual content for your invitations. If more than three languages are available on your account, click the ellipses to see the full list of relevant languages.
 Choose a language from the drop-down list. That language will be placed in the second position, right after the main language set on your account. In our example below, the main language is English. When the user chooses a language from the drop-down list, the language chosen will be placed between English and German.

- Subject (required) - Type a subject for your email.
- Title - Type a title for your email.
- Body text (required) - Type the message for the body of the email. Some tips are provided for creating a powerful email.
You may also use AI to modify the body text. Simply click the Enhance with AI button and additional options display. Clicking on any of the options modify the email accordingly.- Add changes - Produces a different version with your specified changes.
- Rewrite - Produces a different version of the same content.
- Shorter - Creates a shorter version of the same content.
- Longer - Creates a longer version of the same content.
- More formal - Edits current content to a more formal writing style.
- More casual - Edits the current content to a more casual writing style.
Looking for more information about this feature? Feel free to contact your Kaltura representative.
- CTA Button text - Type the text that will display on the Call to Action (CTA) button in the email.
- Footer - Type the text that will display on the email footer.
- Once you are finished editing the Login email, click Save to save and remain on the page or Save and Close to save and exit the page. A notification that the email template was updated successfully is displayed.
Note that you cannot edit the Template name or the Template description. These fields have been set in advance by Kaltura. You also may not disable this email from being sent automatically, nor may you disable the CTA button.
Customize the Notify speaker of session assignment email (an automated system email)
The "Notify speaker of session assignment" email is the email that speakers will receive upon being assigned to a session.
- On the Templates tab, under Automated system emails, click Edit (the pencil icon) in the Notify speaker of session assignment box. The Edit template page displays.
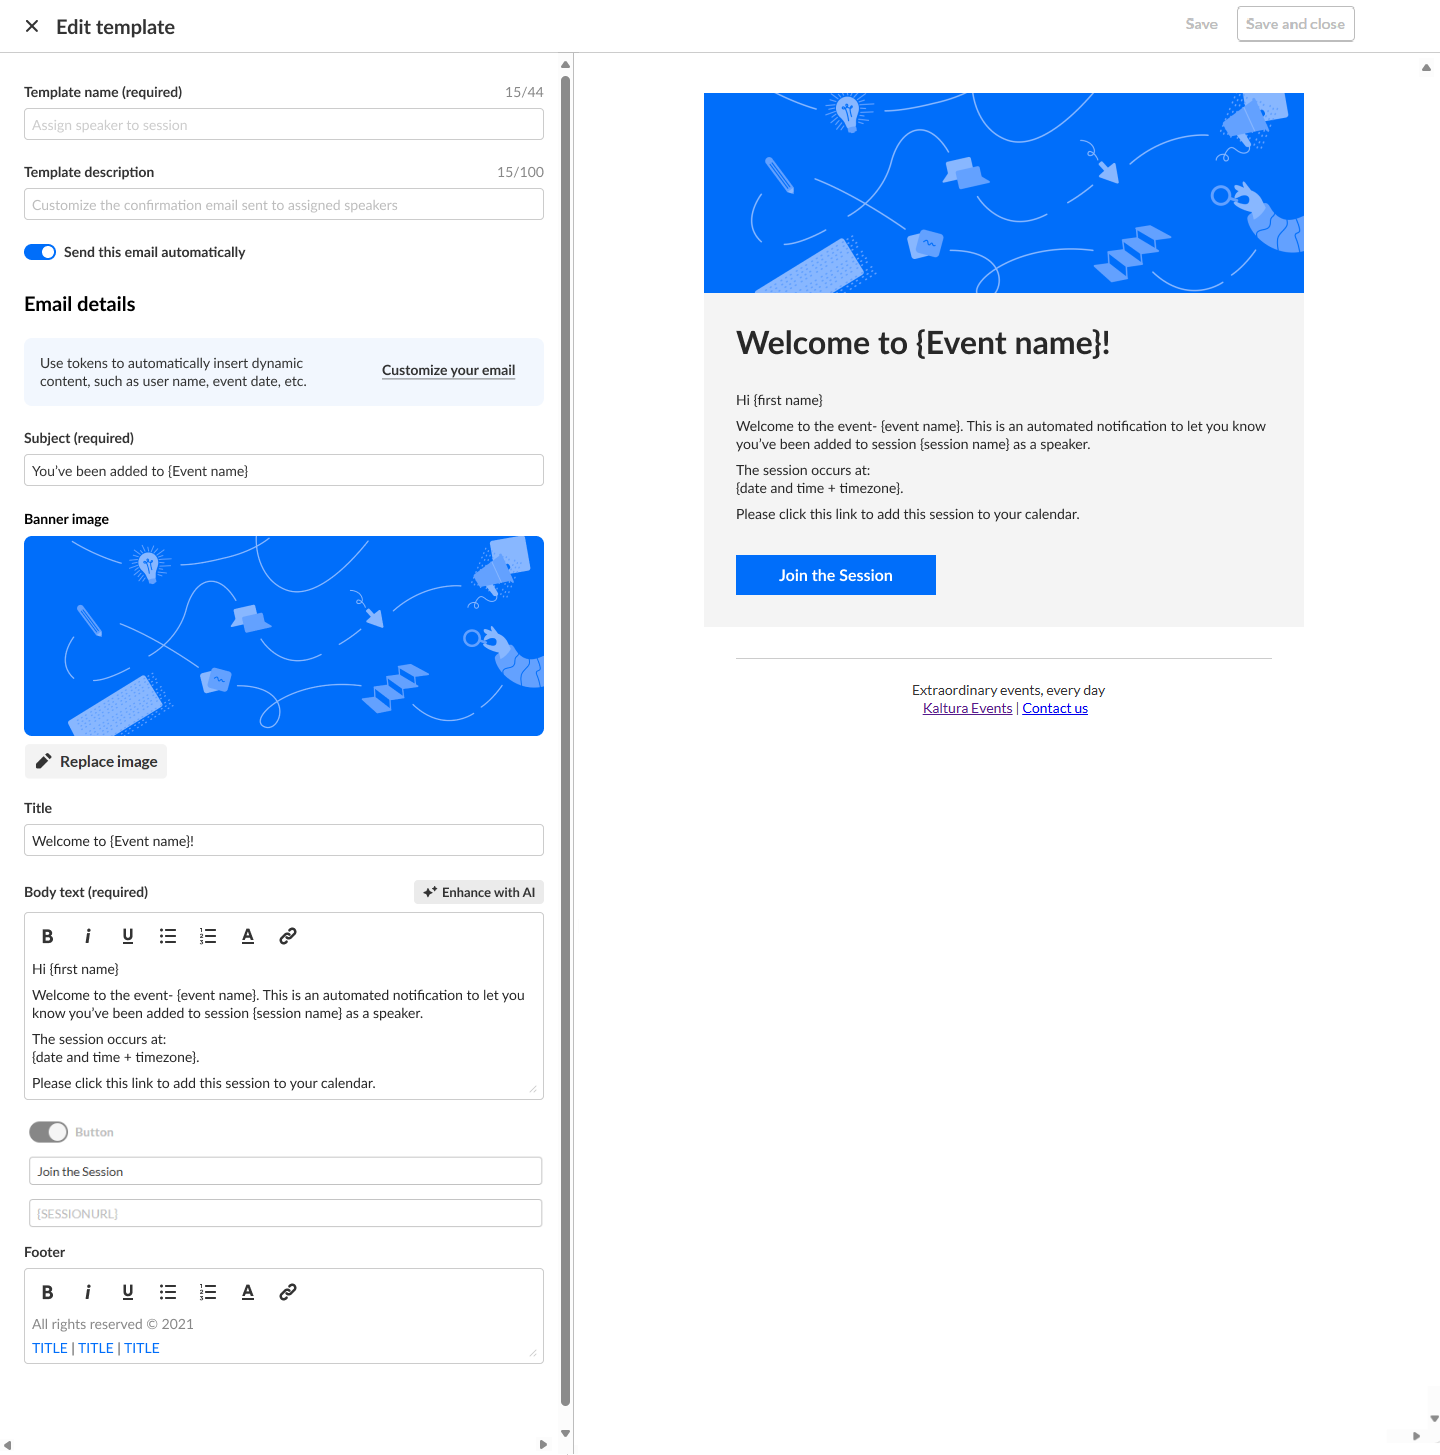
- Edit the appropriate fields.
The editable fields in this Edit template page are as follows. A preview of the Notify speaker of session assignment email is displayed on the right of your screen and updates in real time as you make your changes. You may click Customize your email in the Email details section to see a list of customization tokens that you may copy and paste into fields to customize your email template.- Send this email automatically -
Enable switch to send this email automatically. When enabled, "On" displays on the template card. (This is the default setting.)
Disable switch to stop sending this email automatically. When disabled, "Off" displays on the template card. - Subject (required) - Type a subject for your email.
- Banner image - If you wish to upload an image, click Upload image and choose the desired file. Recommended size is 1920x1080 px. You may click Replace image to choose a different one.
- Title - Type a title for your email.
- Body text (required) - Type the message for the body of the email. Some tips are provided for creating a powerful email.
You may also use AI to modify the body text. Simply click the Enhance with AI button and additional options display. Clicking on any of the options modify the email accordingly.- Add changes - Produces a different version with your specified changes.
- Rewrite - Produces a different version of the same content.
- Shorter - Creates a shorter version of the same content.
- Longer - Creates a longer version of the same content.
- More formal - Edits current content to a more formal writing style.
- More casual - Edits the current content to a more casual writing style.
Looking for more information about this feature? Feel free to contact your Kaltura representative.
- Button text - Type the text that will display on the Call to Action (CTA) button that will redirect them to the session itself.
- Footer - Type the text that will display on the email footer.
- Send this email automatically -
- Once you are finished editing the Notify speaker of session assignment email, click Save to save and remain on the page or Save and Close to save and exit the page. A notification that the email template was updated successfully is displayed.
Note that you cannot edit Template name or Template description. These fields have been set in advance by Kaltura.
Following is an example of a "Notify speaker of session assignment" email.
Customize the Notify moderator of session assignment email (an automated system email)
The "Notify moderator of session assignment" email is the email that moderators will receive upon being assigned to a session.
- On the Templates tab, under Automated system emails, click Edit (the pencil icon) in the Notify moderator of session assignment box. The Edit template page displays.
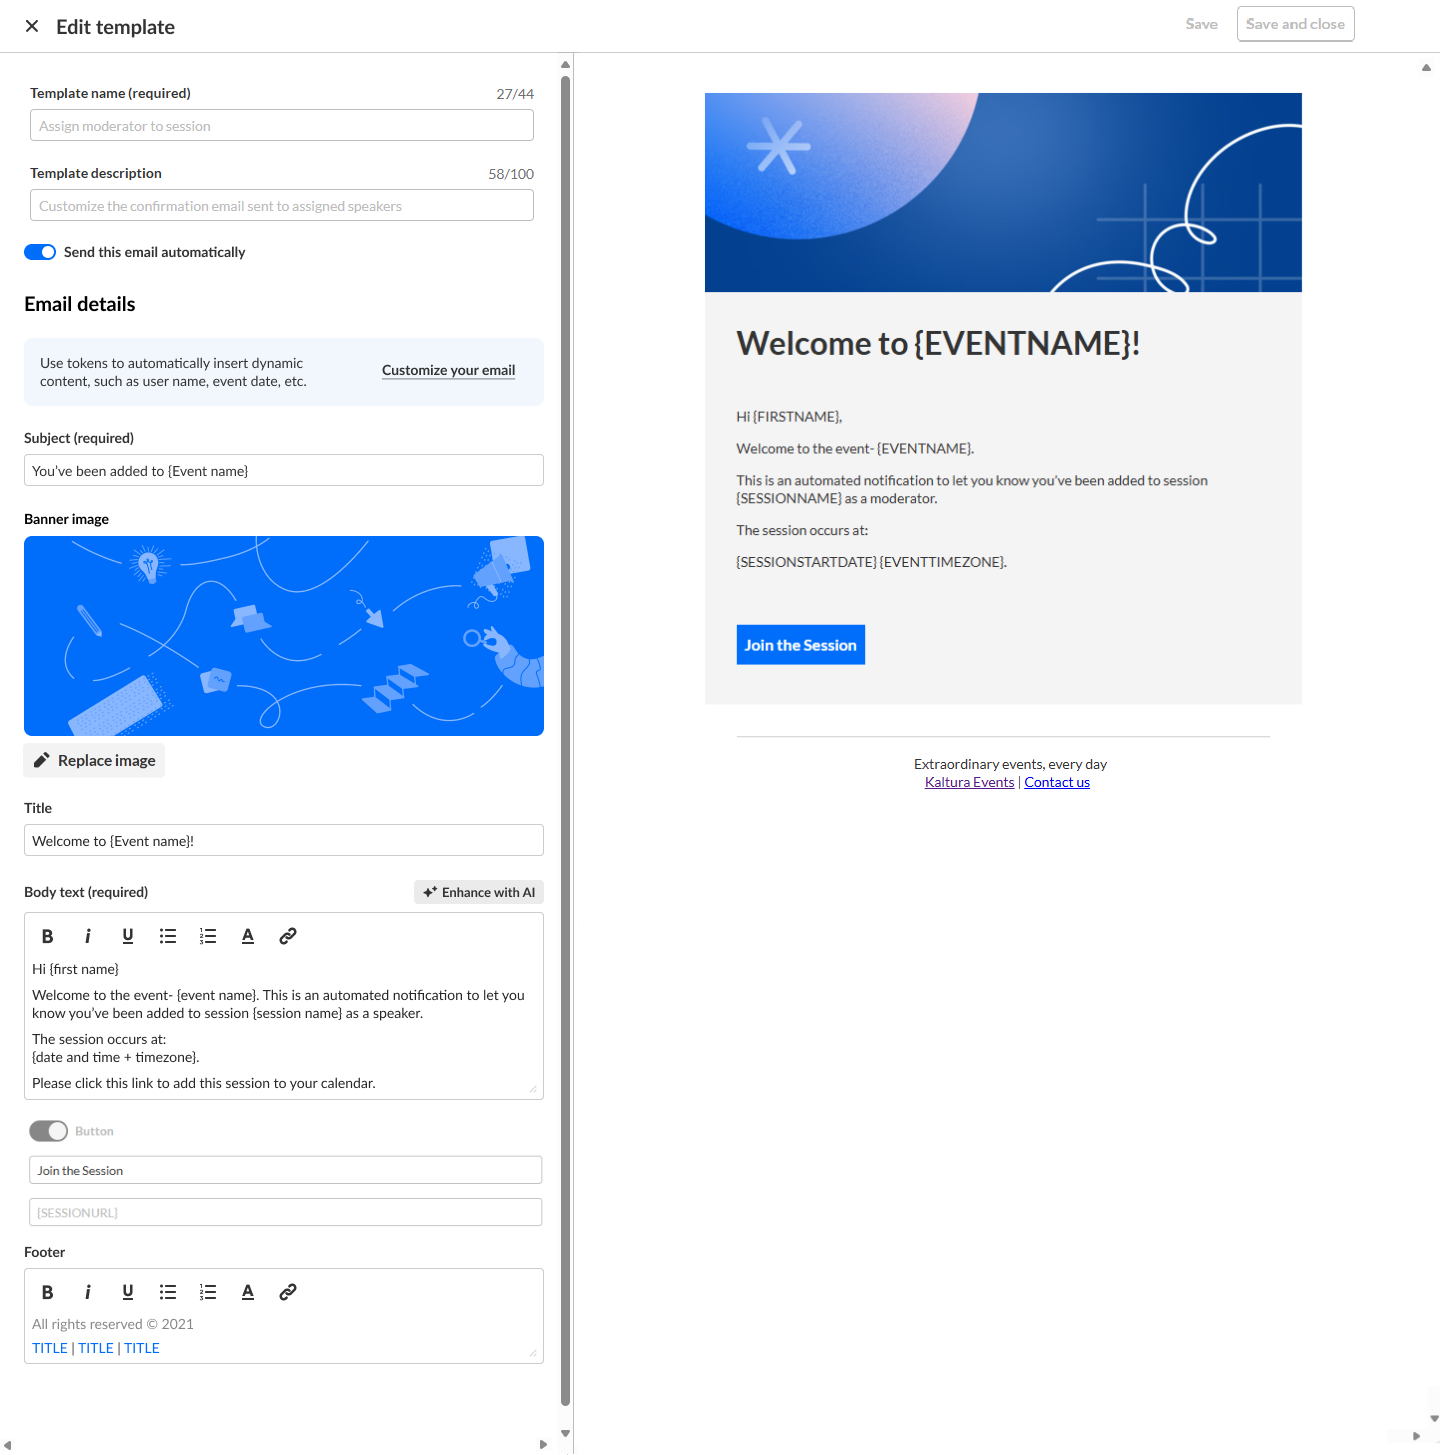
- Edit the appropriate fields.
The editable fields in this Edit template page are as follows. A preview of the Notify moderator of session assignment email is displayed on the right of your screen and updates in real time as you make your changes. You may click Customize your email in the Email details section to see a list of customization tokens that you may copy and paste into fields to customize your email template.- Send this email automatically -
Enable switch to send this email automatically. When enabled, "On" displays on the template card. (This is the default setting.)
Disable switch to stop sending this email automatically. When disabled, "Off" displays on the template card. - Subject (required) - Type a subject for your email.
- Banner image - If you wish to upload an image, click Upload image and choose the desired file. Recommended size is 1920x1080 px. You may click Replace image to choose a different one.
- Title - Type a title for your email.
- Body text (required) - Type the message for the body of the email. Some tips are provided for creating a powerful email.
You may also use AI to modify the body text. Simply click the Enhance withAI button and additional options display. Clicking on any of the options modify the email accordingly.- Add changes - Produces a different version with your specified changes.
- Rewrite - Produces a different version of the same content.
- Shorter - Creates a shorter version of the same content.
- Longer - Creates a longer version of the same content.
- More formal - Edits current content to a more formal writing style.
- More casual - Edits the current content to a more casual writing style.
Looking for more information about this feature? Feel free to contact your Kaltura representative.
- Button text - Type the text that will display on the Call to Action (CTA) button that will redirect them to the session itself.
- Footer - Type the text that will display on the email footer.
- Send this email automatically -
- Once you are finished editing the Notify moderator of session assignment email, click Save to save and remain on the page or Save and Close to save and exit the page. A notification that the email template was updated successfully is displayed.
Note that you cannot edit Template name or Template description. These fields have been set in advance by Kaltura.
Following is an example of a "Notify moderator of session assignment" email.
Customize the Notify speaker of schedule change email (an automated system email)
The "Notify speaker of schedule change" email is the email that speakers will receive when a change has been made to the schedule.
- On the Templates tab, under Automated system emails, click Edit (the pencil icon) in the Notify speaker of schedule change box. The Edit template page displays.
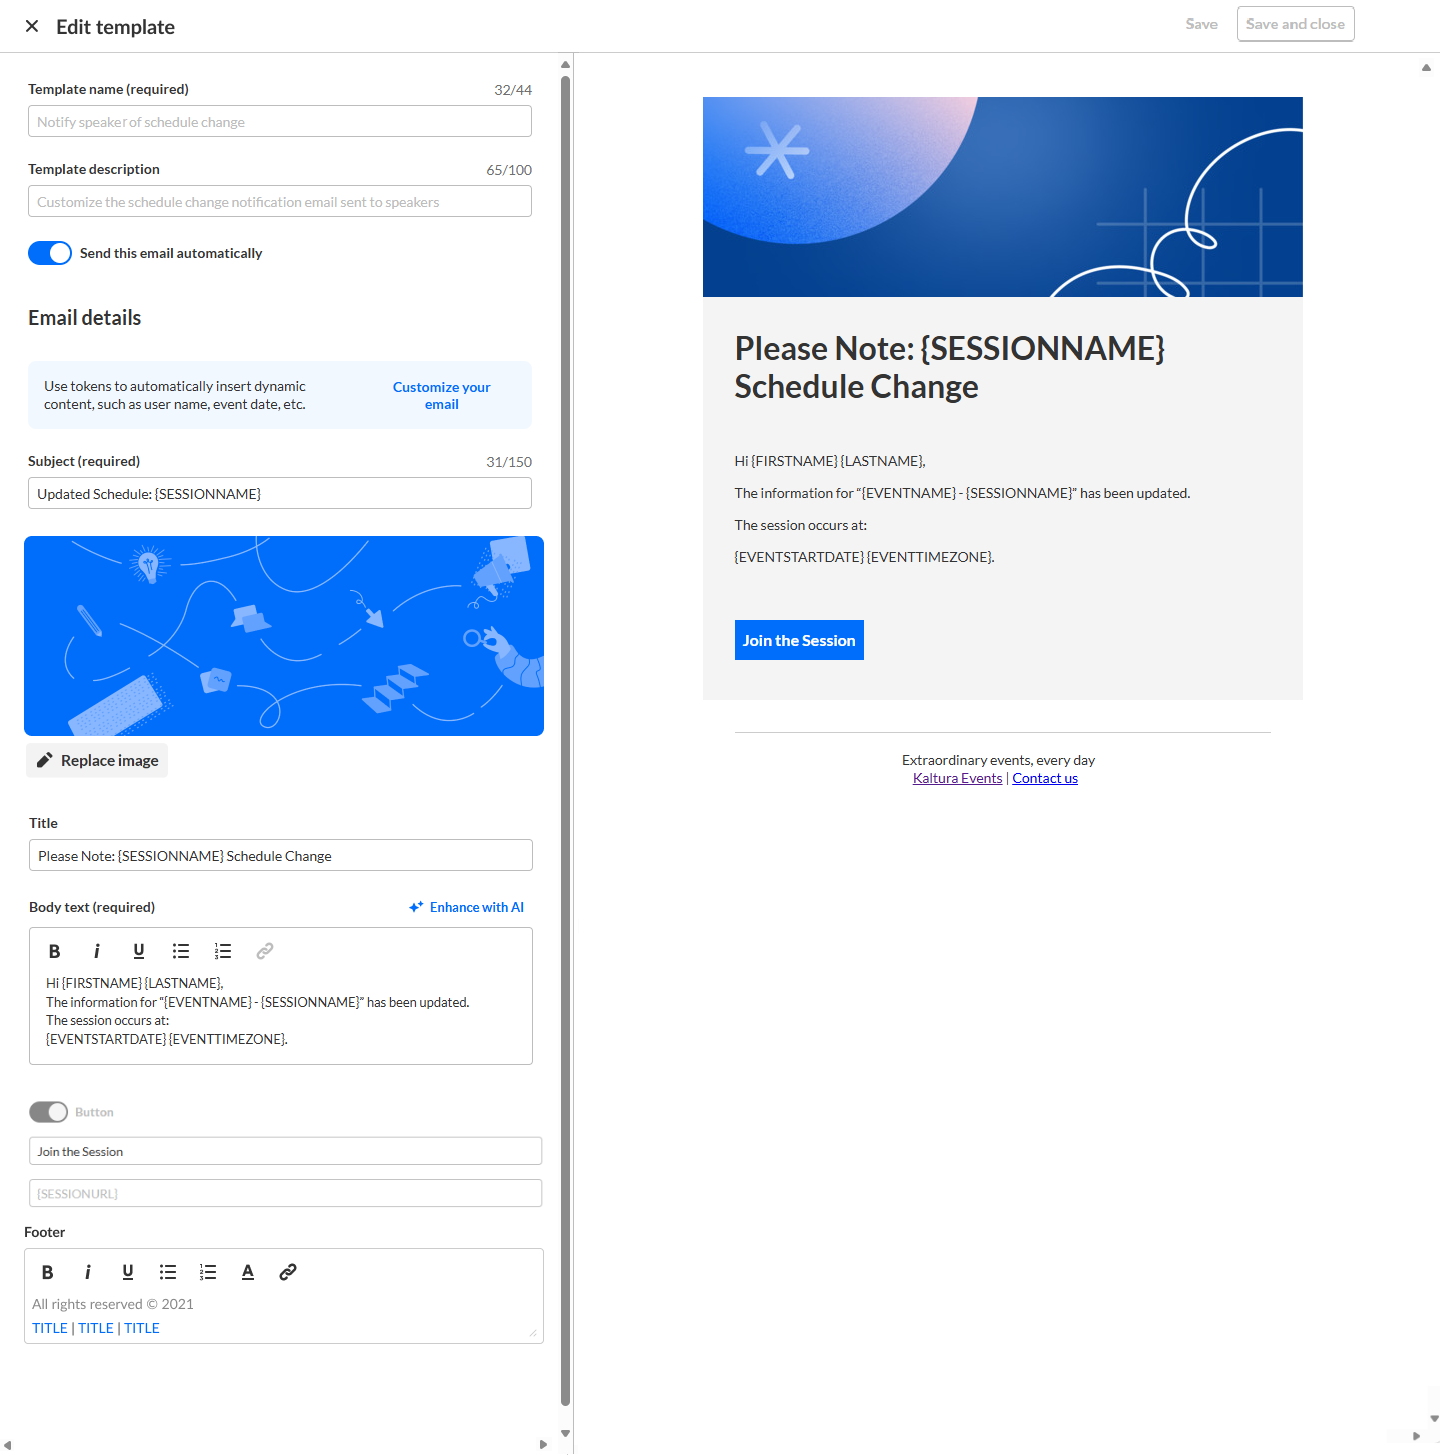
- Edit the appropriate fields.
The editable fields in this Edit template page are as follows. A preview of the Notify speaker of schedule change email is displayed on the right of your screen and updates in real time as you make your changes. You may click Customize your email in the Email details section to see a list of customization tokens that you may copy and paste into fields to customize your email template.- Send this email automatically -
Enable switch to send this email automatically. When enabled, "On" displays on the template card. (This is the default setting.)
Disable switch to stop sending this email automatically. When disabled, "Off" displays on the template card. - Subject (required) - Type a subject for your email.
- Banner image - If you wish to upload an image, click Upload image and choose the desired file. Recommended size is 1920x1080 px. You may click Replace image to choose a different one.
- Title - Type a title for your email.
- Body text (required) - Type the message for the body of the email. Some tips are provided for creating a powerful email.
You may also use AI to modify the body text. Simply click the Enhance withAI button and additional options display. Clicking on any of the options modify the email accordingly.- Add changes - Produces a different version with your specified changes.
- Rewrite - Produces a different version of the same content.
- Shorter - Creates a shorter version of the same content.
- Longer - Creates a longer version of the same content.
- More formal - Edits current content to a more formal writing style.
- More casual - Edits the current content to a more casual writing style.
Looking for more information about this feature? Feel free to contact your Kaltura representative.
- Button text - Type the text that will display on the Call to Action (CTA) button that will redirect them to the session itself.
- Footer - Type the text that will display on the email footer.
- Send this email automatically -
- Once you are finished editing the Notify speaker of schedule change email, click Save to save and remain on the page or Save and Close to save and exit the page. A notification that the email template was updated successfully is displayed.
Note that you cannot edit Template name or Template description. These fields have been set in advance by Kaltura.
Following is an example of a "Notify speaker of schedule change" email.
Customize the Notify moderator of schedule change email (an automated system email)
The "Notify moderator of schedule change" email is the email that moderators will receive when a change has been made to the schedule.
- On the Templates tab, under Automated system emails, click Edit (the pencil icon) in the Notify moderator of schedule change box. The Edit template page displays.
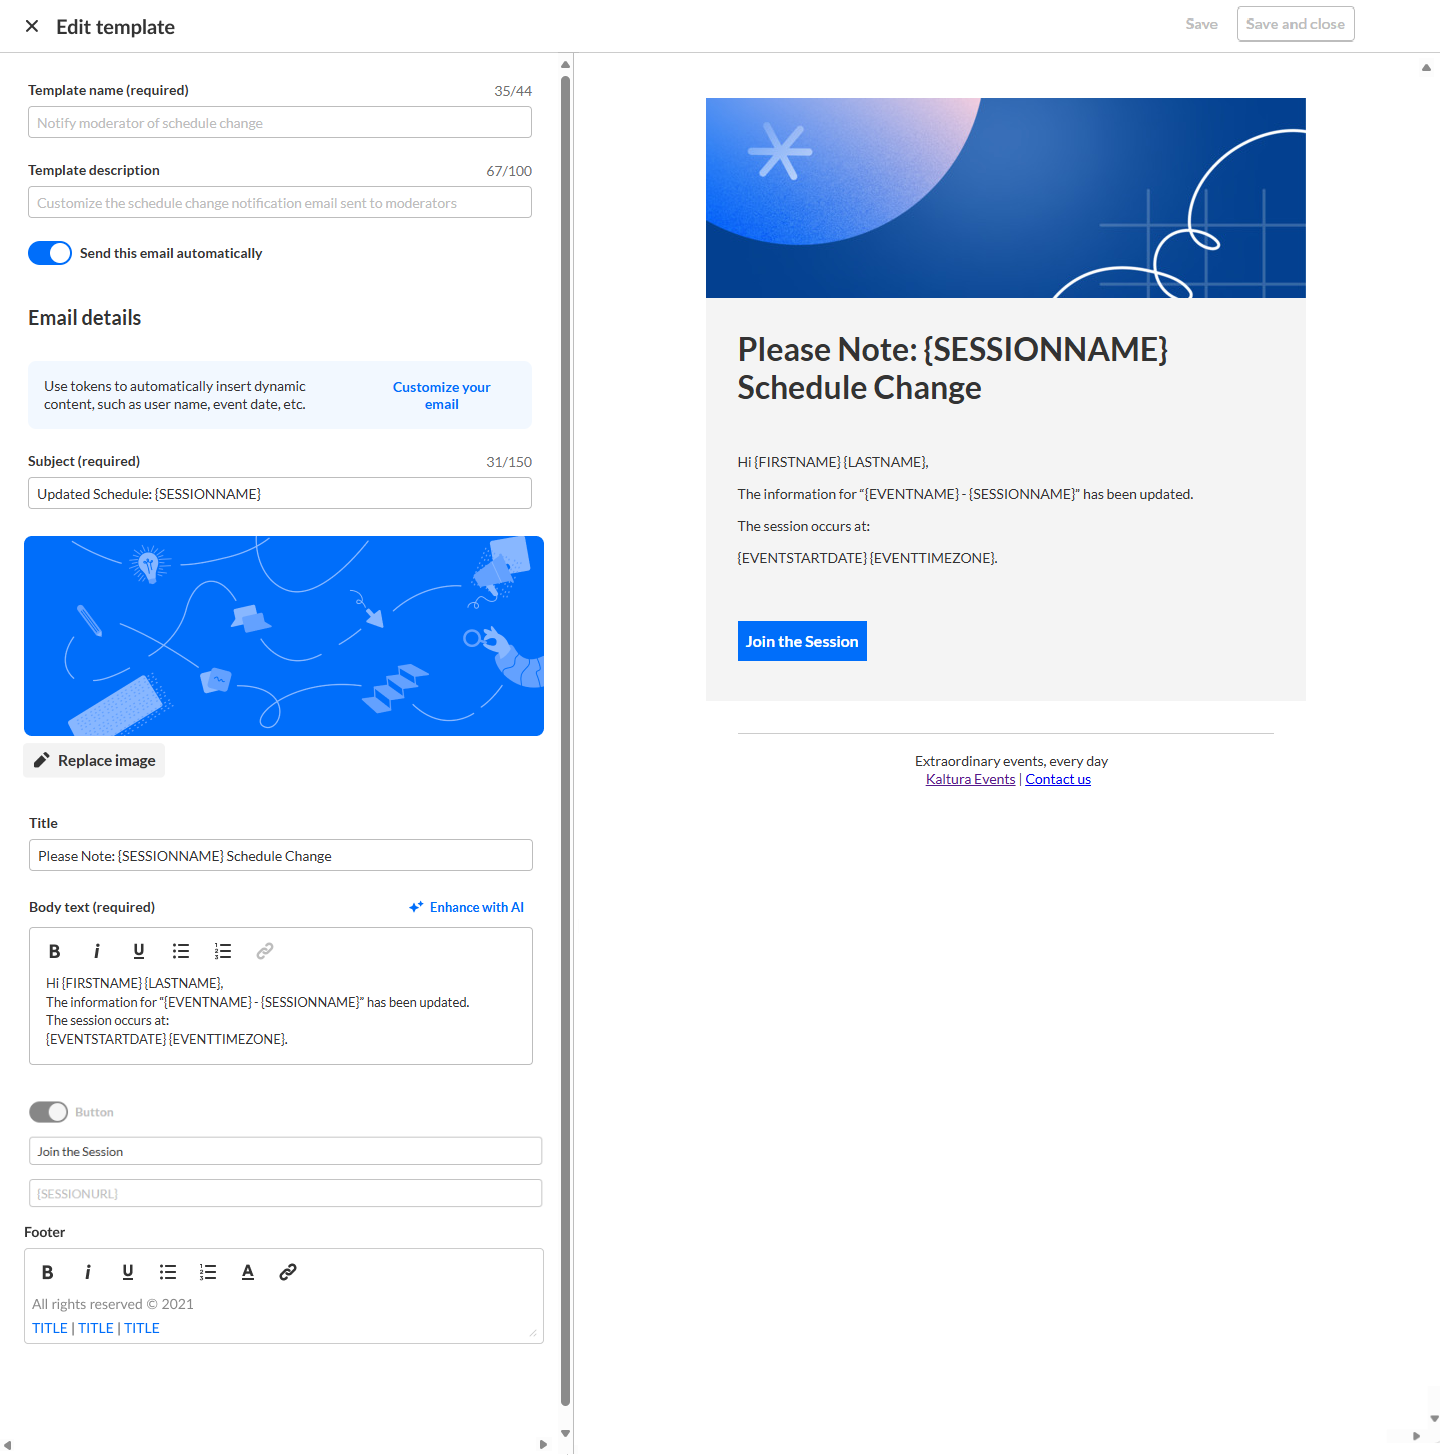
- Edit the appropriate fields.
The editable fields in this Edit template page are as follows. A preview of the Notify moderator of schedule change email is displayed on the right of your screen and updates in real time as you make your changes. You may click Customize your email in the Email details section to see a list of customization tokens that you may copy and paste into fields to customize your email template.- Send this email automatically -
Enable switch to send this email automatically. When enabled, "On" displays on the template card. (This is the default setting.)
Disable switch to stop sending this email automatically. When disabled, "Off" displays on the template card. - Subject (required) - Type a subject for your email.
- Banner image - If you wish to upload an image, click Upload image and choose the desired file. Recommended size is 1920x1080 px. You may click Replace image to choose a different one.
- Title - Type a title for your email.
- Body text (required) - Type the message for the body of the email. Some tips are provided for creating a powerful email.
You may also use AI to modify the body text. Simply click the Enhance withAI button and additional options display. Clicking on any of the options modify the email accordingly.- Add changes - Produces a different version with your specified changes.
- Rewrite - Produces a different version of the same content.
- Shorter - Creates a shorter version of the same content.
- Longer - Creates a longer version of the same content.
- More formal - Edits current content to a more formal writing style.
- More casual - Edits the current content to a more casual writing style.
Looking for more information about this feature? Feel free to contact your Kaltura representative.
- Button text - Type the text that will display on the Call to Action (CTA) button that will redirect them to the session itself.
- Footer - Type the text that will display on the email footer.
- Send this email automatically -
- Once you are finished editing the Notify moderator of schedule change email, click Save to save and remain on the page or Save and Close to save and exit the page. A notification that the email template was updated successfully is displayed.
Note that you cannot edit Template name or Template description. These fields have been set in advance by Kaltura.
Following is an example of a "Notify moderator of schedule change" email.
 The Create with AI screen displays.

 The Create new template page displays.
 The Edit Template page displays. In the example below, we have chosen to edit the Send a reminder template.

 The Send new screen displays. In the example below, we have chosen to send a reminder email.

 The statuses listed reflect the granularity seen upon hovering over the registration status of a user in the All users page. For detailed information on these statuses, see


 If you choose Schedule date & time, make the appropriate selections for date and time.


 You are asked to confirm your action. This action can't be undone.

 Choose a language from the drop-down list. That language will be placed in the second position, right after the main language set on your account. In our example below, the main language is English. When the user chooses a language from the drop-down list, the language chosen will be placed between English and German.


