Automation manager - KMC


About

Kaltura's automation manager is a tool that helps organizations manage and repurpose their media content efficiently. It allows users to automate tasks like categorizing, tagging, and managing media based on specific criteria. For example, it can archive older media, create categories based on viewing habits, and tag media using metadata. The tool also offers flexibility, letting users tag popular content and organize frequently accessed media, making it easier to find and use content effectively.

The automation manager operates automatically at scheduled intervals, scanning all media entries and applying the predefined rules and actions. 

Key features include:

  • Rule management: You can easily create, edit, and manage rules to automate the categorization and tagging of media entries.
  • Review queue: A dedicated queue where all entries matched to any of the rules are placed for the next action cycle. Within this queue, administrators can review, approve, deny or execute planned actions.
  • History and reporting: Administrators have access to a history and reporting section where they can download reports of Automation Manager actions and review this data online. 

If you don't see the automation manager tab in your KMC, you need to enable it on your account. In addition, only users with certain roles can access the automation manager. 

Access the automation manager

  1. To access the automation manager, simply log into your Management Console.
  2. Under the Content menu, click the settings icon.

    The settings menu displays.

  3. Click the Automation Manager tab.

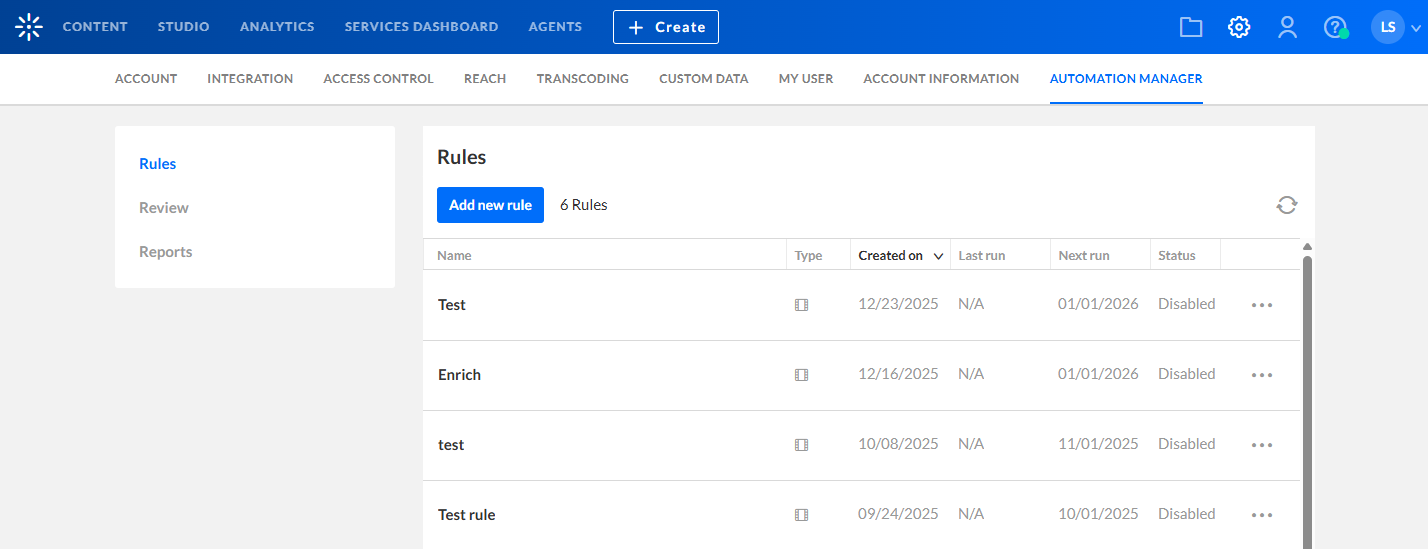
    The Rules page displays.
    Here you can view any rules that have been set up on your account.

Create a new rule

  1. On the Rules page click Add new rule.
  2. The Add new rule window displays.

  3. Complete the fields:
    • Name (Required)  
    • Description (Optional) 
  4. Click Next.
    The Criteria tab on the Edit page displays. 
  5. Click the Add criteria drop-down menu.

Set rule criteria 

Select the desired rule criteria from the drop-down menu. An entry must meet all specified criteria to receive a tag.

For a list of available settings, see the Criteria tab.

Manage rules

Each rule is displayed as a row in a table. The columns for the rules are as follows:

  • Name - name of rule
  • Description - description of rule
  • Created on - the date that the rule was created on 
  • Last run - the last time MR ran this rule
  • Next run - the next scheduled date that MR will run this rule
  • Status (enabled / disabled)

The columns are sortable by Name, Creation on, Last run, Next run and Status.

Each rule has a three dots menu at the end of the row.

The menu has the following options:

  • Enable / Disable - Click to enable / disable the rule state.
  • If you try to enable a rule that has no criteria, an error message displays: No criteria found for this rule. To enable, please define at least one criteria. 

  • Edit - This directs you to the edit page of the rule profile.
  • Delete - Click to delete an existing rule. A confirmation message displays requiring you to confirm the action.

General tab

You can edit the general settings for a specific rule. 

The settings are as follows:

  • Name (Required) - type in a name
  • Description (Optional) - type in a description
  • Rule owner - This displays the current rule owner. The Change owner button allows you to replace the owner.  

Scheduling

  • Start date - Use the date picker to set the first date that the Automation Manager should run.
  • Repeat - Choose frequency from the drop-down menu (for example, daily, weekly, on specific days).

Review

  • Review Period - Choose a time frame (1-90 days) for entries with scheduled actions to be reviewed. This period begins when entries are scanned and matched based on criteria and ends when the scheduled actions are performed. During this time, the entries will appear in the review queue.
  • Require admin approval - When enabled, an administrator must actively approve each entry during the review period for rule actions to be executed. 

Criteria tab

You can set criteria for the automation manager to determine which entries get tagged. Entries must meet all criteria to be tagged. Once you've set your criteria, they will be displayed under the Criteria tab.

The following criteria settings are available:

  • Last played date - Define the minimum or maximum length of time that has passed since the entry was last played. 
  • Creation date - Define the minimum or maximum length of time that has passed since the entry was created. 
  • Number of plays - Specify the total number of plays for the entry - choose more than or less than x plays.
  • Published to categories - Choose categories to which the rule will apply. The rule will be executed if the entry is found in at least one of the selected categories.
  • Contains tags - Choose tags to which the rule will apply. The rule will be executed if the entry contains at least one of the added tags.
  • Entry owner - Select the assigned owner(s) of the entry. The rule will be performed if the entry is owned by at least one of the added owners.
  • Media Duration - Specify the duration of the media - select more than or less than x minutes/seconds/hours.

If you remove all criteria from an enabled rule, a popup message will appear: All criteria for this rule have been removed. As a result, the rule will be disabled automatically. Do you wish to continue?

Actions tab

You can set up a list of actions to be performed on entries tagged by the automation manager. Each entry caught by the rule can have a single action or a combination of actions performed.

Click the Add actions drop-down menu.

Select the preferred actions from the drop-down menu:

  • Keep selected flavors - This action will delete all flavors on the entry except those selected. Select from the drop-down menu.
  • Add / remove categories - You can:
    • add to categories - select the categories where the entry should be published. 
    • remove from categories - select the categories from which the entry should be removed.
  • Add/remove tags - You can:
    • add tags - type in the tags that should be added to the entry.
    • remove tags - type in the tags that should be removed from the entry.
  • Change owner -  Edit the owner of the entry.
  • Delete - Deletes the entry. 
  • If the recycle bin is enabled on your account, it will be moved there like any other deleted item.

Notifications tab

You can set up email notifications.

To set up email notifications, check the boxes for the notifications you would like to have sent automatically with every run. You can choose multiple notifications. There are three types available:

  • Post-entries scan notification - notification sent after entries are scanned 
  • Pre-action notification - reminder that the review period is ending
  • Post-action notification - report on the actions that were performed

Each notification has an Edit button that allows you to configure the settings.

Each notification has the following configurable settings:

  • Email scheduling - Number of days before actions are performed (relevant to pre-action notification only). 
  • Send to - Check the box next to your preferred recipient:
    • Rule owner - enabled by default for every new rule
    • Entry owner 
    • Custom list - begin typing a username, and suggestions of existing users on the account will be automatically provided
  • Email subject - customize the subject line of the email that will be sent out
  • Email body - customize the body line of the email that will be sent out

Email templates can be customized for each rule and specific email.

All emails support the following tokens: {user.firstName}, {scanDate}, {profileName}, {actualExecutionDate}, {plannedExecutionDate}

Review and manage entries

The Review tab lists entries that met the criteria of a rule and were added to the review queue. You can perform actions on the entries.

The columns for each entry are:

  • Name - entry name
  • ID - entry ID
  • Type - media type icon (same as in KMC entries tab)
  • Duration - media duration
  • Triggering rule - the rule that triggered the entry to be added to the review queue
  • Execution date - the date in which the triggering rule is planned to run 
  • Status - the statuses are as follows:
    • Pending - actions won't be performed without manual approval (only relevant for rules that require approval)
    • Auto - actions will be performed automatically (relevant only for rules that don't require approval)
    • Approved - entries that have been approved
    • Rejected - entries that have been rejected 

Each entry has a three dots menu at the end of the row. 

The menu allows you to perform the following actions:

  • Approve 
  • Deny / Reject
  • Perform now - Performing the rule will cause the configured actions to be performed on all selected entries.

Search, filter and refine 

You can search, filter and refine the list of entries in the review queue. 

Search

Use the search field to search for an entry in the review queue.

Refine

Refine your search using the following filters: 

  • Added between - enter the date the entry was added to the review queue
  • Action between - enter the date the actions are planned to be performed
  • Additional filters - you can refine your search using additional filters

The available filters are as follows:

  • Media type
  • Duration - you can set parameters for shorter than or longer than (x minutes) 
  • Owner - filter according to owner
  • Approval status - entries with the approval status of Auto, Pending Approval, Rejected, Approved
  • Rules - all entries that were caught by the selected rule

Bulk actions

Using the More actions menu, you can select specific entries (or all entries on the page) and perform bulk actions.

You can perform the following actions in bulk:

  • Approve 
  • Reject
  • Perform now - Executing this rule now will perform the configured actions on all selected entries.

Export 

You can export a CSV file with all entries based on the filtering in the Review tab at the time of export. 

Reports

The Reports tab displays and allows you to download reports generated by the automation manager for your account. It shows only reports that are in 'Ready' status.

The columns for each rule are:

  • Rule - the name of the rule associated with the report
  • Date - date the report was created
  • Number of items - number of records in the report
  • Type - there are three types: 
    • Scan - this report is generated every time entries are scanned
    • Test - this report is generated every time a test run was performed
    • Action - this report is generated every time actions were performed 

The columns are sortable by Date, Number of items and Type.

You can use the filter at the top right to filter the reports.

The reports can be filtered by the following: 

  • Date - enter the desired date in the date picker
  • Rule -  filter by rule
  • Type - filter by type (scan / test / action)

Download report - Click Download Report at the end of the row to download the report of that entry.

Was this article helpful?
Thank you for your feedback!
User Icon

Thank you! Your comment has been submitted.

In This Article
Related Articles
Back to top

Never miss a thing!

Subscribe to our customer newsletter and our release notes updates, so you always get the best out of Kaltura.
Newsletter