About
You can show ads in your player using Google's Interactive Media Ads (IMA) SDK.
The player supports two IMA integrations:
- IMA - Uses the Google IMA SDK for HTML5 V3 to request and track VAST ads in an HTML5 video environment.
- IMA DAI - Uses the Google IMA DAI SDK for HTML5 to request one stream that combines the ads and the content video (a stitched stream) in an HTML5 video environment.
Ads from the IMA plugin are client-side ads. The player gets them from an ad server and adds them to playback. These ads can be:
- Skippable
- Clickable
- Linear, where the ad break is inserted into playback, or non-linear, where the ad shows over or beside the playing content
VOD
Access the Integrations settings
- Log in to your Rich Media CMS and select the Studio tab.
- From the list, select the player you want to configure.
- In the left panel, select the shapes icon.


Set up IMA
Before you start, make sure you have a VAST-compliant ad server, such as Google Ad Manager. The player supports VAST 3.0 and VPAID 2.0 ads, so you can use any VAST-compliant ad server. After you set up a campaign on your ad server, it gives you a VAST ad tag URL to enter in the IMA settings.
Most ad logic, such as targeting, tracking, and scheduling, is handled on the ad server.
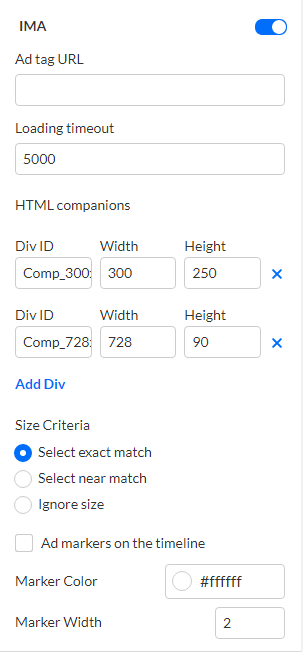
- Next to IMA, select the toggle to enable the setting. More options display.
- Configure the following:
- Ad tag URL - Enter the URL of the ad tag.
- Loading timeout - Enter the time to wait for an ad to load, in milliseconds. If the ad doesn't load in this time, the video starts. The default is
5000(5 seconds). - HTML companions - Companion ads are banner or display ads that appear next to the player while a video ad plays. Your ad server must support companion ads and include them in the VAST ad response. For each companion ad, enter the Div ID of its container and the expected Width and Height. Select Add div to add a container, or select the X to delete one.
- Size criteria - Select how companions are matched to the companion ad slot:
- Select exact match (default) - Only companions that match the size of the companion ad slot exactly are selected.
- Select near match - Any companion that's close to the size of the companion ad slot can be selected.
- Ignore size - Companions are selected regardless of size.
- Ad markers on the timeline - Select to show markers on the timeline where ads play.
- Marker color - Select a color, or enter its hex code. The default is
#ffffff(white). - Marker width - Enter the width of the markers, in pixels. The default is
2.
- Select Save at the top right of the settings page.
Set up IMA DAI
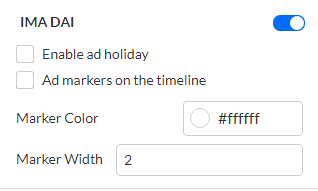
- Next to IMA DAI, select the toggle to enable the setting. More options display.
- Configure the following:
- Enable ad holiday - Select to stop viewers from seeing another ad right after they've watched a pre-roll ad. Set the duration in Google Ad Manager.
- Ad markers on the timeline - Select to show markers on the timeline where ads play.
- Marker color - Select a color, or enter its hex code. The default is
#ffffff(white). - Marker width - Enter the width of the markers, in pixels. The default is
2.
- Select Save at the top right of the settings page.
To check your ad tag, use the Ad Tag Suite Inspector. For more advanced settings, see IMA Config Object.