About
The Custom Embed module is used in conjunction with the standard Embed module, when Embed is configured for Secure Embed but certain designated users need to have the ability to "grab" standard Kaltura embed codes. Custom Embed allows admin to grant certain users, groups or roles the right to "grab" standard Kaltura embed codes. Custom Embed thus allows both standard and secure embed types to be supported side by side in the same account. The sections herein will guide you through enabling and configuring the Customembed module.
This module is for both Content Hubs and legacy Video Portal users.
For technical support, contact Kaltura Customer Care. For all other inquiries, reach out to your Customer Success Manager.
Prerequisites
The functionality of the Custom Embed module is dependent upon the Embed module being enabled and configured with secureEmbed = Yes.
Configure
- Access your Configuration Management console.
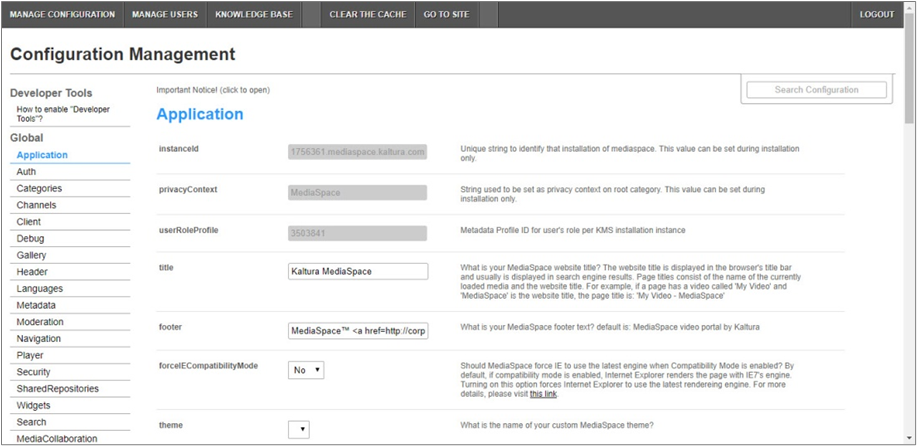
- In the list of configurable items on the left of your screen, locate and click on Customembed.
-
The Customembed window displays.
-
The Module Info box displays the module name, description (what enabling this module allows users to do), and version number.
- In the enabled pull-down list, select Yes to enable the Customembed module.
The Customembed item will be crossed out because it is disabled by default.

Other configurable items following the enabled pull-down list are as follows.
| Configuration Name | Options | Description |
| embedResponsiveness | Yes or No | Choose Yes to display responsive sizing as an option in the embed view. |
| embedTabLabel | Free text | Type the label of the tab displayed to users. If this field is left empty, the tab is named 'Custom Embed' by default. |
| embedAllowed |
Owner Only Co-Editor Co-Publisher Specific Users / Groups anonymousRole viewerRole privateOnlyRole adminRole unmoderatedAdminRole unconfirmedViewerRole |
Select one or more roles/users/groups who can use the embed functionality provided by the Custom Embed module. |
| embedSkins | Free text for name, imgFile, and uiConfId |
Define skins that can be used for embedded players. An empty embedSkins section is displayed and ready for input by default. If you would like to define an additional skin, click + Add "embedSkins". If you would like to delete a skin, click the red Delete button. name - Type the name of the skin. This name is displayed when the user selects an embed skin. 'Dark skin' is default.imgFile - Type the relative path to the image file on the server. The image file represents how the skin looks. 'dark.png' is default. uiConfId - Type the numerical value of the player ID that is used in the embed code. |
| embedSizes | Default values:
Large: 608x402 Medium: 400x285 Small: 304x231 |
Define sizes that can be used for embedded players.
Define the player size in the following format: {width}x{height} |
6. Click Save.
You receive a notice that your configuration for Customembed was saved and the cache was cleared.
End user experience
Once enabled and configured, a new capability is added to the Entry page that allows users to copy the custom embed code. This capability is accessible on Content Hubs via the three dots actions menu > Custom Embed, and on legacy Video Portal via Share > Custom Embed tab.
Content Hubs users:
Once enabled and configured, the Custom embed option is accessible via the three dots actions menu > Custom Embed on the Entry page.


After selecting the Custom Embed menu item, the Custom Embed screen is displayed for the user. The user may then select the player skin and the max embed size then click Copy embed to copy the link to share.

Legacy Video Portal users:
Once enabled and configured for legacy Video Portal users, the Custom Embed option is accessible via Share > Custom Embed on the Entry page.

The user may then select a start and end time and player size, then copy the link to share.
This document is maintained by Kaltura’s Professional Services team. Please send comments or corrections to your Customer Success Manager. Ask them to forward it to the Professional Services team. We are committed to improving our documentation and your feedback is appreciated.
