About
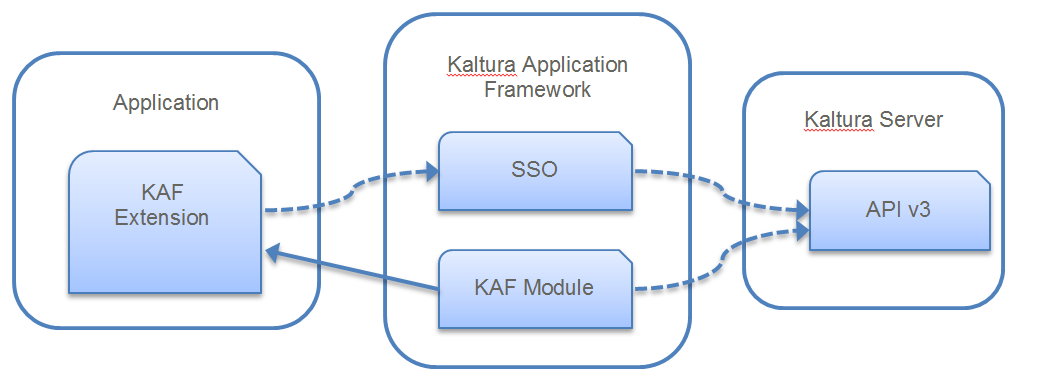
The Kaltura Application Framework (KAF) is the underlying platform that powers Kaltura’s video integrations. It provides the architecture that enables Kaltura’s media tools, such as My Media, Media Gallery, and Browse, Search & Embed, to integrate seamlessly into third-party applications.
KAF is not an end-user product. It is the framework that enables these integrations. Administrators access and configure their KAF instance through the Configuration Management console.
How does KAF work?
KAF components are embedded as responsive iFrames, ensuring they display well on any device. These components use Kaltura APIs to display, add, or update content based on the component’s functionality, with the content rendered in HTML so users can interact with it directly within the integrated application.

Authentication and authorization
To use a KAF component, an authentication process identifies the user and their permissions. KAF supports two main authentication methods:
- KS-based SSO (Single Sign-On): Uses a Kaltura Session (KS) token to identify the user.
- LTI Authentication: Typically used for LMS integrations.
Generating a Kaltura Session (KS) for SSO
To authenticate users, KAF uses a security token called a KS (Kaltura Session). You can generate a KS using Kaltura API Client libraries with a method called generateSession (or a similar function depending on the programming language). This method includes user information, session details, and specific privileges needed for the session.
Below is an example of generating a session in PHP using the client library:
$client->generateSessionV2(

   $adminSecret,

   $userId,

   $sessionType,

   $partnerId,

   $expiration,

   $privileges

);
The following explains the parameters expected by the 'generateSession' method:
- Admin Secret - The admin secret of the Kaltura account, found in the KMC under Settings > Integration settings.
- User ID - The unique ID of the user for whom the KAF component will be displayed.
- Session Type - Type of Kaltura Session. For KAF integration, this must be set to USER.
- Partner ID - The Kaltura account ID, found in the KMC under Settings > Integration settings.
- Expiration - Duration of the KS in seconds, usually set to up to 60 seconds for KAF.
- Privileges - Comma-separated list of privileges. Some privileges are of type key-value pairs, represented as key:value. For maximum security, use actionslimit:-1 to prevent unauthorized API calls.
Here’s an example for generating a KS and rendering an iFrame with the KAF component:
// prepare privileges

$privileges= array();

$privileges[] = "actionslimit:-1";

$privileges[] = "firstName:John";

$privileges[] = "lastName:Doe";

$privileges[] = "role:viewerRole";


// transform array privileges to string

$privilegesStr = implode(",", $privileges);


// prepare additional parameters

$adminSecret = "-the-string-you-copied-from-kmc-";

$userId = "john.doe";

$partnerId = 12345;


// generate the KS using all the above parameters

$ks = $client->generateSessionV2(

   $adminSecret,

   $userId,

   KalturaSessionType::USER,

   $partnerId,

   20,

   $privilegesStr

);


// build iFrame URL with KS

$iframeUrl = 'https://url.to.kaf.com/hosted/index/my-media/ks/' . $ks;


// render iFrame to page

echo '<iframe src="' . $iframeUrl . '"></iframe>';
Privileges for KAF components
Each KAF component may require specific privileges based on the functionality it provides. To view detailed information on required and optional privileges for each component, refer to the KAF Integration test page. You can select any KAF widget (endpoint) and simulate its behavior based on the privileges you set.
Roles and permissions for KS-based SSO
KAF uses two types of roles:
- Applicative Role: Determines what the user can do within KAF, such as uploading content.
- Contextual Role: Defines what a user can do in specific contexts, for example, managing a gallery.
When configuring a KS for KAF components, specify the user’s applicative role and, if needed, the contextual role.
In the example below:
- The applicative role of the user is adminRole. The adminRole user can upload and publish content in different contexts (galleries).
- The contextual role of the user is manager of that gallery, and is given some capabilities that are only allowed for this role.
Contextual role values are the available constants of KalturaCategoryUserPermissionLevel
$privileges= array();

$privileges[] = "actionslimit:-1";

$privileges[] = "firstName:John";

$privileges[] = "lastName:Doe";

$privileges[] = "role:adminRole";

$privileges[] = "userContextualRole:0";


...


// build iFrame URL with KS

$iframeUrl = 'https://url.to.kaf.com/hosted/index/course-gallery/ks/' . $ks;


...
