About
Use the edit webcasting event page to:
- update information about the event
- set calendar reminder
- select or upload a thumbnail for the event
- add presenter information
- fet the live stream details for your broadcast. (not applicable for Kaltura Self-serve Webcasting)
Some tabs may or may not be available depending on your account configuration.
Edit page tabs
Details
The Details tab is used for updating the information about the event you have created. If you haven't created an event yet, see our article Creating a Webcasting Event for instructions on how to create one.
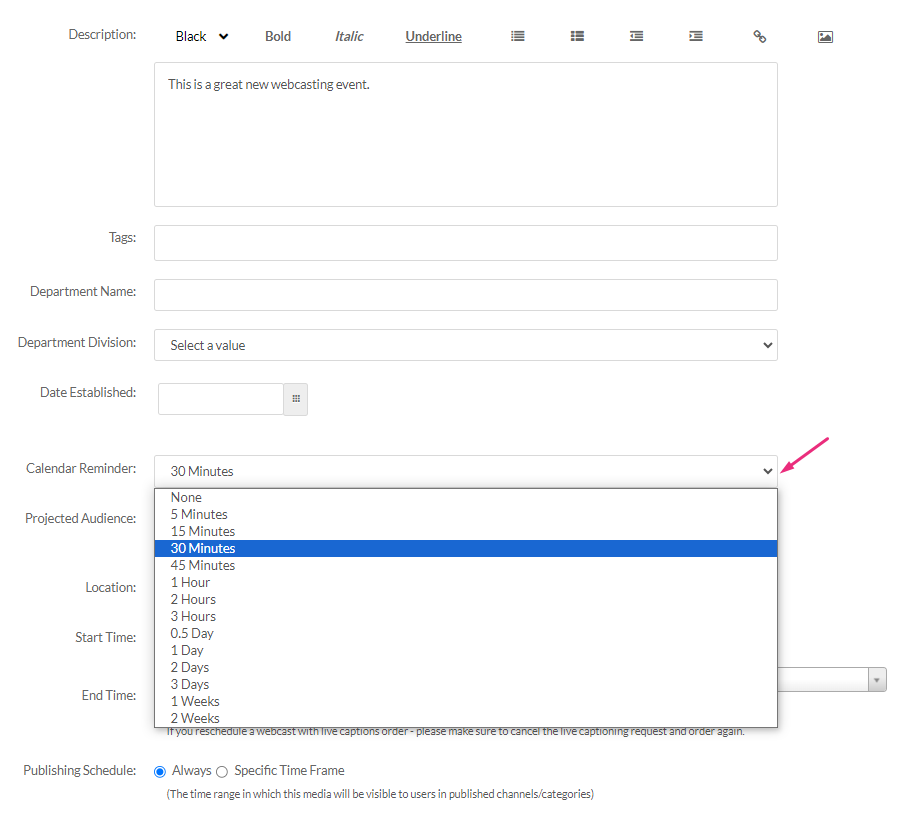
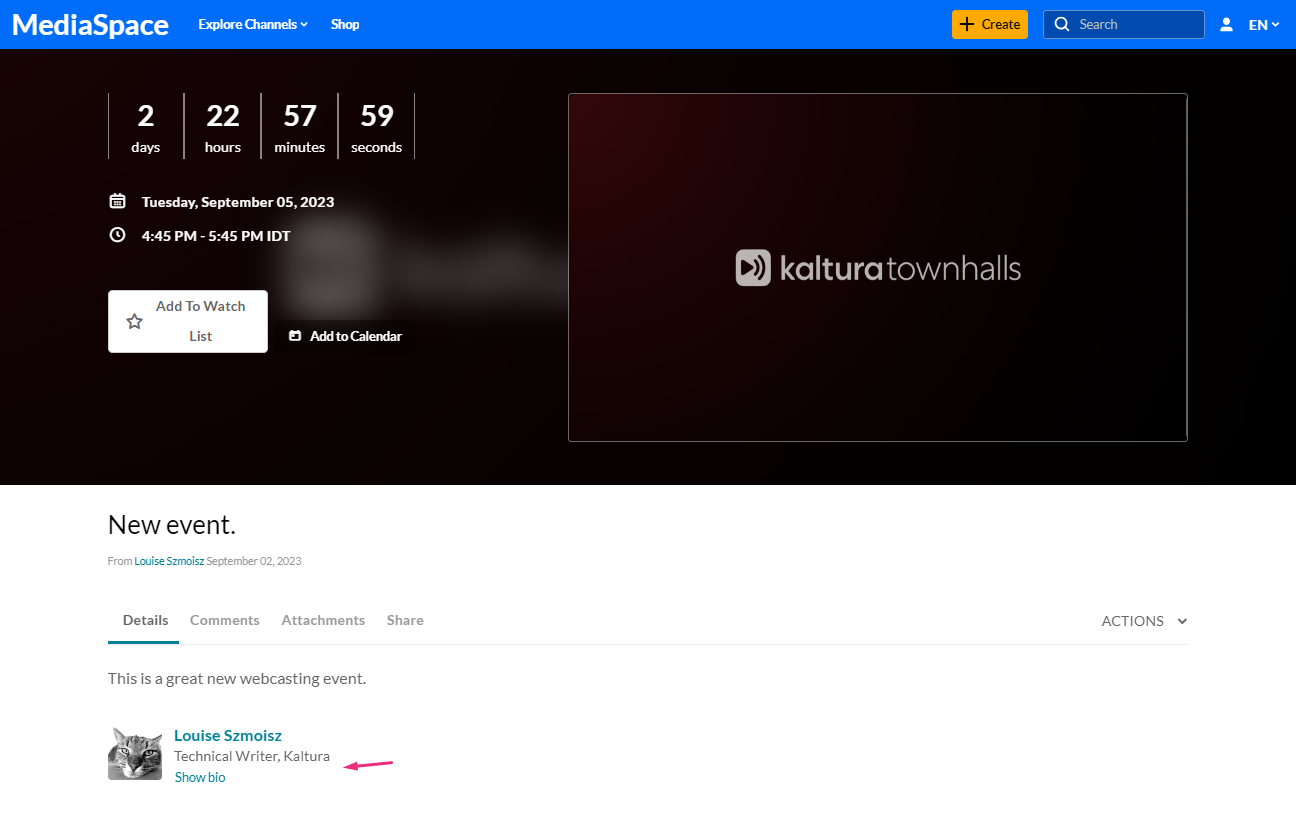
After setting up your event, you can use the Calendar Reminder option to choose when users will receive a pop-up or email notification from their Outlook or Google Calendars, X time before the event.
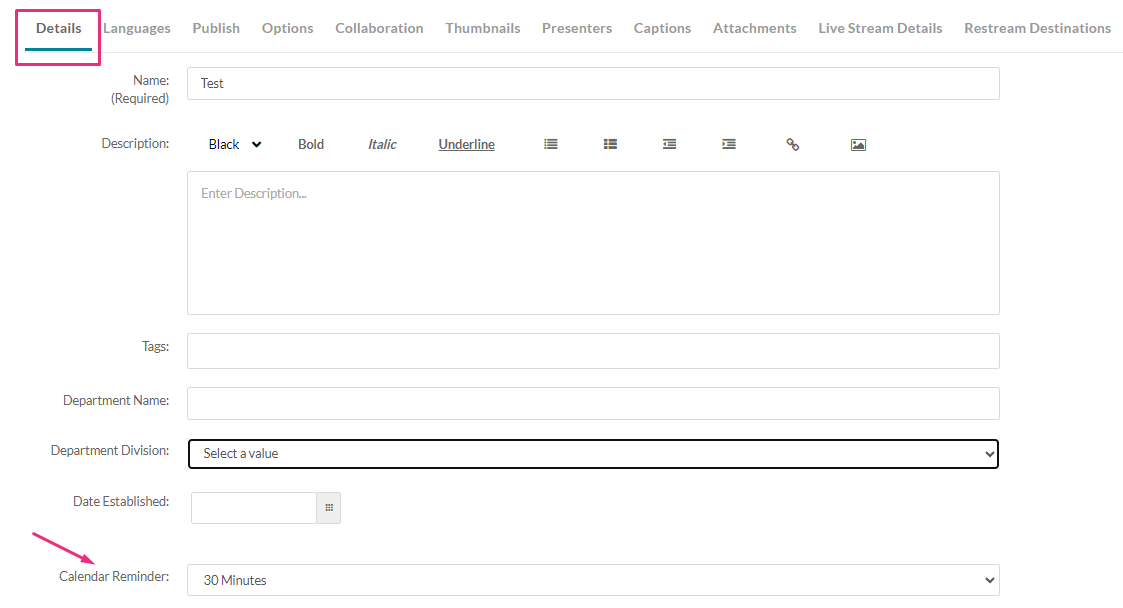
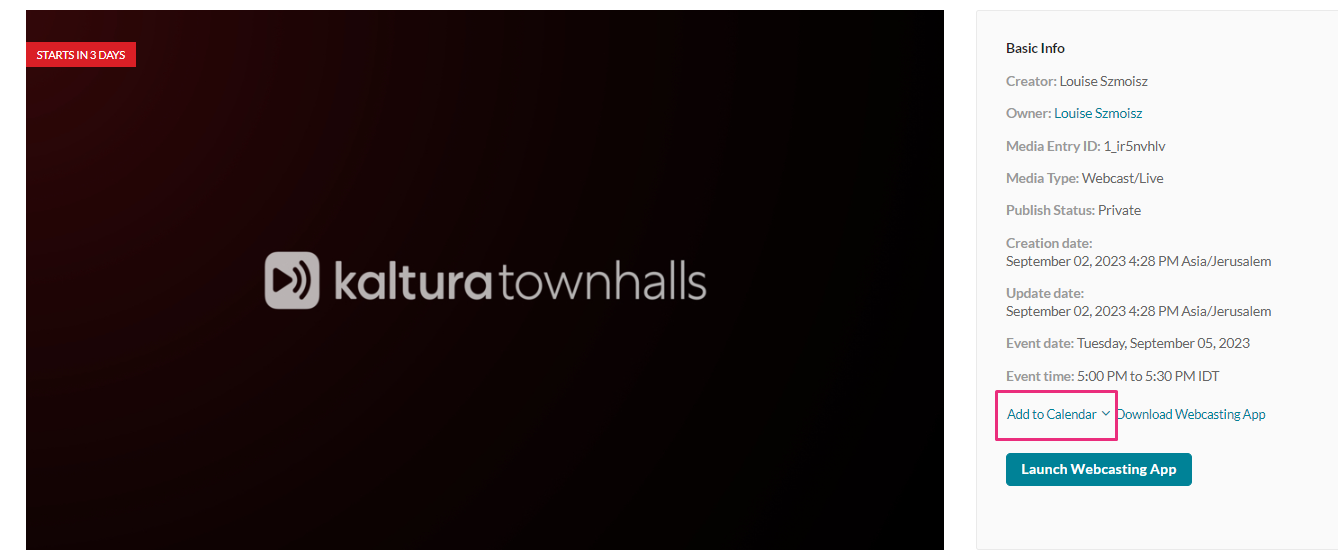
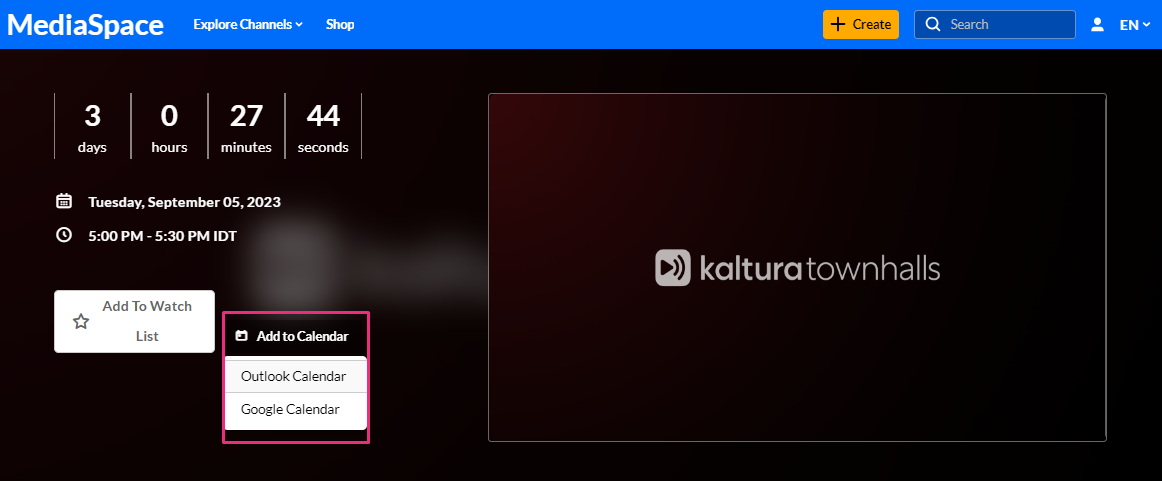
The Calendar Reminder option is for users who have added the event's ICS file to their Outlook or Google Calendar using the 'Add to Calendar' button on the Edit page or Media page, as shown in the images below:
 Edit page
 Media page
Choose a time from the drop-down menu.
After you have made all the necessary changes click Save.
Languages
The media details presented to the viewer will be according to their language preference, or the default language if they didn't choose one.
Publish
- Choose a Publishing Status.
- Private - Media page is visible to content owner only.
- Unlisted - Media page is visible to anyone with a link to the page.
- Published - The media page will be visible to individuals according to entitlements on published destinations; it will also appear in the Video Portal session page. Make your selections in the Publish in Category and Publish in Channel tabs.
- After you have made all the necessary selections, click Save.

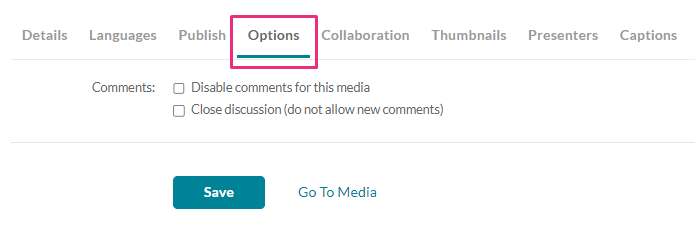
Options
Use the Options tab to select whether to enable or disable comments for the event. During the live event you would likely use the Webcasting Q&A module to engage with your audience and respond to questions. We recommend to disable comments on the event during the event itself and enable comments again once VOD is available.
To read more about disabling and enabling comments see Kaltura Webcasting - Optional – Set the Comments Configuration
Collaboration
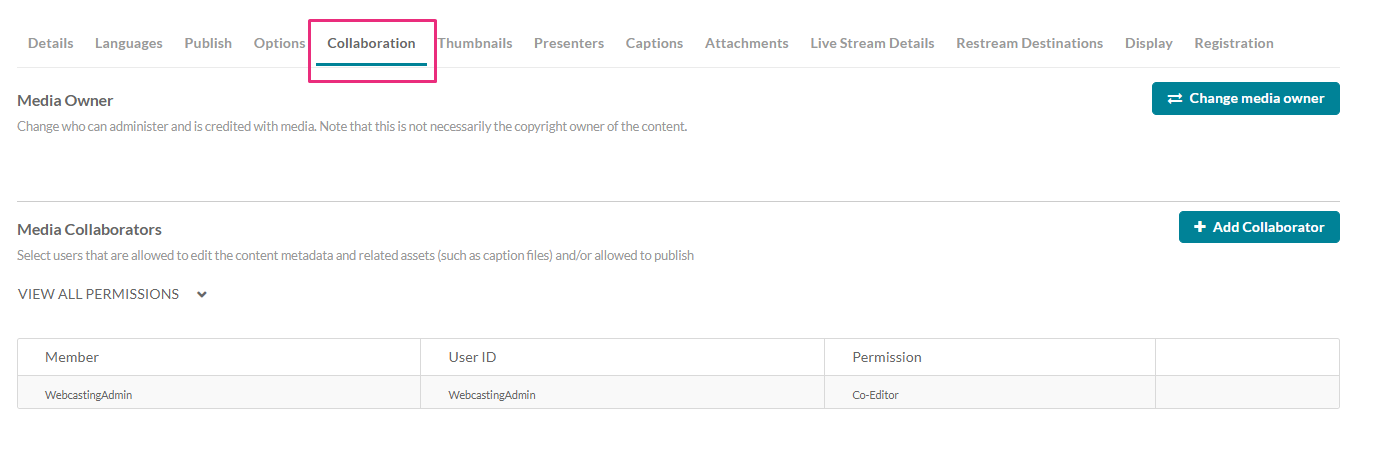
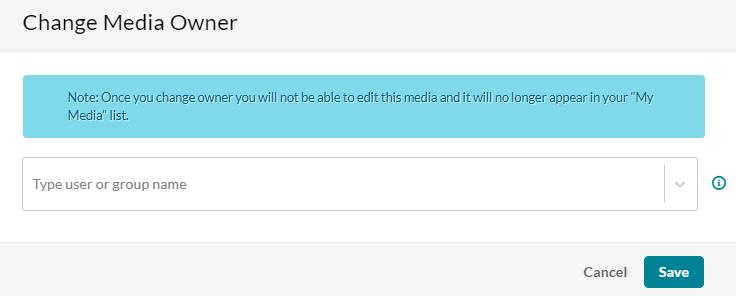
Use the Collaboration tab to change the media owner - the person who can administer and is credited with media. (Note that this is not necessarily the copyright owner of the content.)
- Click Change media owner.
- Begin typing a user or group name and choose from the auto-fill options.
- Click Save.
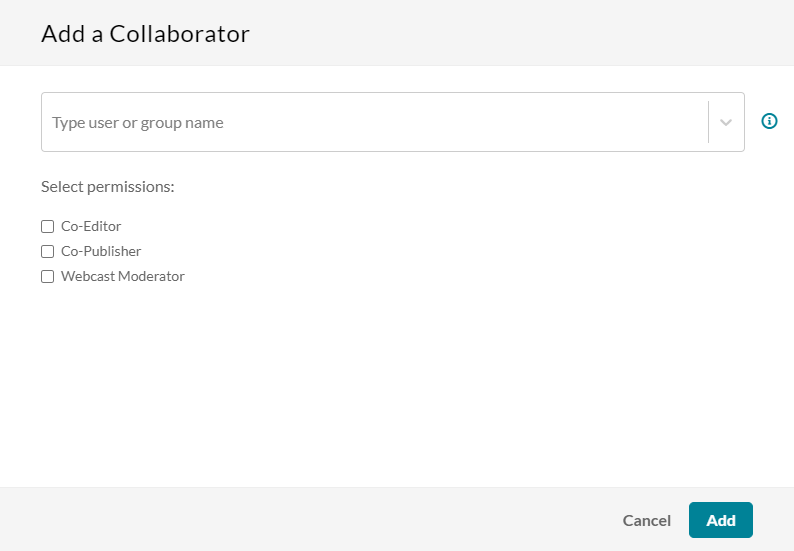
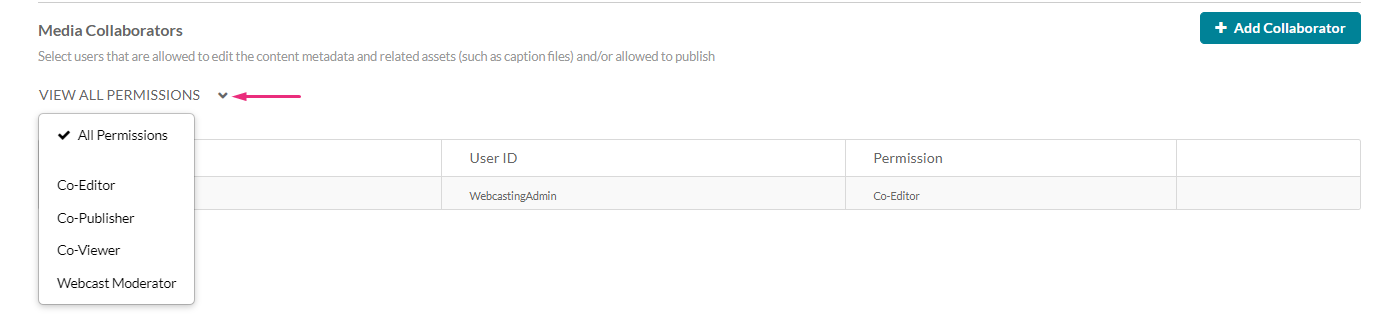
Use the Collaboration tab to add collaborators.
- Click Add collaborator.
- Begin typing a user or group name and choose from the auto-fill options.
- Select permissions.
- Click Add.
Assign webcast moderators
To assign users or group names as moderators, check the box next to Webcast Moderator. This will enable the moderator access to the Moderator View Application via the Webcasting Media Page. To learn more, See Launching the Moderator View Application.
You can use the View All Permissions drop-down menu to filter collaborators by permissions.
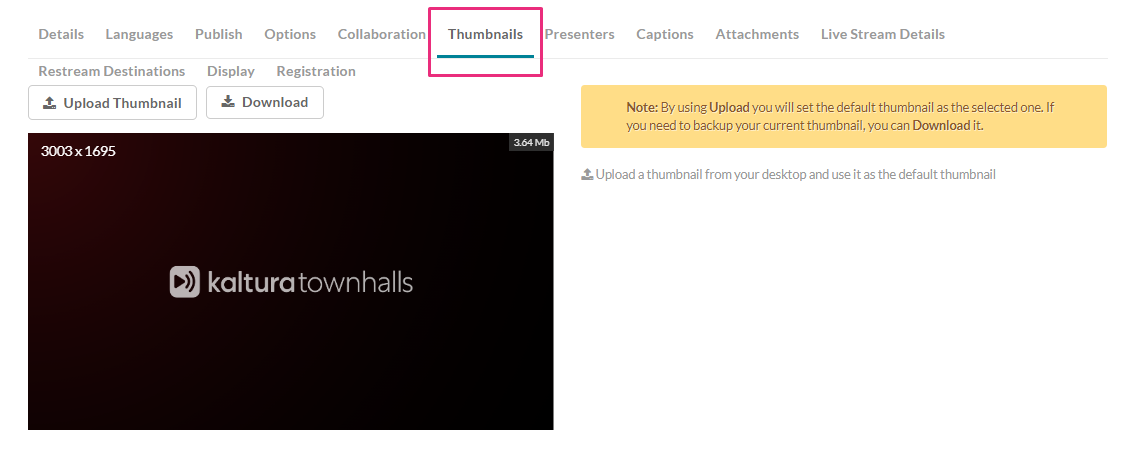
Thumbnails
Use the Thumbnail tab to determine the thumbnail in the webcast event page. The event page displays a thumbnail for the event. The first slide of the presentation you uploaded for the event is used as the default thumbnail. You can also upload a thumbnail from your computer.
To upload a thumbnail
- Click Upload Thumbnail. The supported file formats are image files such as JPG, GIF, TIFF, PNG etc.
- Upload a file from your desktop and click Open.
To download/save a thumbnail
- Click Download.
- Save your image.
Presenters
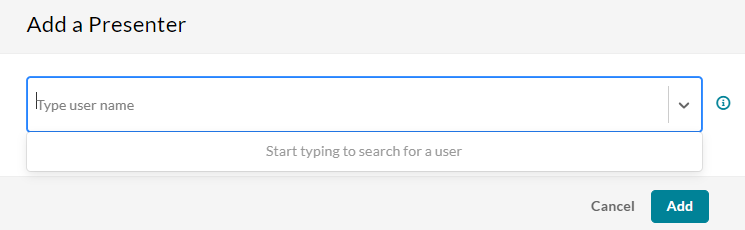
You can add a Presenter who will appear on the Webcast Event page. Presenter information is taken from the user's profile. To add a presenter, click Add a Presenter.

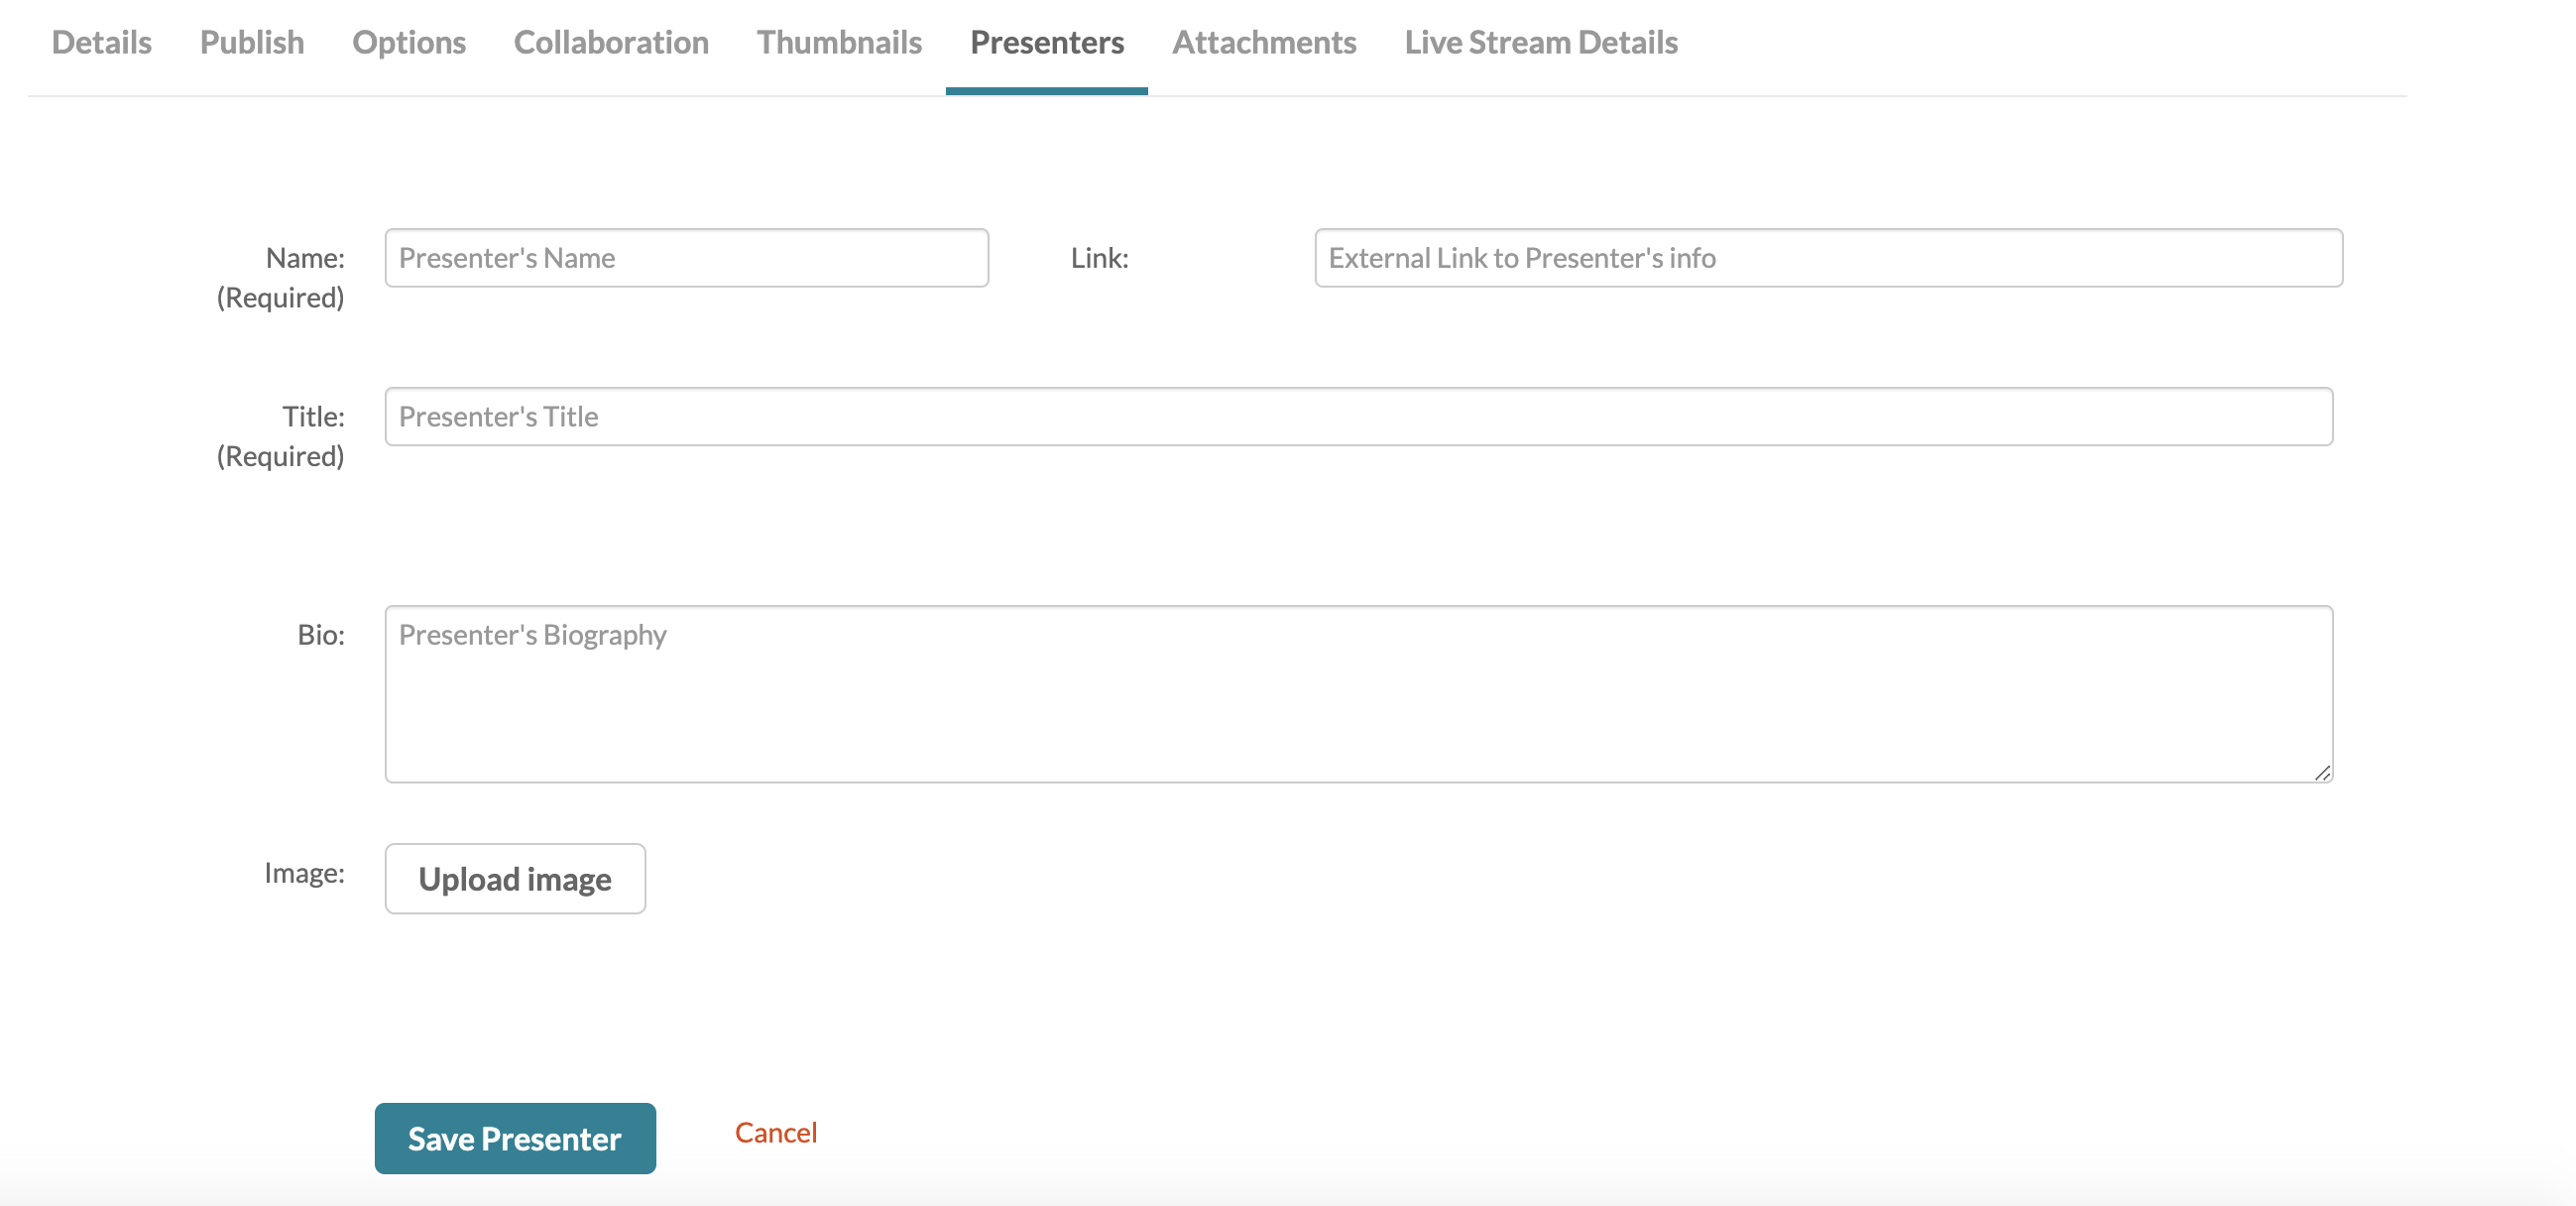
Start typing a name and auto-complete will be presented. Click Add.
The presenter is added.

Viewers joining the event will be able to read information about the presenter(s).
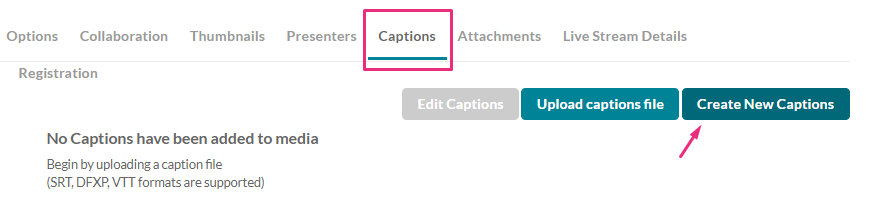
Captions
Any webcasting event will allow ordering live captions. This service is currently available only in the English language, additional languages will be added later.
In case the Live Captions option is not available for you, please contact your Kaltura representative to have it enabled on your account.
- Click Create New Captions.
The New Captions window displays.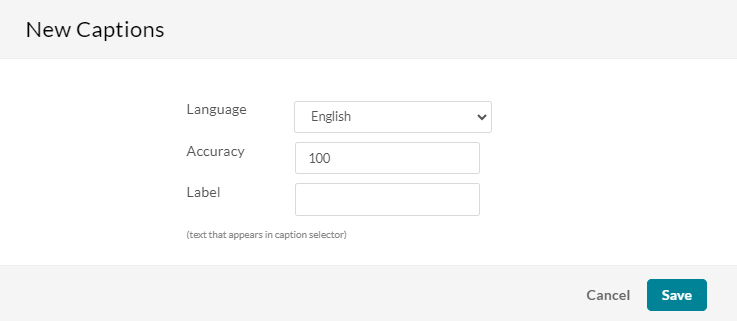
- Language - Select English.
Accuracy - The default accuracy for a captions is 100%. - Label - Type a label to display in the caption selector, for example, 'English'.
- Click Save.


TIPS FOR LIVE CAPTIONING
- Make sure to start streaming your content a couple of minutes before the event is scheduled to be published to your audience to make sure captions are covering the session from its very beginning.
- The duration limit of a live caption session is 8 hours.
- You should issue the order for live captions at least 15 minutes before the session is scheduled to start.
- Canceling a job must be done long enough before the event starts time.
- If you wish to reschedule your event after ordering the live captions job you will have to cancel the live captions job first and then set a new one once the event has been rescheduled.
- In case the user ordered VOD captioning for a recording of a live event with live captions, the new VOD captions will override the ones recorded during the live session.
Attachments
Use the Attachments tab to upload files as attachments to the webcast.
- Click Upload File

- The Upload Attachment window displays.
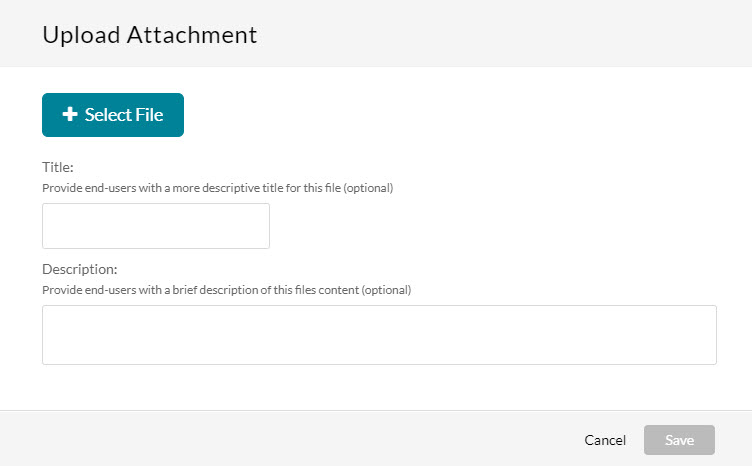
- Click Select File
- Select the desired file, give it a title and description.
- Click Save.


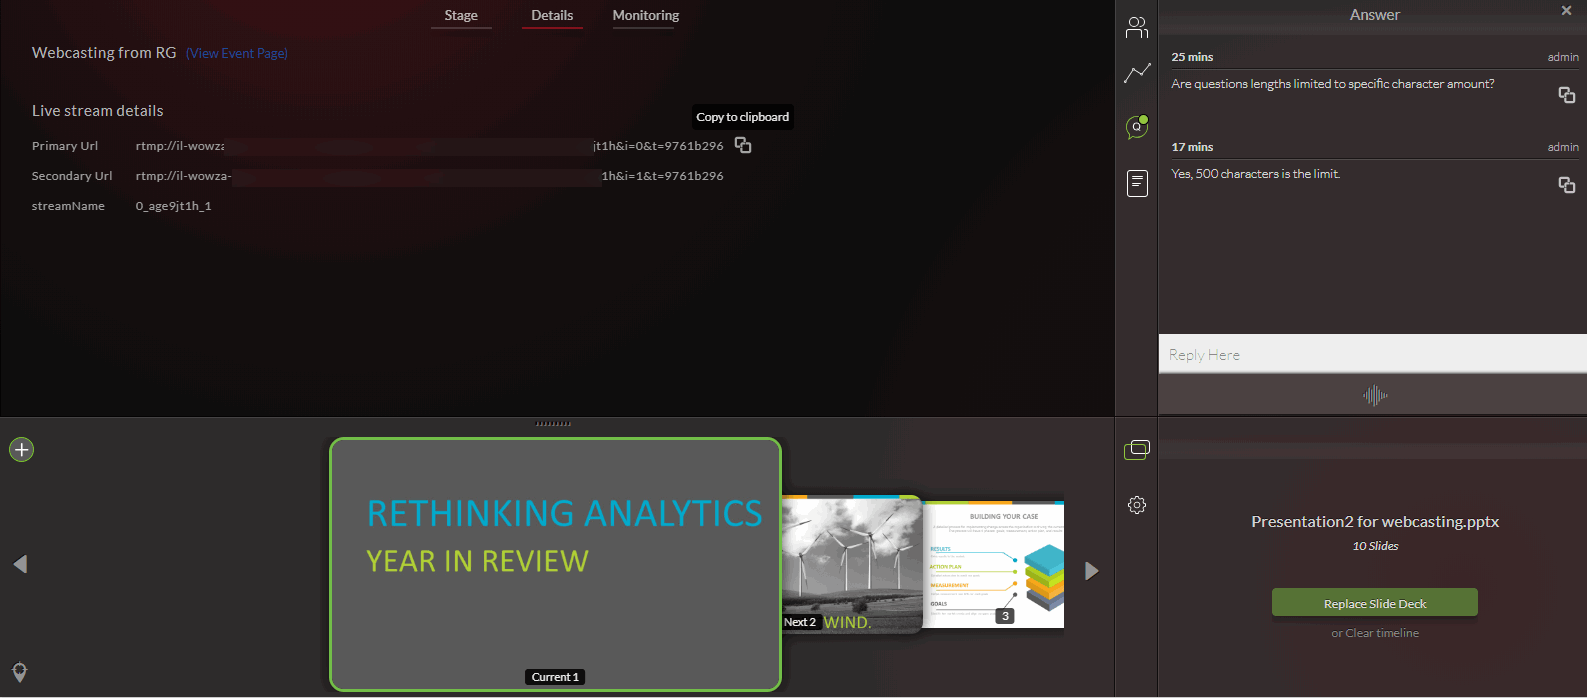
Live Stream Details
Not applicable for Kaltura Self-serve Webcasting.
Use the Live Stream Details tab to view the live stream information. In order to initiate a webcast, please refer to the Webcasting Producer Guide.

In the encoder output settings, configure the following information:
RTMP Primary URL (mandatory) - This is the primary stream target URL for a webcast that uses an encoder.
RTMP Secondary URL (optional) - This is the backup stream target URL. If it exists, your encoder will broadcast to both primary and backup endpoints for cases when redundancy is required.
RTMPS Primary URL - (RTMP over SSL) is the encrypted version of the RTMP protocol. This means you can send live content in an encrypted, secured and reliable way from your encoder to the Kaltura cloud.
RTMPS Secondary URL - (RTMP over SSL) is the encrypted backup endpoint. If it exists, your encoder will broadcast to both primary and backup endpoints for cases when redundancy is required.
Stream Name - This is the unique stream name that is used to identify your stream. Note that if you are broadcasting multiple bit-rate from your encoder, you will need to define several stream names with different suffixes (for example, myStream_1, myStream_2, etc.)
SIP User - This option is no longer in use. Use RTMP live streaming to broadcast with Kaltura Live from your video conferencing tool of choise. Check the following guidelines for Zoom and WebEx.
XML for FMLE - Download a configuration file for FMLE software.
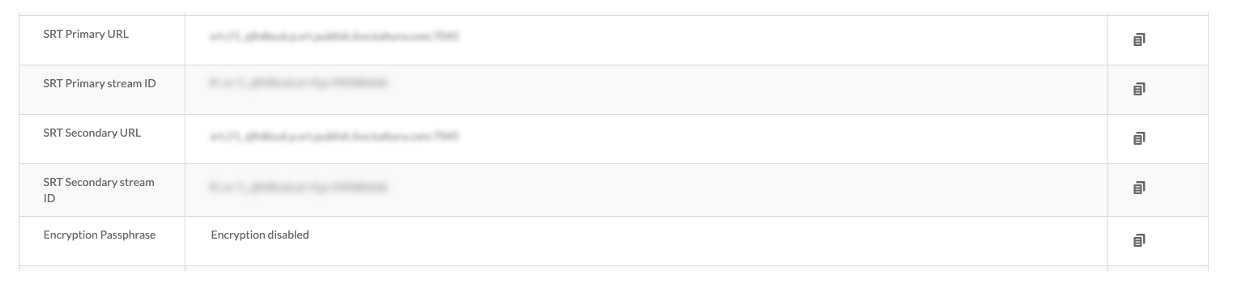
SRT Ingestion
We also support Secure Reliable Transport (SRT) to ingest video stream for a live broadcast. This is an open source transport technology that optimizes streaming performance across unpredictable networks, such as the Internet. The SRT protocol brings several benefits in areas such as video quality, low latency, and end-to-end security. Use KMC or liveStream.get API call to get endpoints URLs and stream IDs for the primary and the backup SRT streams. To enable end to end AES-128 encryption for the stream, set the passphrase found in the liveStream object using the API.
Stream Configuration
- DVR On/Off (not configurable)
- Recording On/Off (not configurable)
- Transcoding Profile (not configurable)
- Preview Enable/Disable
- If checked (enabled), the user must click on the Go Live button from either the Producer Application or from the KMC Real-Time Dashboard.
- The default value is checked.
- If the entry is live, this feature is disabled.
Low Latency
Historically, HLS has favored stream reliability over latency. Low-Latency HLS extends the protocol to enable low-latency video streaming while maintaining scalability. The new low-latency mode lowers video latencies over public networks into the range of standard television broadcasts.
To enable Low-Latency streaming check the Low Latency checkbox under the stream configuration section. Alternatively you can enable Low Latency from KMC or add the "lowlatency" admin tag to your live entry using the developer API.
You can find more in our article Low latency streaming guidelines.
Copy to Clipboard
The Primary and Backup details may be copied to clipboard. Click the copy icon next to the info you want to copy.
For an example on how to set up OBS Studio for broadcast, see Setting Up OBS Studio and Kaltura Live Streaming.
After you have made all the necessary changes click Save.
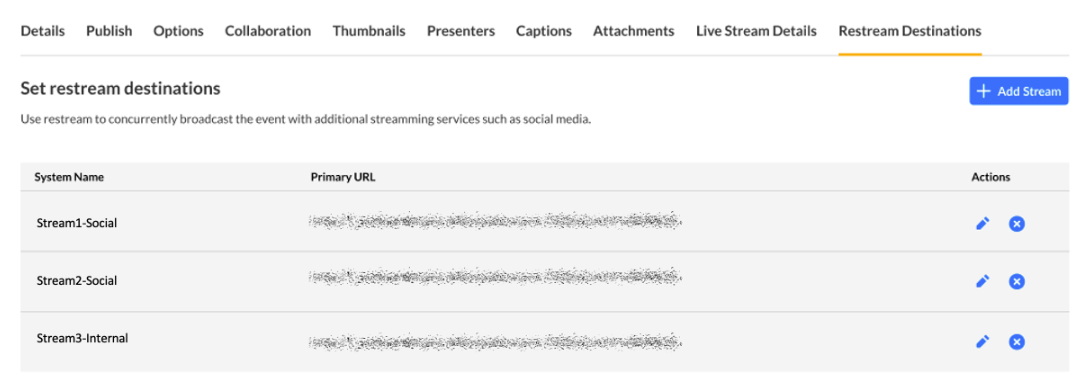
Restream Destination
- Click the 'Add Stream' button to add a new stream destination.

The Add Stream window displays.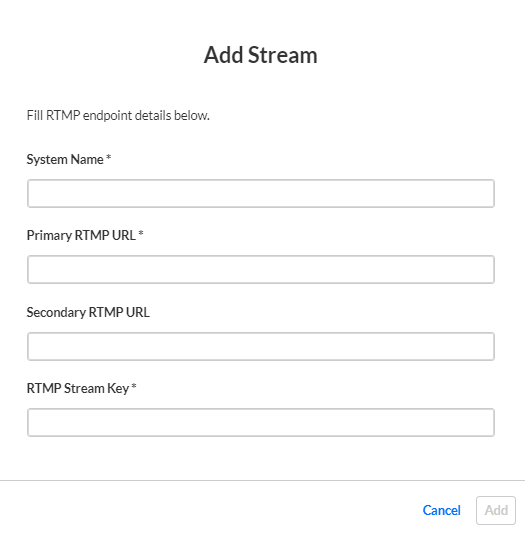
- Complete the stream details:
System Name - The stream name which should be unique among Restream stream names for the the specific Live event.
Primary RTMP URL - This field is mandatory and should be filled with a valid RTMP or RTMPS endpoint URL as provided by the Live broadcasting service.
Secondary RTMP URL - Optional secondary RTMP/RTMPS endpoint URL.
RTMP Stream Key - Mandatory RTMP stream key tas provided by the Live broadcasting service. - Click Add.


To edit or delete restream destinations, find the relevant restream destination, and click the pencil icon to edit restream details or the 'x' icon to delete it.
Display
Use the Display tab to change or modify an entry's display.
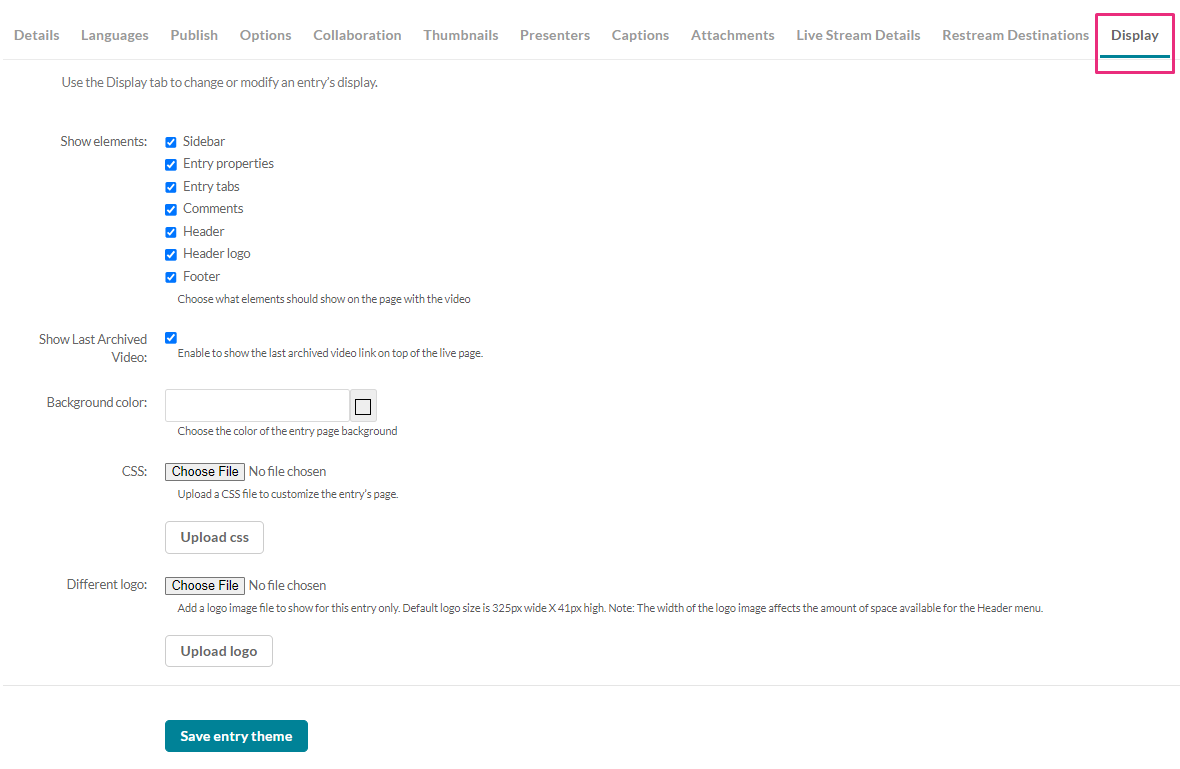
Choose from the following options to customize the design of the entry page. Some options may or may not appear according to how your administrator has configured the page.
Uncheck the UI elements that you want to hide on the entry page.
Sidebar – The sidebar refers to the bar to the right of the player.
Entry properties – The properties are right below the player, containing the entry’s name, owner, and 3 counter icons for views, comments and likes.
Entry tabs – Below the properties tab, the entry tab includes the Details, Share, Attachments and the Actions drop down menu.
Comments – The comment section, if enabled in your KMS/KAF.
Header – The Header includes the entire bar on the top of the KMS/KAF screen. If a you decide to remove it, it will also remove the logo, and all other links.
Header logo – The KMS/KAF main logo on the top left of KMS/KAF screen.
Footer – The KMS/KAF footer.
Show last archived video - Enable to show the last archived video link on top of the live page.
Background color - Choose a background color for the entry page.
CSS - Choose a CSS file to alter only this single page. Click on the "Upload CSS" button to apply the change. Note that clicking on this button without uploading a file first will have no effect.
Different logo - Choose a new logo that will replace the existing one when viewing this page. Click on the "Upload Logo" button to apply the change. Note that clicking on this button without uploading a file first will have no effect.
After you have made all the necessary changes click Save entry theme.

